
There are a lot of great tools available for editing, and my favorite techniques tend to have large impacts for little effort. Lightroom's masking tool does this better than anything else I've ever used. This guide will teach you everything you could possibly want to know about Lightroom masking regardless of your skill level.
While this guide will introduce Lightroom masking as if you've never used it before, making it perfect for beginners, it will also touch on quite a few advanced techniques and use cases. If you'd like to follow along with the video above, it will parallel well if you are more of a visual learner. As the title suggests, the guide will be broken into multiple parts. This part will cover why we use masks, mask panel settings, linear gradients, radial gradients, and the brush tool. The second part will cover color and luminance range masks, plus adding, subtracting, and intersecting masks, which are incredibly powerful ways to use masks in conjunction with each other. The final part will cover all AI-based masks and ways to intuitively use them within your own work.
Masks and Settings
If you've never used a mask before, you might be curious about what they are. Typically in editing, when you are adjusting things like exposure, saturation, or color temperature, you are making what's known as a "global adjustment." However, many times in editing, you want more control, and a way to do this is by making "local adjustments." As you can probably guess, these are adjustments made to a specific part of an image. Masking, or masks, are the tools used to tell your editing software where you want to make those local adjustments. It's as simple as that!

Before we start with our first linear gradient mask, there might be a few settings you want to change. Above is the masking layers panel (shortcut "shift+w") that appears once you add your first mask. Something to note is that each mask can have multiple masks within it, and those masks will combine into a single resulting mask. This will be covered in the next article when dealing with added, subtracted, and intersecting masks.
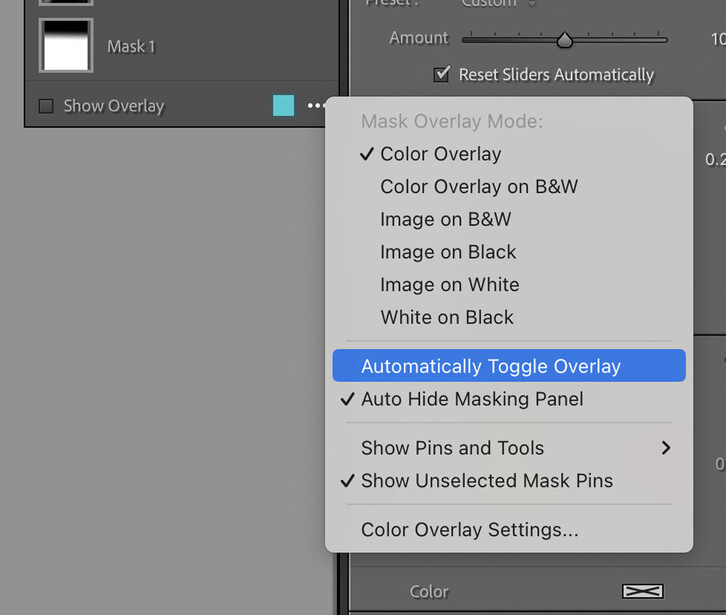
The first setting you might want to change for your preference is how the masks represent themselves in Lightroom. Personally, I use a color overlay that you can change the color of, but your preference might be different, and I recommend trying a few out by selecting the "..." ellipses icon you can see in the above photo. The second setting I personally recommend changing is turning off "Automatically Toggle Overlay." When this setting is enabled, it means that if you make an adjustment and reset it, the mask will automatically enable. This doesn't work for my style of editing, and I tend to not need to see the mask overlay after I've started applying the adjustment. At any time, if you want to show or hide the overlay, you can select the show overlay setting (shortcut "O").
Lastly, you can move this window around anywhere on the screen, and you can even dock it to the main editing section under the histogram in Lightroom by dragging the top bar of the panel wherever you'd like it.
Linear Gradients

One of the earliest tools in Lightroom was the Graduated Neutral Density (GND) mask, which has now become the linear gradient. This tool was created to replicate what a GND filter does in real life, just within software. This has obviously evolved and become far more useful in editing today. Let's create our first one!
Start by creating a new linear gradient (shortcut "M"). Once you've selected a linear gradient, you'll need to draw your mask into the photo. You'll want to click and drag your mouse in a direction to show you the mask you're creating. The spot you start your mask will have a 100% effect on your image, and once you let go, will be where your mask ends with 0% effect. The area in between is the gradient or feather of the effect. Thus, if you draw a very small mask with little distance between when you clicked and let go, you will have a very hard edge with little feathering. If you create a lot of distance, you will have a large feathered edge. In the above example, this is a medium feathered edge. You can always adjust these parameters even after you've created your mask by clicking on either end of the mask or the center to move it around. Tip: when you're creating the mask, you can hold shift for perfectly horizontal or vertical masks.

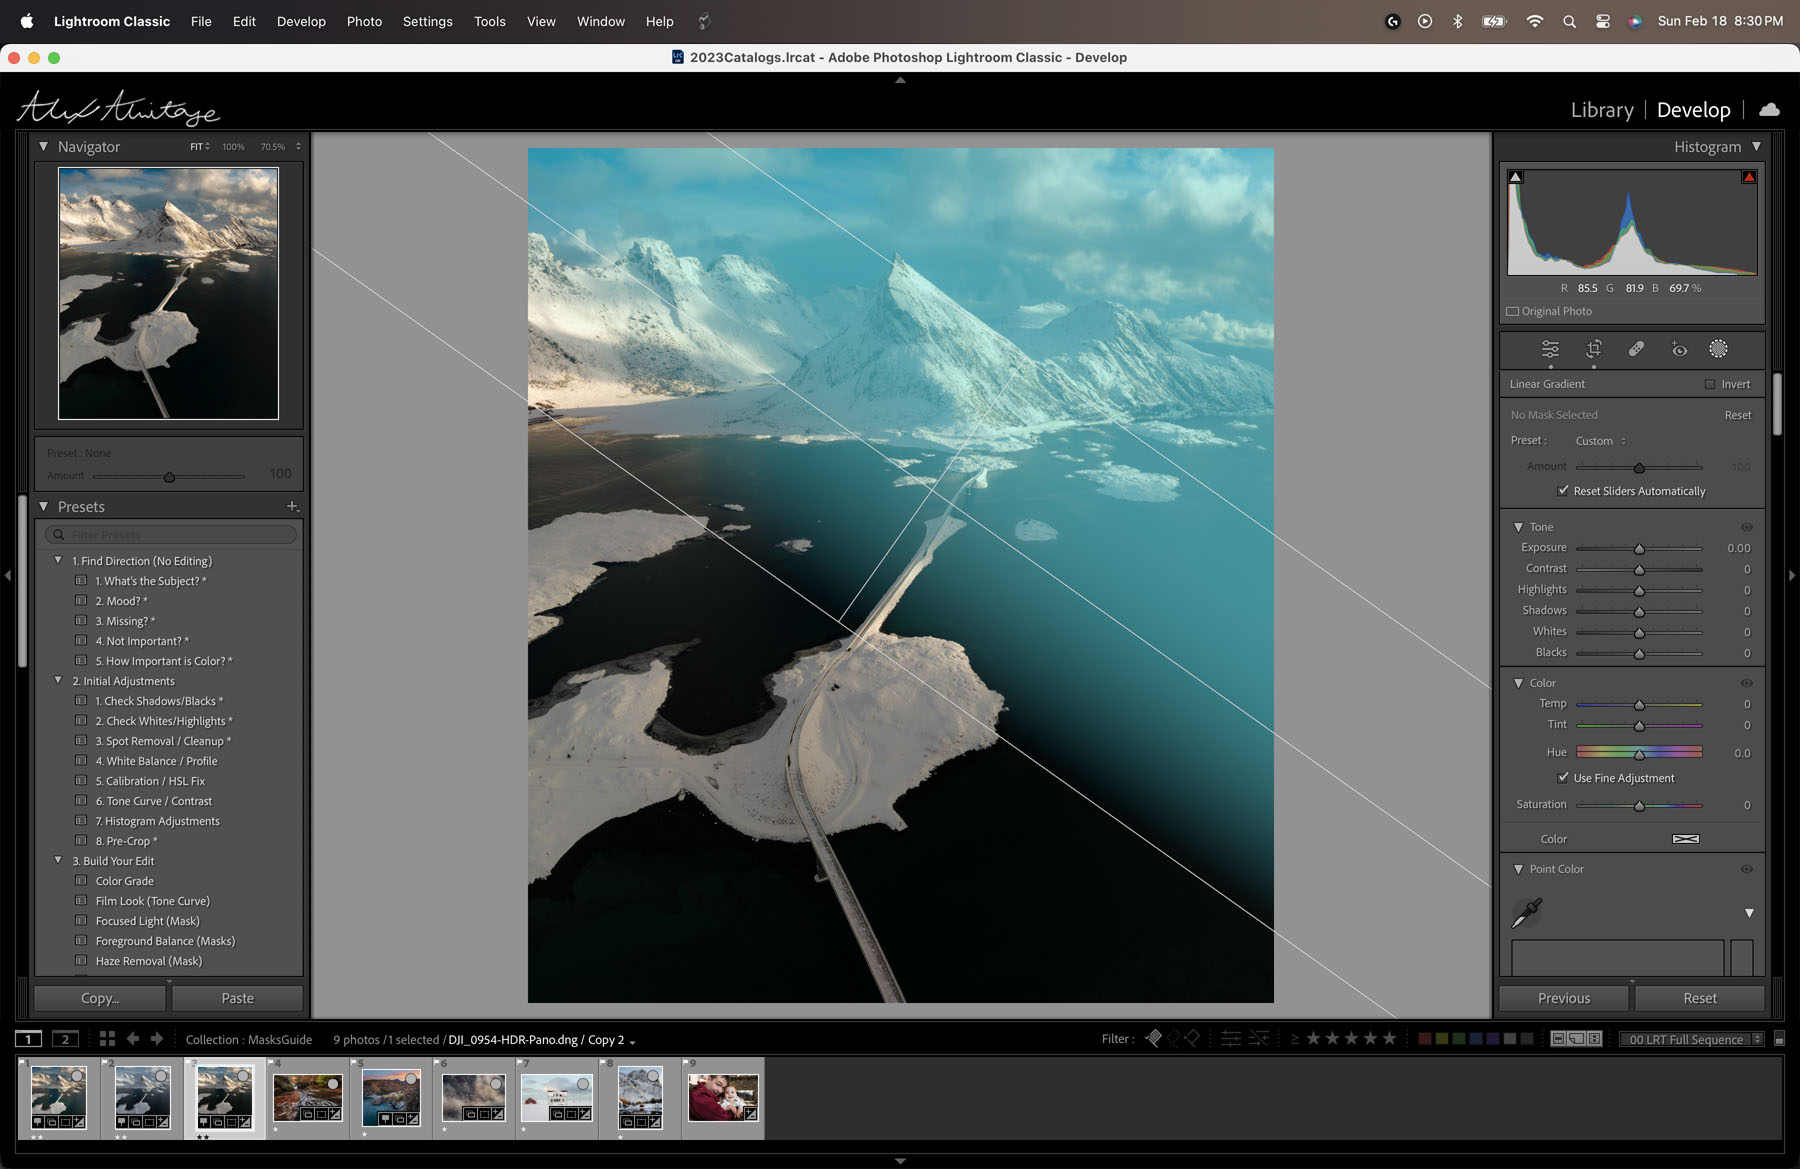
To keep things simple this time, one of the frequent use cases for linear gradients in landscape photography is to decrease the exposure of the sky, but in my image, I want to use it in the inverse and increase the exposure of my foreground. Thus, I'm going to start by creating a linear gradient ("M") and clicking at the bottom half of my image, where the effect will be 100%, and ending the mask by letting go at the top of my image. I've chosen a mask this size so that the transition is very gradual, which helps appear more natural in my edit.
Now the next step is to actually apply an edit to the image, and in my case, all I need to do is bring up the exposure. This will now brighten the bottom part of my image without impacting the sky area in a natural way because of the mask. Many times my masks aren't too complicated, just simple and light adjustments slowly built on top of each other for nice results.
Also, as you're adjusting your first mask, make sure you take note of all the settings you recognize that can be controlled with a mask, such as dehaze, tone curve, and white balance. These attributes are the same for every mask tool in Lightroom. This particular example is very simple, but you'll see adjustments to multiple parameters in a single mask depending on the goal of the image.
Radial Gradients
Once you understand your first mask, the rest will come much easier as you're essentially doing the same thing with a different shape or parameter. Radial gradients are the masks I personally use the most often. To create one, just create a new mask and select radial gradient (shortcut "shift+M").
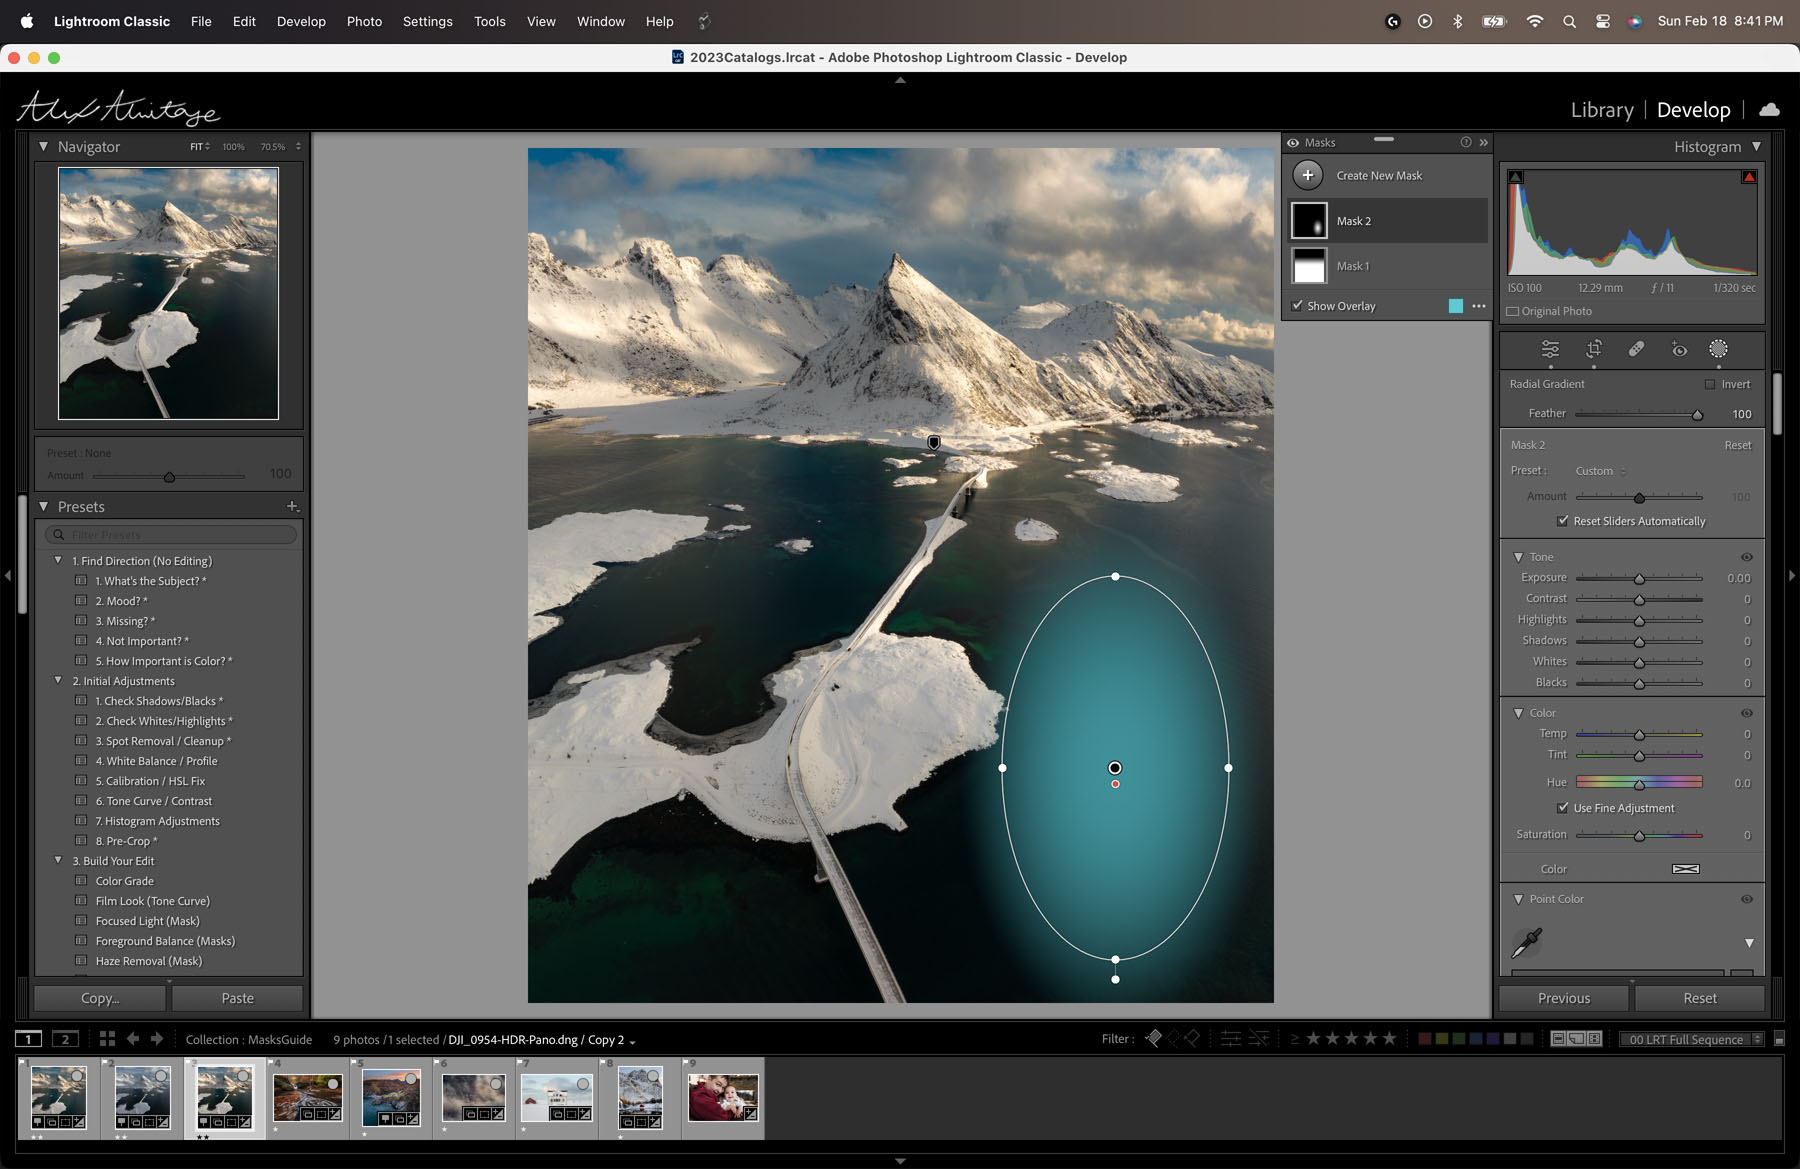
When creating a radial gradient, the first click will be the center of the mask, where the effect will be 100%, and as you drag your mouse away from the center, you'll see the shape you are creating. Just like the linear gradient, you can hold shift for perfect circles, but I don't think I've ever used a circle for editing personally. Once you let go of your mouse button, you'll have created your radial mask. Remember, you can adjust the size, shape, and location even after you've created it, so don't worry if you don't get it perfect.
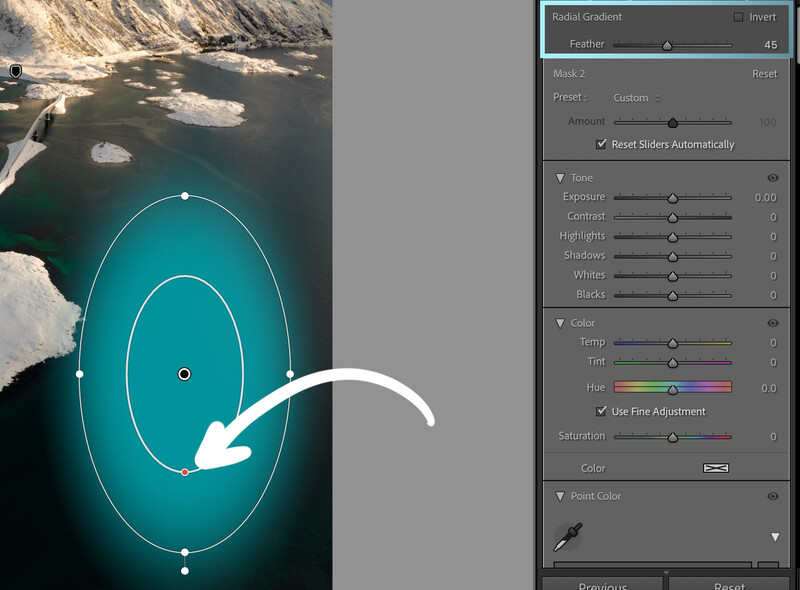
Unlike the linear gradient, where the feather is built into the size of the mask, the radial gradient has a setting for feathering you can find above your adjustments. You can also adjust the feather with the red dot icon within the mask you created on your image by clicking and dragging it.
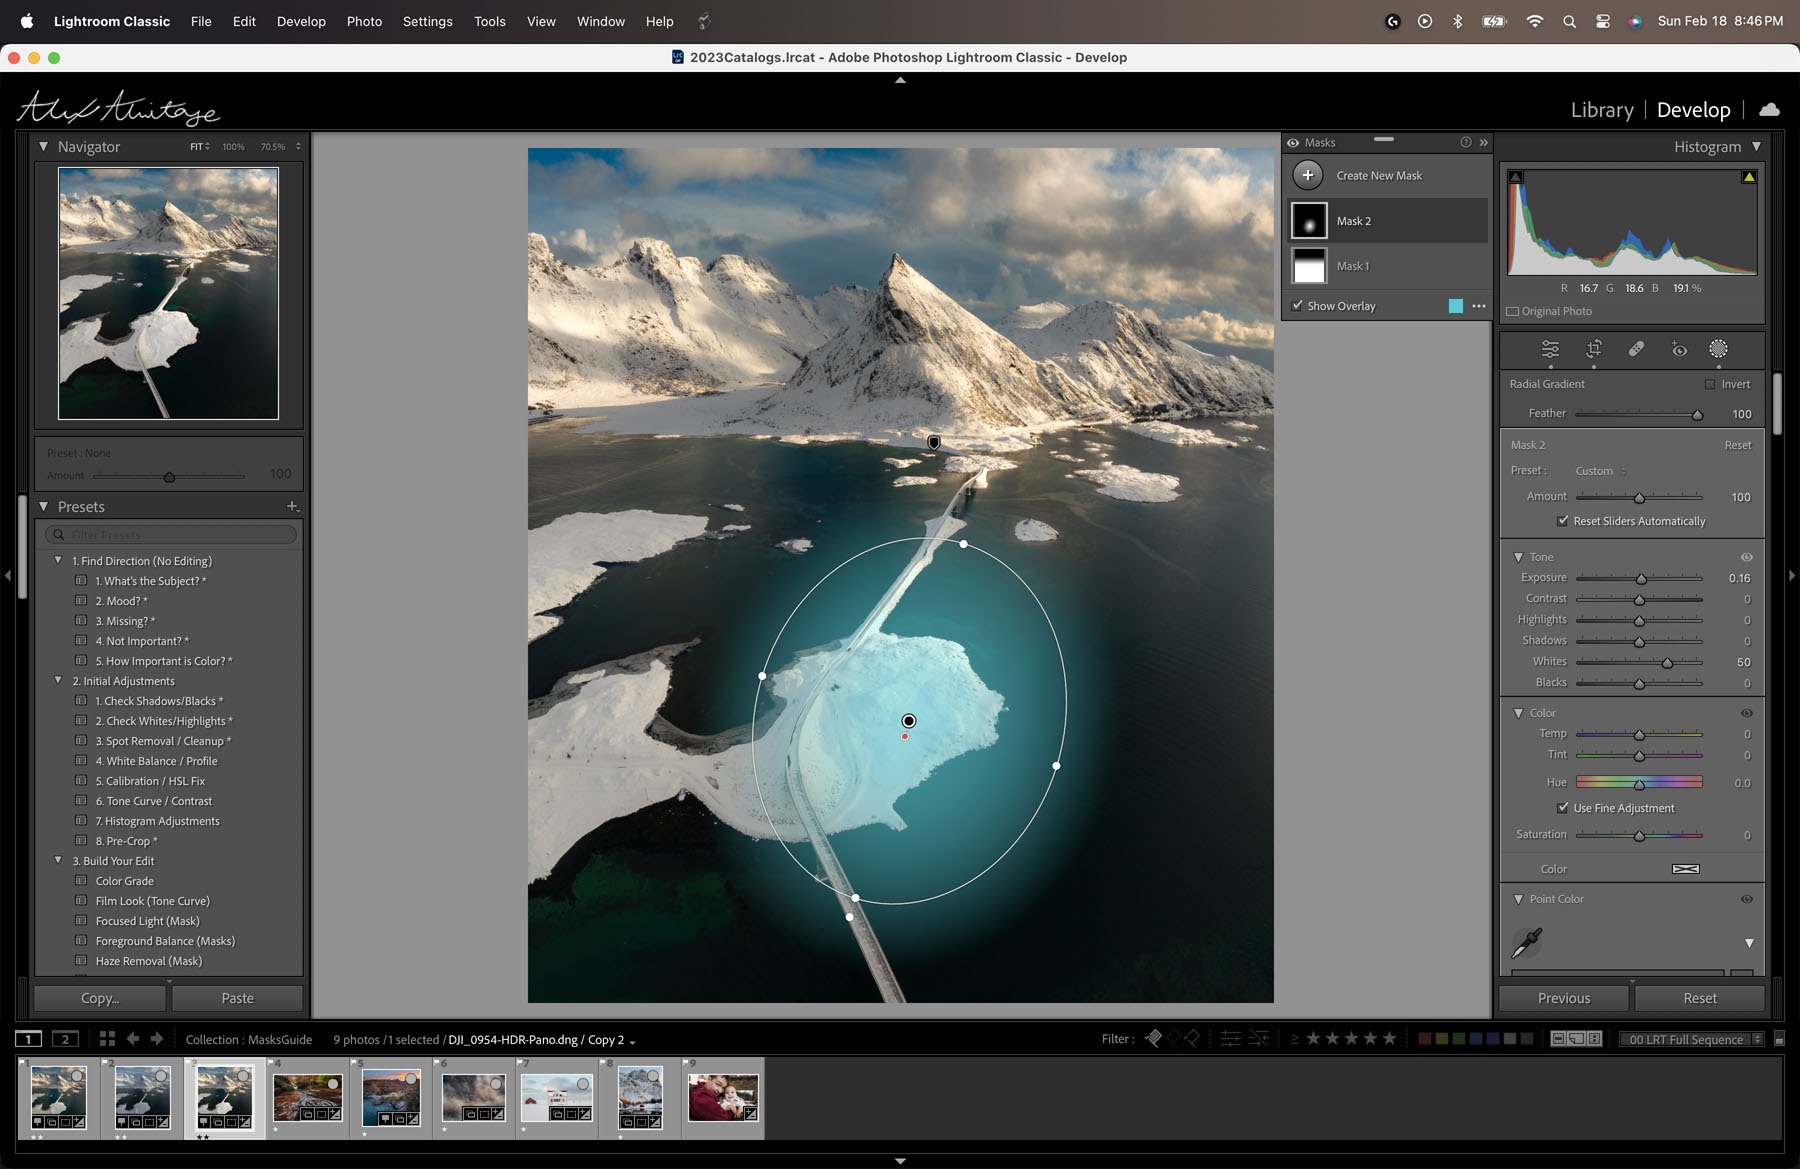
Let's apply one to our image. I'm going to create a radial gradient to increase the exposure of the island in the foreground of my image. To keep it simple, all I'm going to do is bring up the exposure and whites to make it stand out a bit more. I don't want to push it too far, though, because it'll become very obvious quite quickly if I increase the exposure by too much. Typically, I leave my feathering at 100 for most radial gradients as well to help these adjustments appear more natural. I also specifically raised the whites here more than exposure because I don't want to brighten the part of the water in the selection, as it would become very obvious in my edit if I did.
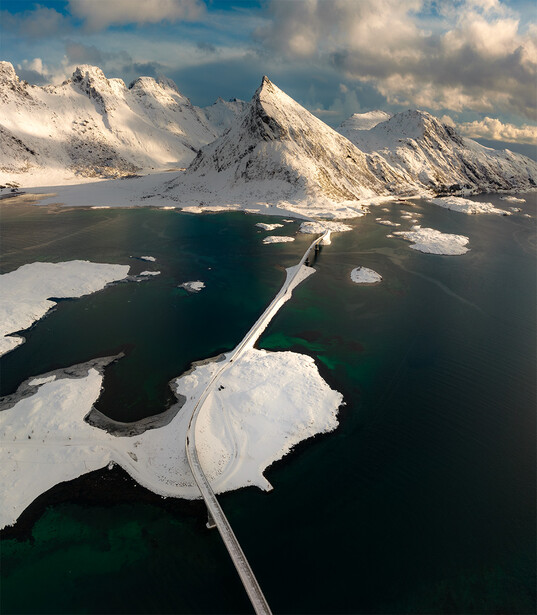
While this seems quite simple, they can be very powerful in practice and thinking outside the box. Within just a few minutes you can transform an image using radial gradients.
Brush Masks
Brush masks are the most precise masks you can use in Lightroom but come at the cost of taking the most time to use. The beauty of the other masks is how powerful they can be for how little time they take. Many times I use brush masks to edit my other masks with intersections and subtractions, something we'll get to in the next part of this series. This time around, though, let's cover how they work and an example of their function.
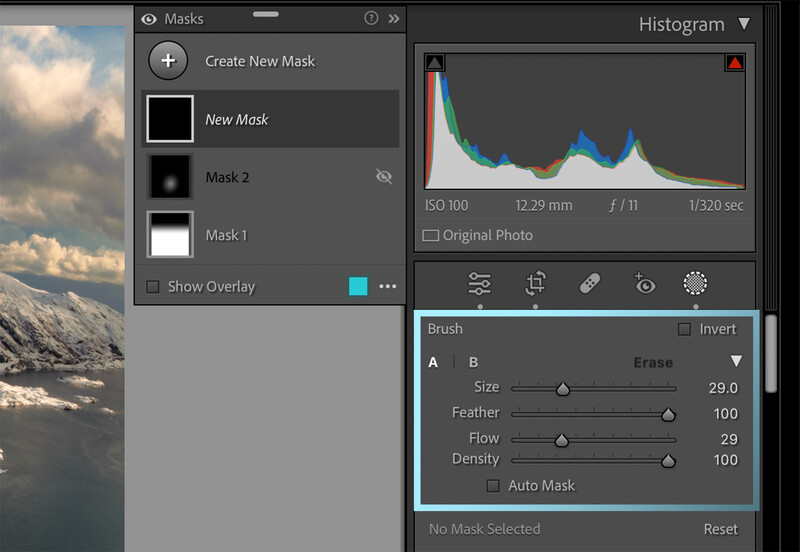
When you create a Brush mask (shortcut "K"), you'll notice a few more settings. Size changes the size of the brush (shortcut "[" or "]"). Feather is like the feather of the other masks, adjusting how hard of an edge you want your brush to have. Flow and Density work cohesively, but in practice, I typically only adjust flow. Flow is how much each click or brush stroke will affect your image, meaning if you set it to "20", each stroke will have a 20% applied and it is additive, so you can build different levels of effect. Density is the maximum amount your Brush can affect the image. Meaning if you set it to "50", no matter how many strokes you make with that brush, it'll never be more than 50% effect. You'll also notice an erase tab in the settings panel which is used to remove brush strokes rather than add them.

A simple example would be to try and replicate the same effect our radial gradient had above. To do so, I'm going to hide the radial gradient, create a new brush mask ("K"), set my flow to 20, feather to 100, and paint in a few strokes on the island, making sure to paint more strokes in the areas I want more effect, in this case, brightness. Something to note here is that you can adjust your settings such as exposure before making the first brush stroke and re-adjust them after you've created the mask. I do this specifically with brushes often so I can see what I'm actually doing to the image. The results are similar to the radial gradient but more time-consuming.
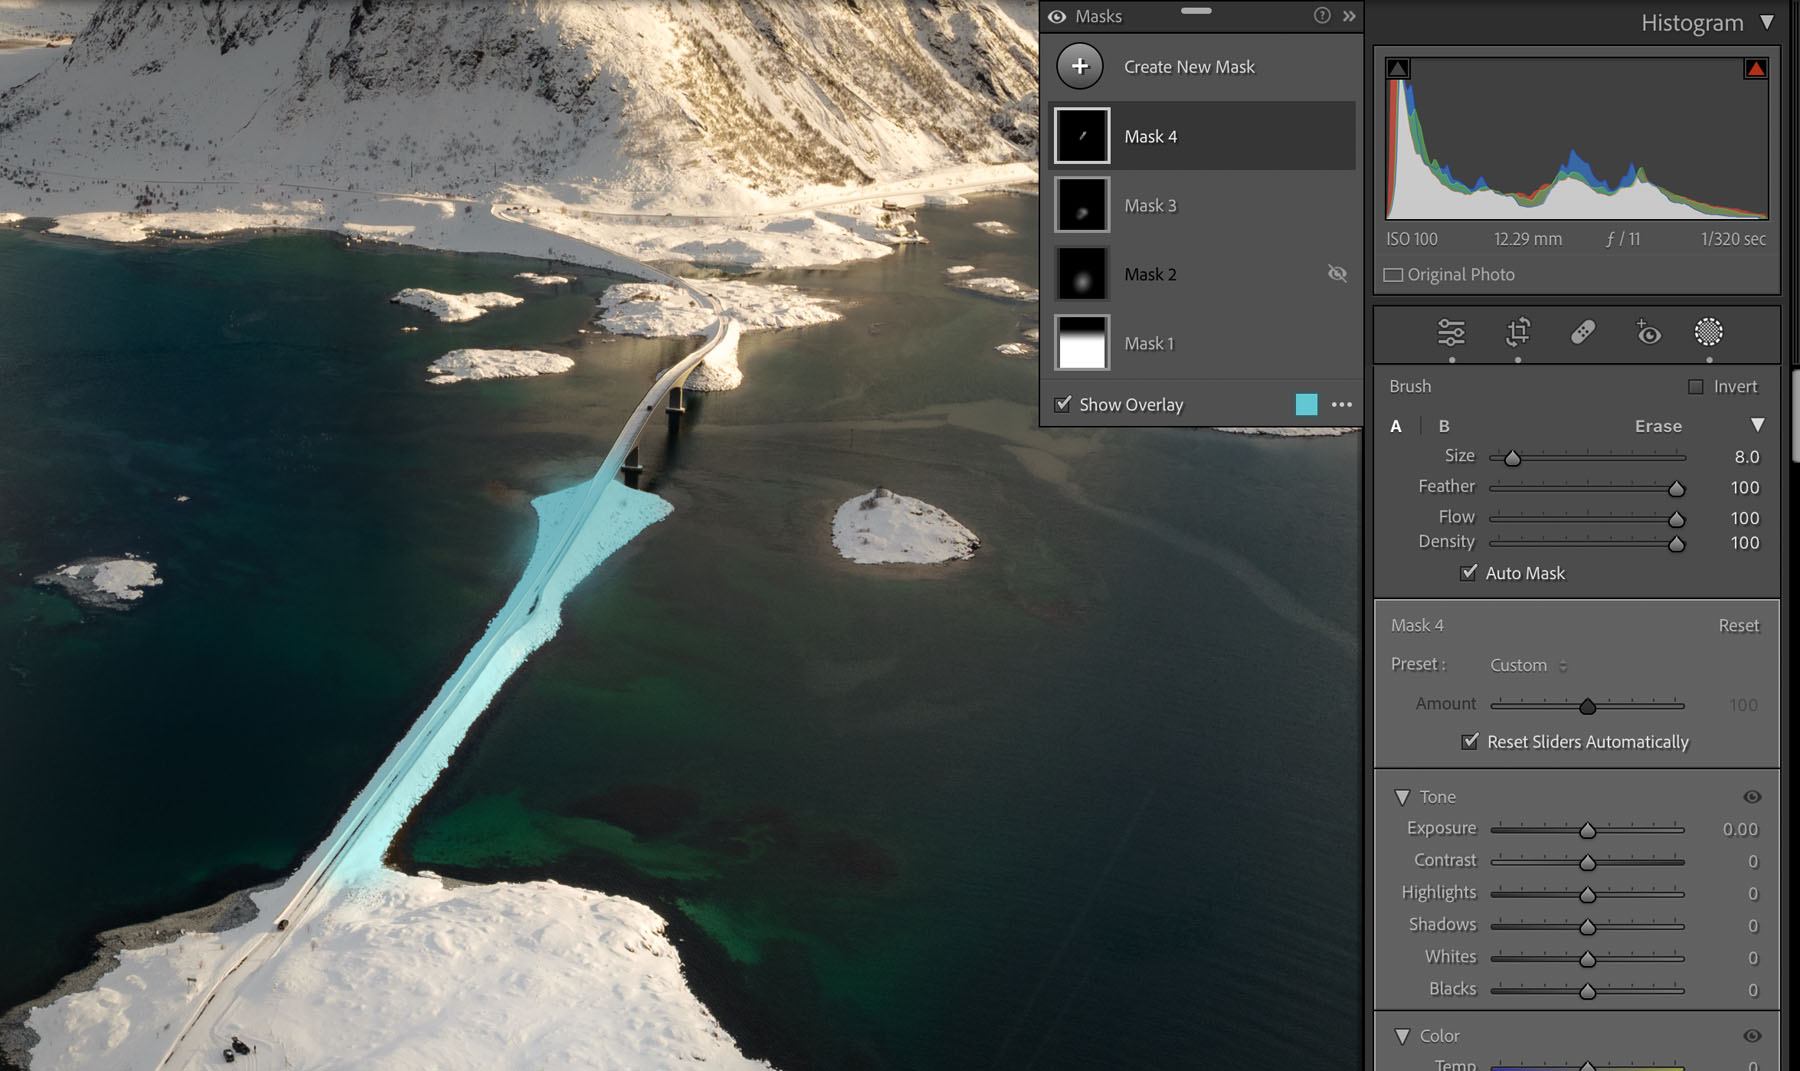
Lastly, you might have noticed the "Auto Mask" setting within the brush tool. This is a smart tool that tries to detect edges in the areas you are attempting to paint. For example, if I turn auto mask on and paint over the small road section in the middle of the image very sloppily, it will automatically detect the edges of the land on the dark areas of the ocean and create a precise mask. This is very useful for mountains on the sky, objects, or highlighted rivers. However, it can be very hit or miss depending on the contrast of the edge you're trying to use, and you may have mixed results.
Okay, that's it for this part of the series. Next up, we will cover some really powerful tools such as intersecting masks. We'll also cover luminance and color range masks, which I've been using more and more often recently, so check back in for that! Thanks for reading, and I'd love to know if I missed anything here or if you learned something new.
Join the Fstoppers community for free
-
Post comments and join in the discussions
-
Browse the site ad-free
-
Share your work and get featured in the community
-
Compete in the photo contests for fun and prizes
2 Comments
Alex - Thanks for the great overview, but I am confused. In your discussion of the linear gradient you state that the gradation begins from the top of the three lines and fades to zero at the bottom. What happens when the top of the three lines is below the top of the image? Is the effect 100% from the top of the image to the top line and then begins to fade? If so, how could you use a linear gradient to just effect a middle section of the image? Also, around 7 minutes into your video you make reference to lightening the bottom of the image with your gradient positioned at the top of the image. I cannot understand how this could be used to lighten the bottom.
Thanks again. I will keep watching and learning.
Kim. Great questions! Anything above that top line on the gradient is effected 100%. You cannot use a linear gradient to only effect the middle section of an image by itself. You can once you use intersections or subtractions which is in the video, but not in this article.
As for that marking at 7 minutes (and in this written tutorial) - The gradient is used to effect most of the image from the bottom and fades away as it reaches the sky. I think what might be confusing is that the gradient effects more than just where the tooltip shows. The tool tip indicates where the gradient starts to fade away. Notice in the attached image how the blue overlay is effecting the entire bottom half of the image after the line with the red dot. I hope this makes sense!