I am notoriously plagued by indecision. I will often stare into my cereal cabinet for tens of minutes. Choosing images strikes fear deep into my heart. Luckily, Phlearn is here to help.
Lightroom actually offers several powerful culling tools, and it's definitely to your advantage to get to know them all. Aaron Nace makes several great points throughout the video, including my favorite: don't try to cull in one pass. Move in steps, reducing to smaller and smaller sets until you have what you need. Picks, star rankings, and color labels make it easy to proceed from hundreds or thousands of images down to a select few.
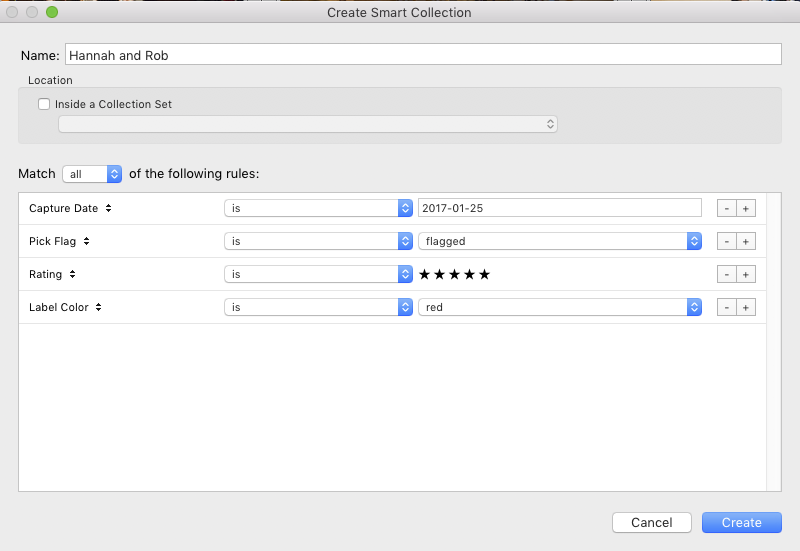
As an additional tip, if you're someone whose final selection will be dozens or hundreds of images (looking at you, wedding photographers), take advantage of Smart Collections. This way, you'll have all your selected images in one spot and won't have to click through all the Library attributes to get to them each time you come back to edit. For example, if I shot a wedding and followed Nace's method, my Smart Collection would look like this:


8 Comments
I use ratings and colors. I used to use flags but they are not necessarily supported by other applications.
But I do use the Rejected flag for those I want to delete.
My star rating is as follow:
1 star- Will not develop but don't want to delete either (usually for family photos, not good but still a souvenir)
2 stars- Candidate to develop (not sure if I'll develop or not)
3 stars- Will develop. People will see those.
4 stars- Quite proud of this image.
5 stars- Wow oh my god (don't have a 5 star image yet because I still suck hehe)
My workflow is as follow:
1st pass: From a smart collection (not rejected, not rated), reject bad images and set star rating. In this pass, many will get 2 stars because I still haven't seen all of the images yet. Very good ones will get 3 stars right away, bad ones I still wanna keep will get 1 star. Most will get 2 stars.
2nd pass: From a smart collection ( rating = 2 stars ), decide on final star rating (3+ stars or 1 star?). At this point, I've already seen each image from my first pass so I have a better idea which ones I like.
3rd pass: From a smart collection (3 stars and up, no color), develop my photos.
4th pass: At this point, if I still have 2 star photos, decide what to do with them.
Final step: Export my 3+ star images and delete rejected images. My 3+ star images get the blue color to indicate they have been developed and exported. This also removes them from my smart collections.
I'm always improving my workflow. Sometimes it takes time to figure out a certain steps is unnecessary or should be improved. Right now, this workflow works for me until I find a way to improve it :)
As someone who usually shoots around 2000 photos per event, i do a lot of culling, so i keep as efficient as possible:
1. Use a usb gamepad with Gamepad Companion (I've read wireless ones work fine too) and map the X (Reject) and P (Keep) with 2 top buttons. A bottom row is mapped to 4 (4 stars) and 5 (5 stars). You'd be surprised how incredibly quickly you can run through collections by using a hand held controller, or really, any midi device with midi to keyboard mapping software.
2. 1st pass: Keep all the photos you like, even if they are close, reject the ones you don't like.
3. Command-Del to delete all photos marked as Rejected. You should have half as many as what you started with.
4. 2nd Pass: Start from the beginning and mark ones that are ok as 4, the ones that are outstanding as 5 stars.
5. Filter collection based on 5 stars
6. Apply global lens correction and start toning/color correcting
The only time i use smart collections is when i send the dng to photoshop (i never import cr2, just DNG, because you don't have to deal with separate xmp files), and save, a PSD is created in my LRcollection, so i'll smart search to single those out in order to exported them to jpg, etc.
Using the above steps, i can easily cull a 2k+ set in 30 minutes, give and take.
I use mainly pick and reject as my primary ways of culling. I also have multiple steps however there are some features in Lightroom that can make this easier. I also use a Contour 2 to quickly do this.
1. Find rejects (much like in the video) be harsh here. If it doesn't have meaning or technical merit it goes bye-bye.
2. My rejects are set to reject then hide, I also have the auto advance after flagging a photo.
3. As I go through I am also looking for picks (these are typically photos that are going to end up in a preview for the customer).
4. Once I have done my picks / rejects (I have my screen to show only picks and unpicked) then I start looking for those photos where I want to do some kind of treatment. Those will typically get red color.
5. Once that is complete I am down to good vs. bad. I might have 2 photos that are very similar so I will use compare to determine which one is better.
I am normally done culling at this point and ready to move on to developing. Sometimes I do this before sometimes after but I do use smart collections. I have a few categories for portfolio images (must be pick, must be 5-stars). Then I have some categories that help me provide the client (typically wedding) a breakdown of the day. Each photo will get a tag of getting ready, father daughter dance, bouquet / garter, etc. These are then gathered into a smart collection for that client and exported to folders that correspond to the time during the wedding.
I do use the same culling process for other sessions but typically don't do the smart collections except for portfolio images.
Thanks,
Dave
Use bridge or photo mechanic. Both will let you instantly view the jpg preview embedded in the raw with out having to wait for it to render. LR is painfully slow unless you render previews and wait 20 min. Using a smart collection to adjust filter flags is asinine. There is a whole filter section where you can save filter presets and manage this more quickly, hit the '/' key to find it. You can even filter by camera serial number so color correction is easier to sync. This is all stuff that maybe should be researched before writing an article on the subject. There is way too much "blind leading the blind" in this industry.
Hey Todd,
I'm aware of all these things. I actually use Perfect Browse, but I prefer to work in Lightroom because I find occasionally my selection metadata doesn't get fully synced and I don't mind getting a cup of coffee while Lightroom renders previews. Also, I'm not using Smart Collections to adjust filter flags; I'm using them as an endpoint to automatically collect selections, which makes it very easy for me to visualize exactly what I need to work on, what's done, and what I want to showcase, which is a level of organization beyond filter presets.
You don't need to go through the whole filter, select, delete thing to delete rejects. Just hit (Mac). You'll be presented with the rejected images for the whole folder or collection already selected and the delete dialog.
When you have a lot of similar shots to cull, use the survey view and do series of repeat selections:
1. Select the first four images, hit 'N' to take you to the survey view. Mark (*, pick, whatever) the best one. Now select the next four and repeat. Repeat through all the similar shots.
2. Now go back and repeat; select the first four shots that you marked in 1 above, unmark all but the one you like best. Repeat for all the marked shots.
Repeat step 2 above until you have only one marked shot. That's going to be your best.
Good thing I followed a similar system :)