Masks in Lightroom Classic are no longer niche tools. If you shoot wildlife, landscapes, or portraits, smart masking decides whether an edit looks polished or clumsy.
Coming to you from Terry Vander Heiden, this practical video walks through seven masking moves that speed up edits and keep detail intact. You start with “Select Subject” to grab what matters, then flip it with “Duplicate and Invert” to work the background without redoing tight brushwork. Add and subtract let you clean up edges, so talons, branches, or hair don’t glow after global changes. Tapping O to toggle the overlay keeps you honest while you nudge exposure and highlights to push attention where you want it.
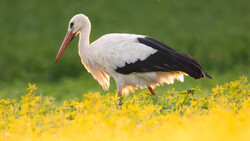
Color Range earns its spot when a bird’s chest or a jacket needs a nudge. You sample the hue, refine the range, and subtract spill from rocks, grass, or walls so you’re not tinting the scenery. The smart move is intersecting selections: combine Subject with Color Range and you isolate, say, the finch’s head while ignoring feeders and background texture. This beats hammering HSL and hoping it spares the rest of the frame.
Landscape masking is the sleeper feature that saves you from sloppy global sliders. Lightroom Classic can detect water, sky, mountains, and more, letting you pull highlights in glare off water without dulling clouds or ridgelines. It’s the same idea with “Select Sky” when you only need to calm harsh cloud edges or tuck a bright horizon back into the scene. Keep the edits local, and you avoid the flat look that comes with dragging down highlights on the whole image.
There’s also a line you cross when you want a different sky entirely. Vander Heiden shows the quick path into Photoshop’s “Sky Replacement” to drop in a new sky, blend it, and get on with the rest of the edit. Building a personal sky library pays off, especially if you want regional realism and consistent light direction. Back in Lightroom Classic, AI Denoise cleans up high ISO shots once you’ve settled your local adjustments, and you can always back off saturation if a color push goes a bit loud after noise reduction.
Brush remains the control freak’s favorite. You add a new brush with K and stack subtle presets: a tiny catchlight, a gentle iris lift, a touch along a beak or a rim on feathers. Then you dial it back so it reads as light, not makeup. This is where you shape attention without announcing the edit, and it’s fast when your most-used brushes sit ready. The trick is restraint after the rush of seeing the before-and-after jump.
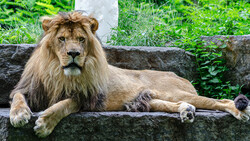
The bird examples make the point, but the habits carry to people, products, and city scenes. Build the subject first, refine with subtract and add, intersect to be surgical, and label masks so you can return and tweak without guessing. Save the heavy lifting like sky swapping for Photoshop when the scene needs drama rather than correction. Keep global sliders as a last step so local work sets the stage. Check out the video above for the full rundown from Vander Heiden.


Join the Fstoppers community for free
-
Post comments and join in the discussions
-
Browse the site ad-free
-
Share your work and get featured in the community
-
Compete in the photo contests for fun and prizes
No comments yet