As I promised when I wrote my Anatomy of An Interior Shoot post a few weeks ago, if the interest was there, I'd continue the series. I'm happy to report that I've got much more in stock for you. If you're interested in kicking your architectural and interiors photography into high gear and adding some special sauce to your photos, this post is for you.
When I wrote the last post, I wrote that there’s often much more than meets the eye at first glance when it comes to architectural and interiors photography. That same concept applies here: if patience and problem solving aren’t in your repertoire of photography skills, you might find yourself struggling with creating dramatic, interesting, and dynamic images of spaces.
This post will cover some basics to get us started, and I'll be explaining many more concepts in further detail in the weeks to come. If you're interested in architectural photography as a source of income, shooting real estate for an agent, or just improving the quality of your architectural shots while on vacation, I'm hoping that this and the subsequent posts will help. So without further adieu, I’m going to walk you through a few techniques that I’ve come to use when I’m photographing a space.
Be Mindful of Vertical Lines
This is usually the number one issue that rears its head over and over again when people who are interested in taking photographs of architecture or interiors ask me for help. If you want to dive into this type of photography, this rule can’t be ignored. When we tilt the camera up or down, vertical lines converge. This leads to the ever-ugly ‘building falling backwards’ look. If you’re shooting for an architectural client, this is especially important, as leaning vertical lines and buildings that look like they’re about to fall over backwards will make it appear as if the architect or builder is incapable of keeping a line straight and true, and that the building is not structurally sound.
Using a tilt-shift lens is one way to change the field of view of your camera while keeping vertical lines vertical. Another method is to adjust the vertical lines in Photoshop, though this will usually result in some of the image being cut off and a slight loss of image quality.
Even though I use tilt shift lenses for my work, I still find myself bringing images into Photoshop to correct the vertical lines, as even the slightest misalignment will be glaringly obvious when viewed under a discerning eye. The fastest way to correct this is by using the Free Transform and Skew tools in Photoshop.
Note in the below image the converging vertical lines, I've outlined them in blue. You can see how even though they are just a touch off of perfect, it still contributes to the building feeling like it is not architecturally sound. Not the idea we are trying to get across when we want to show that our client is a competent architect! The finished image, with the corrected verticals and lighting added, can be seen below. Now we've got a nice, sturdy building that doesn't look like it is in danger of collapse.


Take Some Time to Stage and Organize
When we walk through a room without a camera, our brain is very good at disregarding a little bit of clutter to see the big picture. We can overlook some books on a coffee table in disarray, or a few coffee cups and crumpled blankets and say “wow, what a beautiful room!” While we’re great at filtering that stuff out while we’re just walking through a room, it is a very different story with a photograph of a room. Everything must be placed very deliberately or the flaws of the room become more obvious. Pillows tend to look sad and dejected in a photograph if you don’t take a minute to fluff them up, creases and uneven blankets on beds will photograph terribly, crooked carpets can ruin the perfect composition by fighting with your eye and the leading lines of a photograph, and toasters and microwaves (as expensive as they may be) kill the photogenic qualities of most kitchens with ease.
If you aren’t at liberty to remove and rearrange, I at least recommend taking five minutes and walking through the room to straighten, align, and organize everything possible. Staging and organization probably plays just as big of a role as lighting when it comes to interior photographs, and to rush through any shoot without putting in a few minutes to clean up is definitely a shame.
In the below images, I've shown what the space looks like before I took what was literally five minutes to stage and re-arrange to my liking, next to the final staged image. Note that I was working alone and none of this involved any crazy logistical planning, with the exception of a trip to Whole Foods to pick up $10 worth of vegetables to stage the first image. While you can certainly tell that they are nice spaces without the staging, cleaning up and organizing certainly brings things from 'not bad' to 'whoa!'


Add and Control The Light
As far as photography is concerned, waiting for the right light is a tried and true method to improving your images. But sometimes, we don't have a choice; sometimes scheduling doesn't work to our favor, or we've got a client that needs the images NOW, and we might not have the luxury of waiting a few hours for the perfect golden light. There are a number of reasons why lighting a space will improve the look and feel of a photograph. When we don’t add our own light to a space, we are often at the mercy of the weather, poorly designed interior or exterior lighting, and a number of other factors that are out of our control.
When we control the light, we’re able to convey emotion and feel, add emphasis or interest to select areas in the photo, add life, bring out color and detail, improve contrast, and so much more.
If you really want to improve the quality of your interior and architectural photography, learning to control light is probably the single most important skill that you can have in your repertoire. How many successful portrait photographers take images using only natural light, without modifying it in any way? I’d be willing to bet a significant sum of money that the number is very, very small, perhaps a fraction of a percent. Why is this? Because adding light to a portrait is probably one of the best ways to improve the mood, feel, emotion, contrast, and impact of a portrait. Same goes for interiors and architecture.
Many people will say “well, I can get away with just using HDR, can’t I?” And sure, you can get away with it, but you’re going to be missing out on a world of possibilities, not to mention the technical limitations that you’ll run into if HDR is your only method of shooting a space. HDR and Exposure Fusion both suffer in high-contrast situations, leading to muddy and soft images (think of a dark wood interior with a bright sun outside: HDR will yield a muddy result every time). Learning to tame the light and add your own will dramatically improve an image in this setting.
Below I've shown what a space looks like after staging and cleaning up, but without any light control involved. While it looks okay, it's not a photo that I would be proud to display for a number of reasons. The window is blown to the point of overtaking the entire image, the area behind the bar is a total black hole, and even with a healthy dose of contrast added in post, the image still appears muddy and a bit washed out. In the bottom image, I was able to expose for the window and add light to the interior, which gives a much more dynamic, inviting and interesting image. Much better when the space is seen dripping with soft and glowing light, rather than a muddled, contrast-free mess that the natural light gave.


If you want to create dynamic and interesting images that jump off the page, taming and shaping the light to your vision is certainly going to help you accomplish that.
Be Patient
Photographing architecture, interiors, or anything that doesn’t move for that matter is an exercise in patience. There are many subjects that we have the luxury of moving to make a better photo: we can take a model into a studio or move them into the shade, we can move a car into better light, we can we can reposition a product for better angles. Not so with architecture: our options can be pretty limited.
But what should we be waiting for? There are three things that I’m always willing to wait for.
1) Most obviously, the right light. Since we’re shooting stationary objects, if we really want to make a spectacular shot, we’ve got to wait for the light to be the best it can if we want to create a jaw dropping photo, even if we're going to add our own light to the scene. If you're not working with lights, waiting until the scene is bathed in golden light or free of shadows can do wonders for your photos. If you are using supplemental lighting, having the best possible natural light combined with well-placed artificial strobe light can create amazingly dynamic images that simply aren't possible otherwise.
2) People, cars, and other objects to get out of the way. Unless we have the luxury of cordoning off a street or area to keep wandering bystanders and cars out of the way, we’ve got to wait for it to happen by itself. Waiting just five minutes for the area to be clear of people or cars can go a long way to ensuring that the viewer’s eye stays on the subject and doesn’t wander or get distracted by elements that aren’t adding anything to the final photo.
3) Just taking a deep breath and double checking everything. There is often a lot going on in an interior or architectural photograph. Some things that I watch out for include:
• Leaves, trash, other detritus on the ground
• Crooked lampshades, uneven bedspreads
• Misaligned furniture, carpets, and chairs
• Crooked vertical lines in my composition
• Things that, on second thought, aren’t adding to the composition
• Reflections of objects that will be difficult to remove in post
Taking a minute to clean these things up will save you endless hours and frustration in Photoshop after the fact. Believe me - I've learned the hard way. I've got a checklist that I take with me on every shoot, which reminds me to slow down and try to catch any problem areas on location so I don't have to tear my hair out over it in post.
And in closing...
I’ve got many more of these interior and architectural-themed posts planned in the upcoming months, so be sure to stay tuned if this is the sort of thing that interests you. If you would like to ask any questions or give feedback, I’d be glad to answer any questions, as always, in the comments section below, in the Fstoppers Facebook group, or on my Facebook page. Or check out my Los Angeles Architecture Photography.


Join the Fstoppers community for free
-
Post comments and join in the discussions
-
Browse the site ad-free
-
Share your work and get featured in the community
-
Compete in the photo contests for fun and prizes
29 Comments
nice article
You're posting this series just as I'm taking my photography business into RE and architectural. Excellent timing! I'll keep an eye out for your future posts. Thanks!
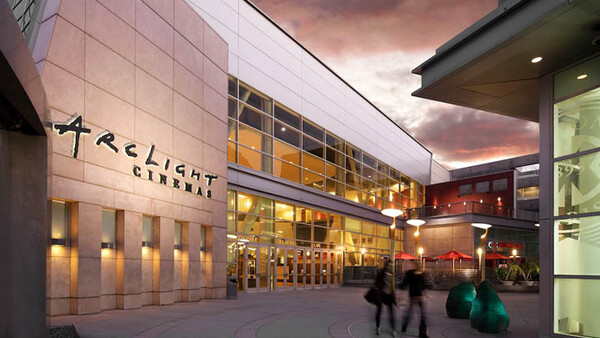
Could you explain what additional lighting you used? Especially in the Arclight photo up top.
Hi Will,
Check out these videos at the bottom of the page for a little more info:
http://mpkelley.com/about/
How did you compensate for the window in the last picture?
when you're on set, shoot multiple frames of the same scene but change the exposure for each image so when you're editing, you could layer mask things that you want or things that you do not want and then you will be able to compensate the exposure of the window without underexposed the other scenes. Hope this helps!
Hi Warren,
I just increased the shutter speed to get a more acceptable exposure for the exterior. While this darkened the interior, I was able to bring the inside back up by using additional strobe light.
basically, this is one of the most-needed editing skills a architecture photographer must master
Yes indeed :)
Hello Mike! As always your posts are fantastic! Keep it up! I would like you to write more about the different photos you shoot and how you mask layers in photoshop later. This is one of my biggest problems today. To be more specific, I would like you to do a post with all the pictures (without post-production) that you use in an architectural picture and then the final photo editing. In addition to the tips of photohop to make masks. You've posted some videos with these steps, but the speed of the video is very fast, you can not follow the details. Thank you! hugs, Jony.
Thanks Jonathan! I think this is a good idea for a post and I will keep it in mind when I write the next one :)
Best,
Mike
The exit signs and the vents and the nails and all those little imperfections.... photoshop????
Yes: As this was shot for an architectural client and they were not designed by the architect, but rather, installed by the contractor to meet building codes and for utilitarian purposes, the architect requested their removal for the final image.
In other words, the architect only wanted to show what they designed, not what was mandated by a building code or contractor. This is relatively typical in architectural photography.
Your articles are great, I love to read them.
Perhaps you should add, that using a panoramic nodal point adapter,
will get you straight vertical lines, too. Of course this method only
works, if there are no moving subjects, but it's much cheaper than a tilt-shift-lens and gives you huge noiseless files.
Sry for my not perfect english.
I'll stay tuned for you next posts, thank you very much :)
Thanks Dom, glad to hear that you like the articles! Yes, maybe I will mention something about stitching in one of the upcoming posts.
Great post! Thanks for the tips! :)
What lens(es) do you use for indoor and exterior shots?
Thanks Johanne! I use Canon tilt-shifts and the 17-40mm, and occasionally will break out a 50 1.4 if I have enough room.
is there a tutorial on how to do this realistic looking HDRs? This would also work on portrait photography.
Just came across this article and some of the other posts you've done and they are great! One question I have is you mention using strobes/flash versus using continuous lights. Do you have a preference or recommendation? I can see the benefit to strobes in terms of portability,but with continuous light you can actually see the image with the adjusted lighting with your own eye before you even press the shutter, while with strobes you have to take the picture,view it on screen and make adjustments. I welcome any insight you have on this. Thanks!
excellent, not a lot of truly thorough, well illustrated articles on the internet on this topic.
Any chance we could get you to post the checklist you mentioned?
Great post, I just have a question. Do you have a post about balancing the color temperature when you combine outside natural light with inside lights and strobes??
I've been shooting interiors for a while and use a mix of exposure fusion, ambient exposures, and strobes depending on the situation. One thing I'm having a big problem with is getting consistently lit interior shots when I'm mixing ambient window, tungsten, and strobe in a big open concept room with large expansive ceilings.
If I try and hide a strobe behind a couch or counter, it will cast shadows up high from whatever it is close to. If I just light from behind the camera, many areas of the photo are left underexposed in front of the camera. I've tried multiple flash exposures in different locations mixed with ambient light exposures in photomatix but I end up getting all those shadows cast by the multiple flash exposures in the final photo! Plus the light is just very dead and flat.
Is the key to move beyond the basic flash-bounce-off-celing stage and selectively light areas using light modifiers???
This room shown below is a great example.
Thanks!
When I shoot indoors I often have a problem with lamps and their halo effect. Or I will be in a dim room with two very strong lamps, so that when I make an exposure time for the room the two main light sources are way blown out while the room looks exposed correctly. I Do NOT have the possibility of bringing in additional lights, just the flash on my camera, which I usually try avoiding.
Thank YOu!
Great post Mike, especially the parts about being patient and staging. Two things I always seem to forget. Its too easy to just jump in and start clicking.
Thanks for this. Its a great technique. Alot of post work involved but works great. I used it recently and client loved it. Its up a large displays around their resort
http://oliveredwardsphotography.tumblr.com/image/80973913622
I love your work and am putting into practice a ton of your tips. I just shot 3 buildings using a few of your techniques. I can't wait to edit them up!
Mike what company do you use for your marketing brochure. You and mentioned $2-3 each. I can't find anything good for that price. And how many do you buy at a time. Is there a place where you go over your marketing materials in dept. Thank you.. Your DVD is amazing. I've found numerous tips alone in your DVD that are worth $300 each!
Smart techniques! Thanks for sharing Michael. Love the stuff you are putting out there! Keep it coming.