
Shooting in harsh sunlight is always a challenge. Recently I shot a test while out on a trip in Los Angeles. Due to scheduling we had to start shooting around 4 p.m., so we were dealing with hard sunlight. In this post we will look at five different setups you can use to shoot in and manipulate these less than ideal lighting conditions. In a previous post, I showed how to quickly scrim hard lighting. In this quick tutorial we will look five different ways to light while in the same environment and conditions in order to alter the look of our image.
The Tools
During this shoot I packed pretty lightly. We were a small team — just me, the model, and the MUA — so we needed to be able move quickly and without many hands. My gear included:
- Nikon D800
- Nikon 85mm 1.4
- Sigma 50mm 1.4
- Profoto B1
- Elinchrom 53 inch Rotalux Octabox
- Lastolite Medium Skylite
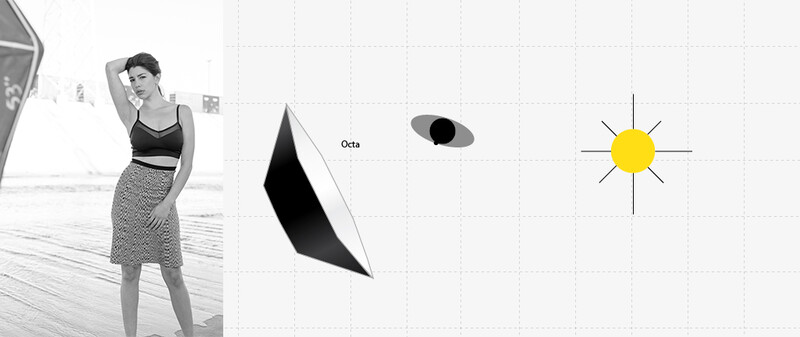
Let's now consider the scenario. It's around 4 p.m. and we are about an hour and a half or more away from have soft golden hour type light. So the sun is going to create a directional hard light. Also, we shot in the L.A. River which is made of a light-colored concrete that does help to reflect light a bit. Now here are five different ways to light in these conditions (there are certainly many more than five):
1.) Shade or Scrim
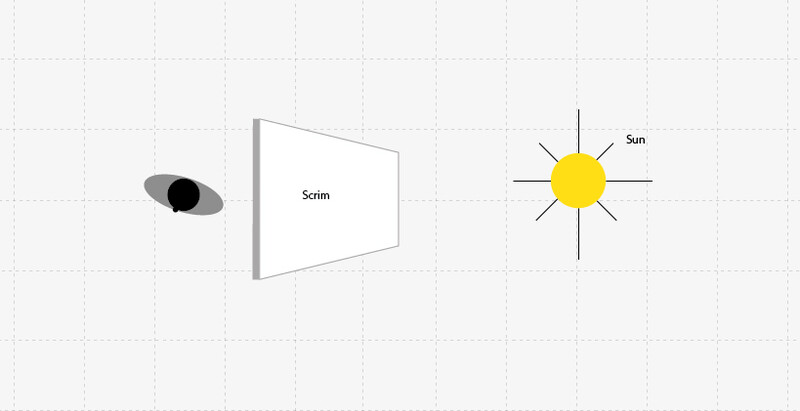
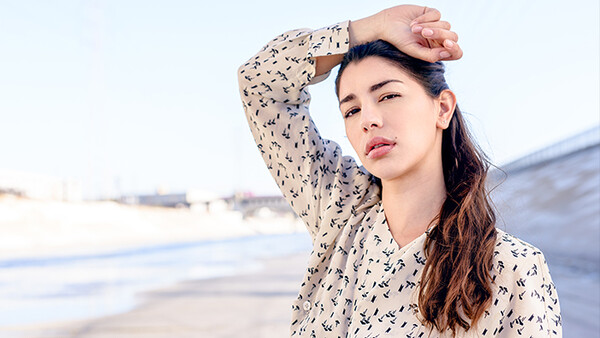
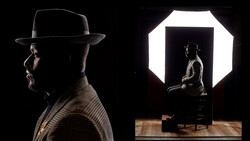
The first way is maybe the most simple of the setups; either find or create shade. You may be able to see in the back of some of these pictures that the location has bridges that go across. The bridges create large areas of shade, so place your subject in a pocket of shade and you will have nice even light. Also, if you place your subject on or near the edge of the shade you may be able to get some directional quality to the light. Your other option is to create shade. By placing my scrim between the subject and the sun I create a pocket of shade for my subject to stand in. Since the light is coming from camera right, there is a slight directional quality to it. The same benefit of the natural fill from the location is also flattening out the image a bit in this scenario. If you wanted the light to appear more directional, you could place the black side of a reflector camera left. The portrait photo above, the header image, was shot using this method. I used the scrim to create shade. I also noticed that using the scrim instead of the natural shade helped me to not blow out the background quite as much.
2.) Shade or Scrim with a Softbox
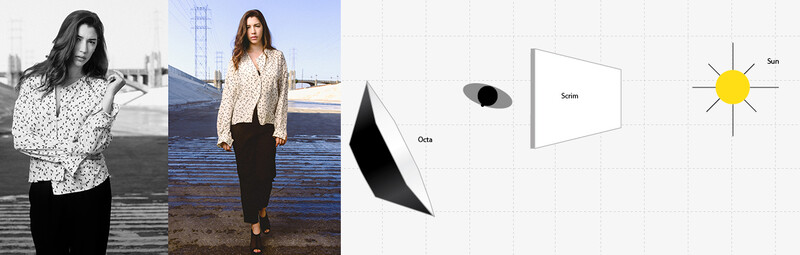
Taking the first method just one step further, I am still using shade or the scrim but now adding the octabox. In this setup, the octa is acting as my main light. When using the octa along with the scrim it is key to get the power output up a bit so that the octa is pushing out more light than the scrim side. This will allow you to get the shape and directional light that the softbox is putting out. Both of the images above were shot under shade with the octabox about 45 degrees to the side and camera left.
3.) Direct Sun with Bounced Fill
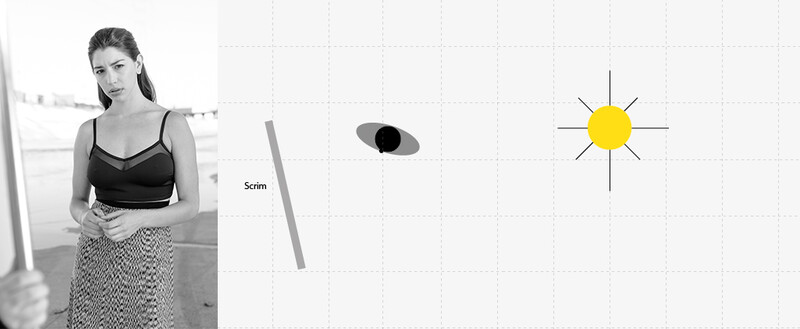
In the next two setups we will look at shooting with the sun directly hitting our subject from a side angle (direct refers to the quality of the light, side refers to the direction of the light; direct light does not necessarily mean front lit). In this setup we are working pretty minimally again. The hard sunlight is hitting the left side of our subject and the scrim is bouncing some light back to fill in the shadows. I did not add on the silver reflector in this setup, this is still the white diffusion material. I prefer it here because it reflects back less light, allowing to fill in the shadows but still maintain a directional light (not flattening out the lighting).
4.) Direct Sun with Strobe Fill
This setup is doing basically the same thing as the previous. We are using the sunlight as our main light and then filling in the shadows. The end result here is not much different from using the scrim, so why do it? Bringing out a strobe and a softbox on location takes a lot more time and effort then using the scrim. For the results I wanted, the scrim is what I would use, but the softbox gives you more control. You have the option of controlling how much you fill in. You can fill just a little bit into the shadows, fill with the intent of having even light from side to side, or even overpower the sunlight, making the strobe the main light. With the scrim you do have some control, you can back out the scrim further or closer to control the amount of fill. The downside to that is it can affect how you shoot. For instance if you want a good bit of fill, you may need the scrim to be very close, eliminating the option of shooting full length or shooting horizontally. So there is definitely a give and take between the two options.
5.) Direct Sun
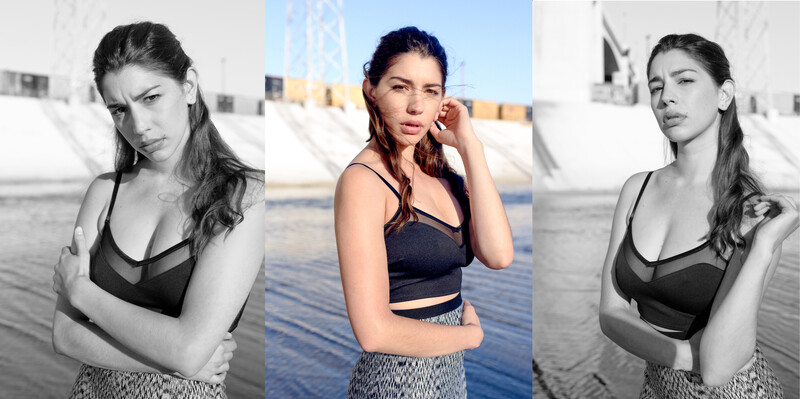
The final setup here is very simple: just shoot in the direct sun! Now you most likely don't want to just place your model wherever and start shooting. But, use what you know about lighting patterns and place your model so that the shadows fall in flattering positions. In the middle image, the model is placed almost right in front of the sun. There is just a slight angle so that the shadow goes across her neck instead of straight down. By turning your model and directing his or her chin position, you can get front lighting, butterfly, or Rembrandt lighting patterns. Also try to pay attention to possible raccoon eyes (shadows underneath the eyes) and direct your model's chin up a bit to avoid them. Finally, keep in the mind the style and subject matter you are shooting; hard light only works for certain applications. If you are going for a edgier fashion-type look then hard direct sun can work well. To see more images from this shoot visit the gallery on my website.


Join the Fstoppers community for free
-
Post comments and join in the discussions
-
Browse the site ad-free
-
Share your work and get featured in the community
-
Compete in the photo contests for fun and prizes
9 Comments
If you found this useful (or even if not), there was a great presentation by Jerry Ghionis for B&H on YouTube where he explains some great techniques not mentioned here for shooting in direct sunlight -- including shooting in mixed sunlight/shade that most photographers run away from. The example photos he provides are quite good.
You can find the video here: https://www.youtube.com/watch?v=H2nNxaBA6ss - 1hr 44m, but worth it.
Thanks for sharing. I love Jerry's work.
Wish I would have read this 4 hours ago! Great read by the way!
Haha. Glad you liked it Hunter!
If you take nothing else away from this piece... SCRIM.
The rest you can add or remove with layers in Ps. You can't remove that look of squinting or blown harsh highlites.
"The rest you can add or remove with layers in Ps" - I always love it when people say that. There used to be a time when photographers actually took good lit and nicely set up pictures... Good ol' times.
I'm a bit confused. Isn't the (very beautiful) model standing in the shade in set up 2, 3 and 4? It really doesn't look like direct sun to me. On set up 2 the background looks as if she was standing in the shade.
I' asking because I usually have the problem when using the scrim that the "scrim shadow" shows on the floor and it looks awkward.
Hi Oliver - In setups 3 and 4 she is standing is almost the same spot and direction as in setup 5 - the difference is I am filling in the shadow side to make not look like hard direct sun. Let me know if you have other questions - I'm happy to answer
This is super helpful! If you found this useful you might want to check out this guide for more tips! http://www.adoramapix.com/blog/2016/09/29/cloudy-or-a-bright-sunny-day-…