
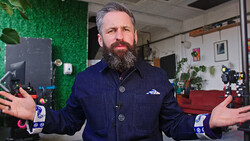
In this tutorial I will show you how to setup your studio strobes for full length portraits as we shoot an editorial style lighting setup. First we will look at the entire gear list we used and you can use for a similar setup, from the backdrop to the studio heads. I will breakdown our lighting. with lighting diagrams and explanation of WHY we are placing our lights where we are. Also, in this video tutorial we share some Behind The Scenes from our shoot day.
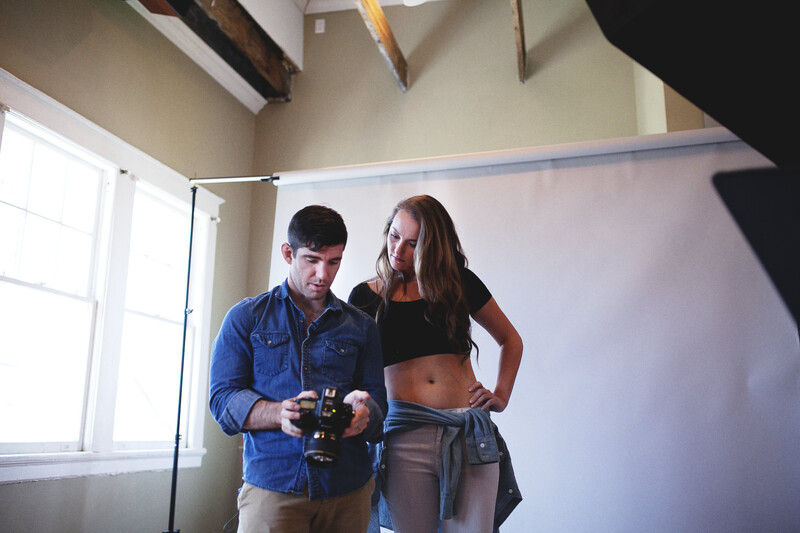
We had a great day in studio shooting and recording lighting setups; I want to thank BronColor USA for sending out gear for us to record the lighting tutorials. In the video tutorial we will discuss the how and well as the why, as mentioned above. It is important when going through this tutorial to not only consider where lights are placed, but why we are placing them there in order for you to be able to take these tools and use them for yourself. If we only learn the how, then when variables change, or things aren't quite working right, it will be difficult to make adjustments. Knowing the appearance we or you are going for will allow you to build your lighting setup and shape the light around the subject to fit the exact look you are going for. So before we get into the setup, lets look at the gear list.
Gear List
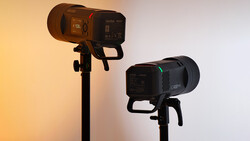
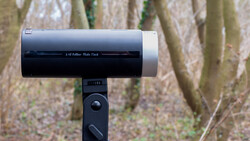
1 x Broncolor Siros 400 S Monolight - 400 w/s monolight with built in WiFi - These strobes run approximately $1,400 although the non-WiFi model is $1,000 and with EDU pricing from B&H the 400 w/s strobe is $859
1 x Broncolor Siros 800 S Monolight - 800 w/s monolight with built in WiFi - the 800 w/s strobe runs between $1,100 (Non WiFi EDU Pricing) and $1,700
1 x Broncolor Stripbox - $256.68 on B&H
1 x Broncolor Octabox 4.9' - $380.37 on B&H
2 x Broncolor M Stand - $74.48 on B&H
Savage Seamless Paper in Slate Grey 107" - $45.00 on B&H
2 x Pony Adjustable A Clamp - $2.70
Rosco Black Gaffer Tape - $33.96
On the camera side of things I was shooting with my trusty Nikon D800, I'll link to the D810 on B&H if you would like to take a look, its dynamic range is something I haven't found a replacement for in the DSLR world. For my lens I went with the Nikon 85mm 1.4 - this is a great portrait lens and allows you to also get tighter crops without distortion. My trigger that you will see in the video tutorial above is the Phottix Stratos 2. One of the great features of these triggers, besides their lower price point, is the ability to very quickly turn strobes on or off with the A, B, C, and D channels on the back of the trigger.
The Lighting Setup
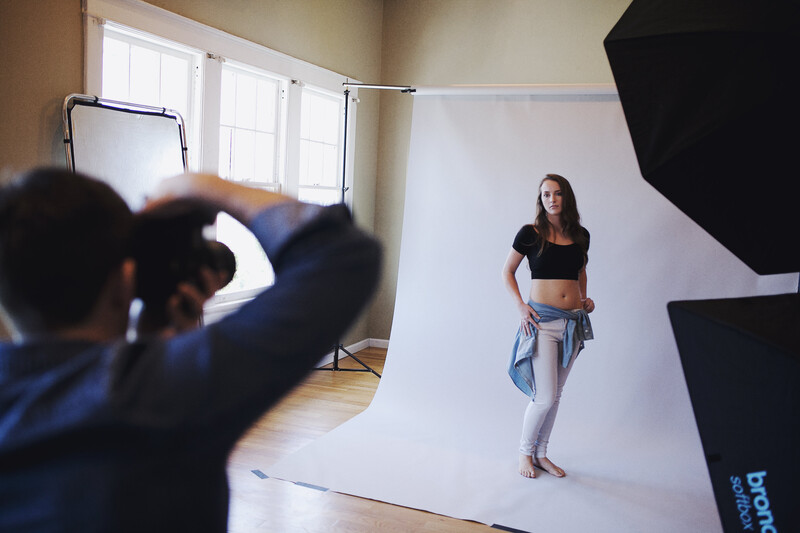
In the tutorial video we will walk you through the complete setup for this shoot. The challenge is lighting for a full-length portrait without it appearing that we are using two different light sources and without having any fall off. In the examples, in the video, you will see what our subject looks like with only the Octabox. In that instance, the bottom half of our subject is darker in exposure from the rest of our subject.
The main light in this setup is the 800 w/s Siros strobe with the Octabox as the modifier. The 2nd strobe, the 400 w/s strobe is fitted with the strip box and is lighting the lower half of the subject. When you see this setup or when you test the setup yourself, you may be surprised at how low the strip box is in its positioning. Also keep in mind that you want the light to move on the same direction and on the same angle as your main light. The main light is higher than the subject and pointed down towards her, so the strip box should be pointed at the same downwards angle. If your strip box is pointed straight or at a different angle it will lose the effect of appearing to be one large source and will possibly create an un-natural effect.
Having the strobes at about a 45 degree angle from the subject allows for the light to reach the far side of the subject while still creating a dynamic and directional light, with a clear "shadow side". When shooting clothing its important to light for the clothing. Straight light usually doesn't flatter clothing, because it flattens everything out, minimizing the shadows that show the shape of the clothing. For a catalog type look you also don't want your lighting to be too dramatic, that is too say you want to be able clearly see from left to right, this is determined by the angle of the light and the fill on the opposite side. Having the light too far to the side will create an even more dramatic or even split light look, which is something that you would want to stay away from for this style of look.
You may also notice in the image above that we have two potential sources of fill, the window and the reflector. In order to take advantage of the window light, we would need to slow down the shutter. Remember that Aperture will control your strobe light and shutter will control your continuous light. The window light, in this setup, had little effect on our image in reality.
The reflector also had only a slight effect on the image, providing just a bit of reflected fill on the shadow side of our subject. In the video tutorial I discuss the difference in power output between the Octabox and the Stripbox. When considering fill we need to look at the far side our subject but we also need to consider the stripbox as a fill light as well. The Octa is our main light, but the strip box is filling in where the Octabox light source is dropping off.
The next two tutorials that we have slated for release include shooting window light in studio and how to create one very large source using monolight strobes and a fabric material.
Finally, remember to Subscribe to the YouTube Channel to get updates on the other lighting setups we recorded. If there is information or details that you would also like to see and hear in the tutorial videos, let us know so we can make sure our lighting and retouching tutorials are as informative as you guys want!

Join the Fstoppers community for free
-
Post comments and join in the discussions
-
Browse the site ad-free
-
Share your work and get featured in the community
-
Compete in the photo contests for fun and prizes
24 Comments
How about giving us solutions that don't take three months of house payments?
you do realize he gives you a "solution", or as I like to call it, a recipe for how he lights for this situation, and it is not gear brand dependent, . . right? I mean, you can get different brands, and shoot a Nikon D3000 with a sync cord
Not everyone has $3600+ to drop on lighting, and considering the vast majority of articles here are total G.A.S. oriented, maybe writing a few articles for budget sets, or better yet listing similar but not wallet murdering options with these articles would be smart.
As others have noted on this same article, this smells of product placement because of a new sponsorship thing, instead of thoughtful tutorials for a wide range of readers.
the brands he uses are irrelevant to what is being displayed in this post, you don't need fancy lighting equipment to accomplish what he has, . . . why whine about a free article that teaches something that can be replicated with any brand of lighting equipment. Oh, got news for you, a lot of these celeb photogs are sponsored by some brand, but that doesn't mean you can't learn from them.
Eric, one of my other tutorial videos on my YouTube channel uses Einsteins. They are also a great solution and cost about $500 per head. I personally love the Einstein light, but definitely if you want that consistency and the build quality I would look at Bron or Profoto.
Thank you.
one of 3 billion ways to shoot full length editorials and a really boring way at that. Lance you should really say that this post is brought to you by Broncolor, thank you for the equipment and I'll keep pimping it if you keep sending it…
Sponsored photographer, can't wait until they start wearing jackets with all their sponsor logos on it.
M L - you are correct on of MANY ways to shoot. The idea was to put together some lighting setups, we recorded 3 - one of them doesn't use any strobes just window. Bron was nice enough to send gear, but they didn't sponsor the shoot or me. I was trying to return the favor by also showing the gear, no harm in that. I'm not currently sponsored by anyone but sure wouldn't mind it.
Cool. I'm doing similar except I'm in the bush in Africa and spending less than a 10th of that (excluding camera / lenses). When I arrive in a small village in Africa I usually spend a couple of days trying to DIY a studio from what I can find.
Usually I'm not complaining about typos and stuff like that but I only read half of it and then stopped, because I was tired of figuring out what some sentences were supposed to mean.
(Plus, I couldn't see any use for me for all the reasons stated in the comments above.)
Yes this is a plug for broncolor's new baby, the siros monolights. You would think if they're pushing a $1400 light, not to mention their other equipment, they could have filmed a video that actually provided usable information, not a generic 2 minute commercial. (And apologies to Mr. Nicoll, but this is an incredibly mediocre video at that)
This is more a BTS than a how-to. Nice I guess but the title is a bit missleading. :)
Uhhh...selling more Broncolor are we?!
Ok, to all you WHINERS here, who feel the world owes you a favor because you've clicked on a link: fstoppers provides FREE content. Someone's gotta pay for all the bandwidth, hosting and writers' time, right? They're not seasoned journalists, so if you find the occasional spelling & grammar error a nuisance to your English-major self, perhaps you'd best just avoid this site. Most writers here are busy photographers by trade, not spelling bee winners. So what's the big deal?
And where is the gratitude to busy professionals like Lance, took the time out of their busy schedule to produce a video like this? Have any of you produced a video? Do you have any clue how much time and setup is required to shoot even a 2-minute short like this? And frankly, why the sponsorship hate? Most of you should be so lucky as to get recognized by a major brand like broncolor. Things in life aren't free folks. Someone, somewhere's gotta foot the bill.
I just don't get this whole mentality where everyone here expects FREE top-notch content, provided by seasoned pros, solely out of the goodness of their hearts. It's free. Don't like it? Don't click on it. And if you're going to comment, do so with your real name, and keep it constructive.
I agree, the truth is some of the best videos I have watched are on sponsored YouTube channels such as B&H and Adorama. Even a short video and article takes a significant investment in time for a busy person.
I valued the light-placement advice here but didn't really care so much about the gear - I think too many people focus on the gear anyway quite frankly.
This is not top notch content. Mediocre, yes but nothing higher than that. If the site needs to pay the bills, just note on the article that Broncolor is an advertiser that's all. Be fair and honest. If a restaurant server gives you mediocre food and mediocre service during your entire stay, would you thank them for it? Honestly? Yeah, neither would i.
But if I was in a restaurant I'd be paying for that service, not on a website providing free advice
Actually by law they have ... FCC rules on endorsed videos.
https://www.ftc.gov/tips-advice/business-center/guidance/ftcs-endorseme…
At no point did Lance say that you had to have Broncolor gear to do a shoot like this . If you don't like his photos or videos please show us how to do it . I'm personally glad that Lance is willing to share this with us for free . Some of us find value in the content .
I always look forward to your articles on this site. Great run-through with thorough explanations, and the gear list is a always such a great starting point to think about how to start building up one's own arsenal. Thank you so much for taking the time to share your knowledge.
I like Fstoppers.com. I'm a big fan and visit this site often. They do a great job and appear to be very popular and successful. Of course they can publish whatever they want, and they do. As someone who clicks on their content and views their ads I have opinions and preferences. The increase in content marketing and product placement online often turns me off if the content is minimal and paid sponsorship is not clearly identified. Careful editing of text and content contributes to high standards. When the newspaper I worked for made a big push toward online publishing they decided editing was less of a concern because of the short shelf life of online content. After editors were laid off, quality and standards declined in my opinion. Some will say the content is free so the "consumer" has no say in quality or standards. Maybe so. I like sponsorship clearly identified, and prefer comparison between brands when equipment and services are discussed.
Fstoppers is one of my favorite websites. If a paid subscription helps the site grow and flourish with more content and less marketing I support the idea.
Some of you are so caught up in the gear he has that you don't that you're crying over spilled milk. You can get a couple of Alien Bee 400s and similar lighting modifiers for less than $750.
Authors just can't win, eh! If they don't list their gear, the comments light up with "What did you use for that?" questions. If they do list their gear, comments light up like in this article.
High end gear isn't and has never been necessary to get great photos. High end gear is good for other reasons: it's often more durable, it often sets up easier, it's often more consistent right from first firing to the last shot, it often has more features that allow new creative freedom, like strobes with HSS. But, you basically NEVER need it to get a shot.
As for whether or not to detail gear like this, I like it. Not only does it serve to help me decide if I'd ever buy lights like this if I were looking, it also serves to show me how well my existing gear does in comparison to the highest-end stuff.
I'm assuming Lance is sponsored by Broncolor since half the video was taken up by their softbox and that's all his articles talk about. I'm all for FStoppers making money and working with companies, but would like to see "Sponsored by Broncolor" somewhere. So, I don't feel like they think I am an idiot and don't realize this is a sponsor pitch.