

Every photographer has a collection of images that almost worked. The composition was there, the moment was right, but something about the light fell flat, or the exposure didn't quite capture what your eyes saw in person. We also tend to accumulate old family photographs in shoeboxes and drawers, images yellowed by time and marked by creases from decades of handling. These are the kinds of problems that used to require either significant manual work in Photoshop or simply acceptance that some photos couldn't be saved. Skylum's recent updates to Luminar Neo take direct aim at both challenges, and I've spent the past few weeks putting their newest tools through their paces with my own work.
The Fall 2025 update introduced Light Depth and Restoration, two features that address lighting limitations and photo degradation respectively. More recently, Skylum added an AI Assistant that provides real-time editing guidance. Perhaps most significantly for photographers who work across devices, Luminar Neo has evolved into what Skylum calls an ecosystem, allowing you to start edits on your phone and seamlessly continue them on your desktop. I wanted to see how these tools performed in practice, not with cherry-picked demo images, but with the kinds of photographs that actually sit in my catalog waiting for attention.
Light Depth: Fixing What the Sun Got Wrong
The original Relight AI tool in Luminar Neo was useful but limited. You could adjust lighting from front to back, which helped with backlit subjects or flat midday light, but the control stopped there. Light Depth is a complete replacement that takes a fundamentally different approach. Instead of simple front-to-back adjustments, the tool builds a depth map of your image and lets you manipulate light as if it exists in three-dimensional space. You can target specific depth ranges independently, adjusting the light falling on your subject without affecting the foreground or background, and you can tweak temperature and brightness separately for near and far elements in the frame.
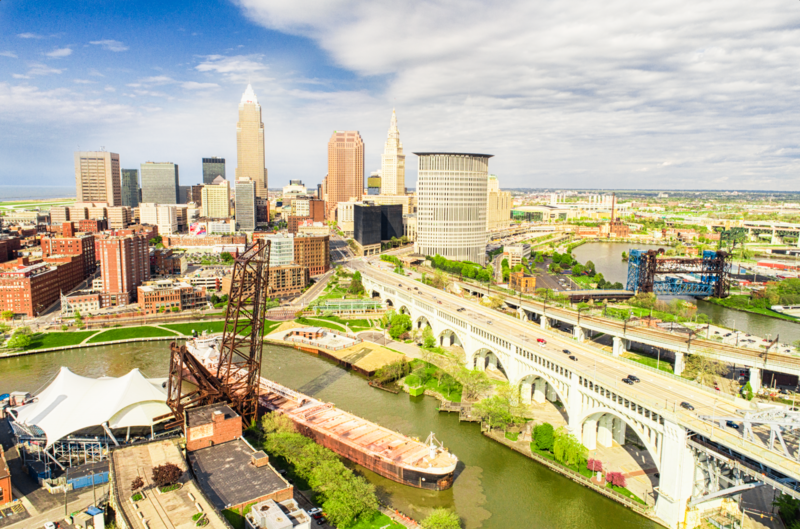
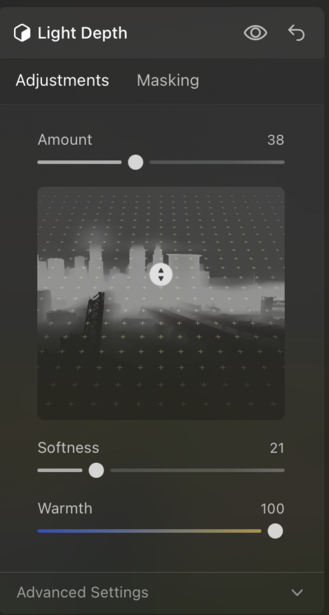
I tested this on a cityscape photograph of the Cleveland skyline taken from above the Cuyahoga River. The original shot was fine, but the skyline didn't pop the way I wanted it to. Everything sat at roughly the same visual weight, and the buildings blended into the background rather than commanding attention. With Light Depth, I was able to bring more emphasis to the skyline by darkening the near and far elements while adding warmth to the mid-ground where the buildings sat. The interface shows a depth map of your image and lets you adjust brightness and warmth independently for near and far zones. I pulled Brightness Near down to -60 and Brightness Far all the way to -100, then pushed Warmth to 100. The result gave the skyline a golden hour quality and made the buildings the clear focal point of the image, even though the original lighting conditions hadn't been particularly dramatic.

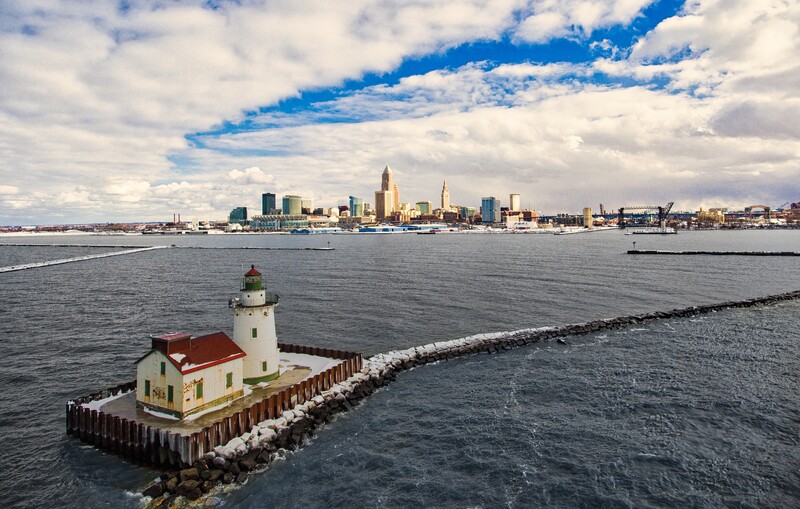
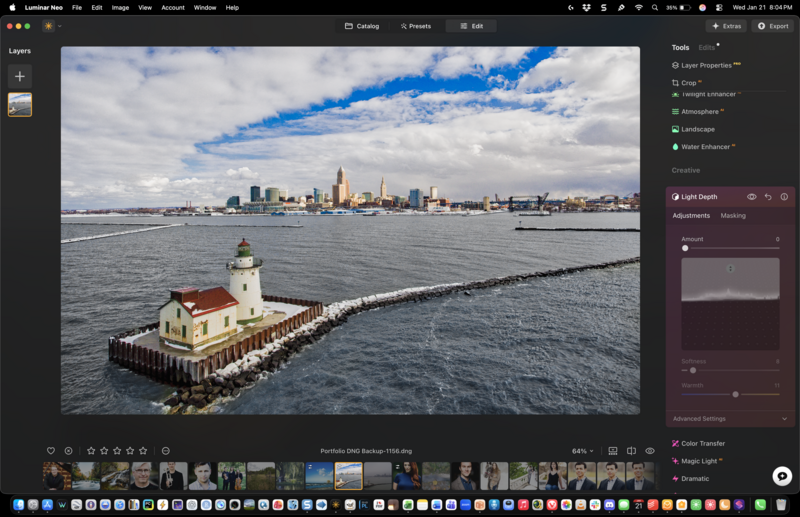
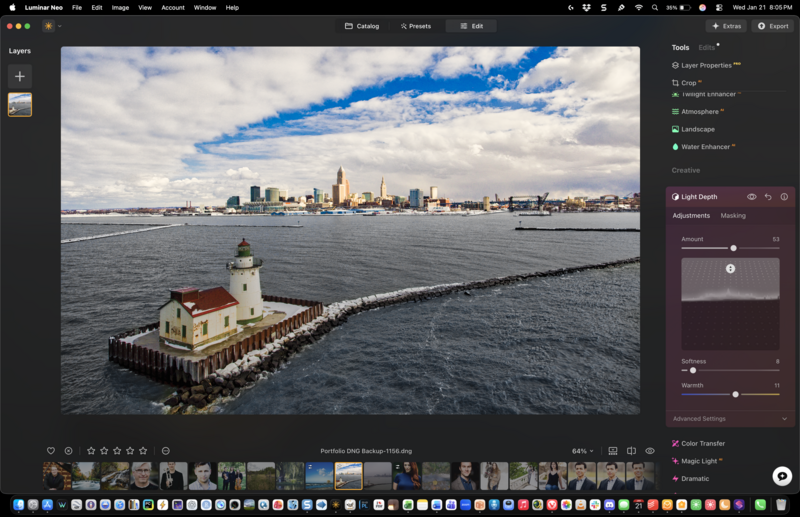
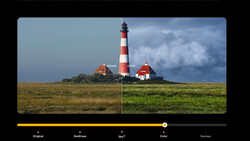
I also used Light Depth on a winter shot of the Cleveland Harbor West Pierhead Lighthouse with the city skyline in the background. This image had strong foreground interest with the lighthouse and breakwater, but I wanted to draw the viewer's eye through the frame toward the skyline. Using Light Depth with the Amount at 53, Softness at 8, and a touch of Warmth at 11, I was able to create a visual flow from the lighthouse in the foreground to the buildings in the distance. The tool understood the depth layers in the scene and let me adjust them independently, something that would have been tedious to accomplish with traditional masking.
The interface presents depth-based sliders that feel intuitive once you understand what they're doing. You're essentially deciding how much light should fall on elements at different distances from the camera, and the AI handles the complex masking that would otherwise require careful manual selection. There are limitations worth noting. The current version doesn't support diagonal or angled lighting adjustments, so you can't simulate a light source coming from the upper left corner of the frame, for example. Skylum may add this capability in future updates, but for now the tool works along the depth axis. That said, the problems it does solve, it solves remarkably well. Images that previously required either elaborate luminosity masking or resigned acceptance now take minutes to correct.
Restoration: A Second Chance for Older Photos
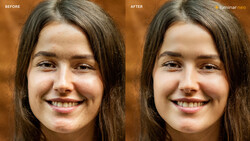
Of all the features in this update, Restoration is the one that surprised me most. The premise is straightforward: feed the AI an old, damaged, or deteriorated photograph and let it repair the visible signs of age. Cracks, stains, discoloration, fading, scratches, and water damage are all fair game. What surprised me was how well it actually works, and how much emotion it unlocked when I started digging through boxes of old family prints that I had essentially written off as beyond saving.
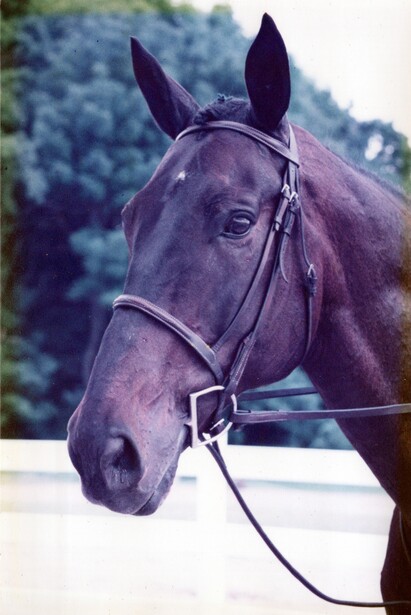
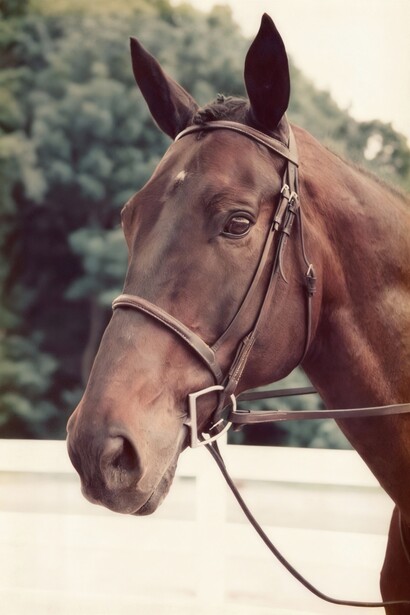
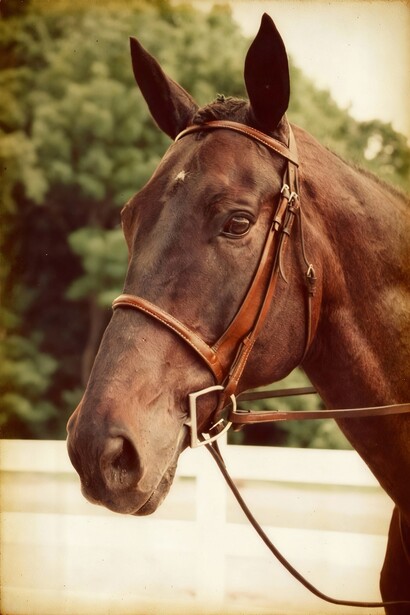
I started with a scanned photograph of my horse, Kramer, who passed away a few years ago. The original print had suffered significant sun damage over the years, leaving it with a heavy blue and magenta color shift that made it almost unrecognizable. The image was washed out, the contrast was gone, and what should have been a rich bay coat looked purple and dull. I scanned the print, imported it into Luminar Neo, and applied the Restoration tool. Within about thirty seconds, the AI analyzed the damage and produced a corrected version with natural color tones restored. The bay coat looked like I remembered it, the green trees in the background were actually green again, and the white fence rail no longer had that sickly purple cast. One thing I appreciated was being able to run the restoration multiple times to get different interpretations. Each pass produced slightly different results, giving me options to choose from rather than forcing me to accept a single automated output.
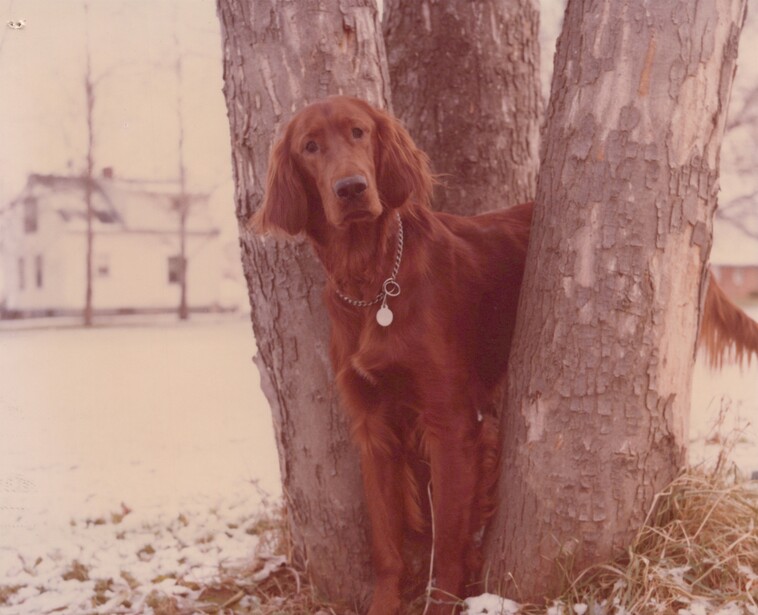
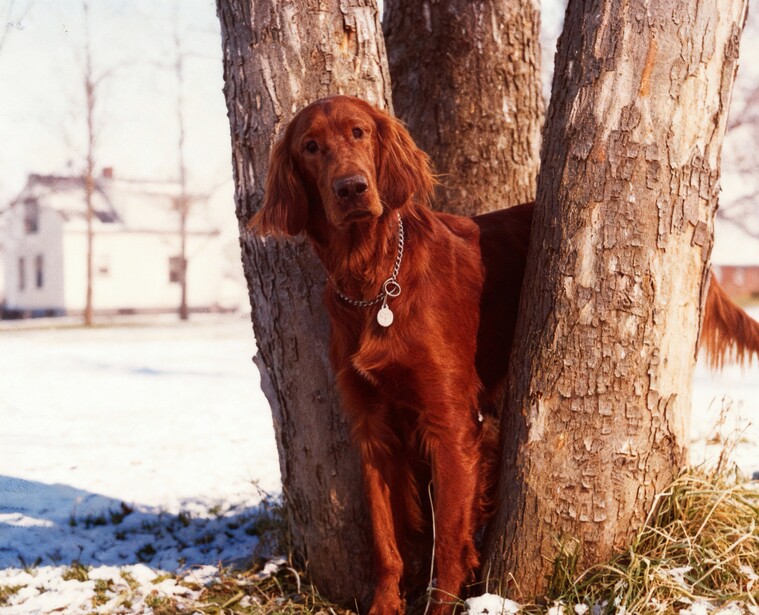
I tried another old family photo, this one of my mom's Irish Setter standing between two tree trunks in the snow. The original scan had faded to a pinkish sepia cast, with the whites blown out and the contrast flattened to the point where the dog's beautiful red coat looked muddy and dull. After running the Restoration tool, the difference was striking. The coat regained its rich, vibrant red, the snow looked properly white with natural blue shadows, and the background details that had been lost in the haze came back into focus. Two very different types of color damage, two excellent recoveries.
The tool offers different modes depending on what you need. You can focus solely on physical damage repair, which fixes scratches and cracks while leaving the color profile alone. You can address colorization separately if you want to bring a black-and-white image into color. Or you can let the tool handle everything at once, which is what worked best for my sun-damaged photo. The color restoration felt intelligent rather than heavy-handed. It didn't simply invert the color shift or crank up the saturation uniformly, but instead seemed to understand what natural tones should look like, bringing them back without making the image look artificially enhanced.
For photographers interested in offering archival restoration as a service, this tool opens up commercial possibilities that previously required specialized skills and considerable time investment. For the rest of us, it offers something arguably more valuable: the ability to rescue images that connect us to people and moments that might otherwise fade from memory along with the physical prints. I spent an entire afternoon scanning and restoring old family photographs after testing this feature, which tells you something about how compelling the results can be.
AI Assistant: Guidance When You're Stuck
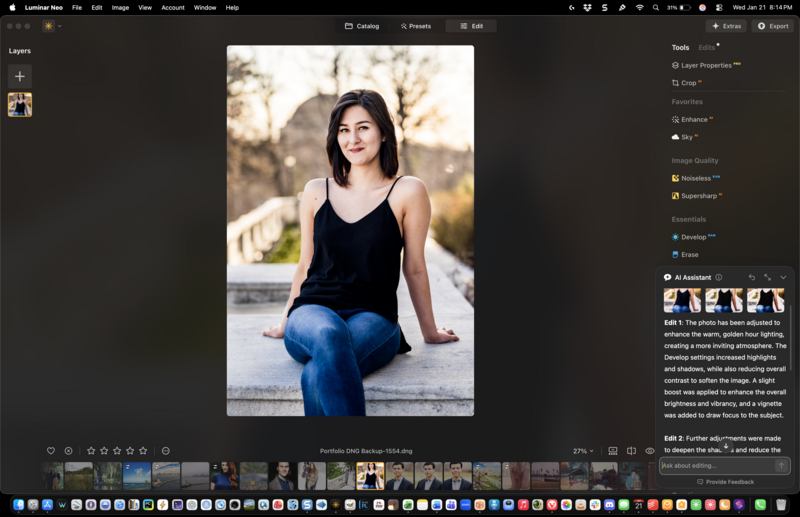
The AI Assistant takes a different approach than the other tools. Rather than performing a specific technical function, it analyzes your image in real time and offers suggestions about what you might want to adjust and how. Think of it as having an experienced editor looking over your shoulder, pointing out that the highlights might be a bit hot or suggesting that the composition could benefit from a tighter crop. You can ask it specific questions about how to achieve a particular look, and it will walk you through the relevant tools and settings.
I approached this feature with some skepticism. AI-generated suggestions can often feel generic or miss the creative intent behind an image. In practice, the Assistant proved more useful than I expected. I tested it on a couple of portraits, simply asking it to give me a warm, subtle edit. Rather than just suggesting adjustments, the Assistant went ahead and applied them directly. On one portrait, it made changes to the Details panel with some light sharpening and large detail enhancement, along with adjustments to Enhance, Structure, and Develop modules. On another, it worked through the Toning panel to add warmth to the highlights, applied some Glow, and made tweaks to Color Harmony and Structure. The results matched what I had asked for: warm without being overdone, subtle without being invisible. What impressed me was how the Assistant seemed to understand the difference between a portrait and other types of images, choosing tools appropriate to the subject matter rather than applying a one-size-fits-all approach.


The tool shines brightest in two scenarios. First, when you're working through large batches of images and want to maintain consistency without individually analyzing each frame. The Assistant can help you establish a baseline and flag shots that deviate from the treatment you've applied to others. Second, when you're learning and want to understand not just what adjustments to make but why they work. The explanations it provides serve an educational function, helping you internalize principles that you can apply independently in future editing sessions. It currently doesn't support generative tools or some of the more advanced merging functions, and it won't automatically apply adjustments from the Edit tab, preferring instead to guide you through making them yourself. This feels like a deliberate design choice that keeps you in control of the creative process rather than handing everything over to automation.
The Ecosystem: Editing Without Boundaries
Skylum has been building toward a unified platform for some time, and the ecosystem feature represents the realization of that vision. The basic idea is simple: your devices connect to form a single editing environment, so work started on one device continues seamlessly on another. In practical terms, this means you can begin culling and making initial adjustments on your phone while you're still in the field, then sit down at your desktop later and pick up exactly where you left off. Your edits, adjustments, and organizational decisions transfer automatically.

For photographers who travel frequently or who want to make productive use of downtime away from their main workstation, this is a significant quality-of-life improvement. I tested it by starting basic color and exposure adjustments on my phone during a flight, then opening the same images on my desktop after landing. Everything synced correctly, and I was able to continue refining the edits without any manual file transfers or concerns about version conflicts. The system currently syncs from mobile to desktop but not yet in the reverse direction, so you can't start on your computer and continue on your phone. Skylum will presumably add bidirectional sync in a future update, but even in its current form, the workflow matches how most photographers actually operate: quick initial work on mobile, detailed finishing on desktop.
The update also introduces Luminar Spaces, which provides a way to create and share web galleries directly from within the application. It's a nice addition for photographers who want to share curated collections with clients or collaborators without maintaining a separate portfolio website, though it's more of a convenience feature than a transformative one.
Putting It All Together
After several weeks of testing, my overall impression is that Skylum has focused on solving real problems rather than adding features for their own sake. Light Depth addresses a genuine pain point that every photographer encounters, giving us meaningful control over lighting that we couldn't capture correctly in the field. Restoration opens up possibilities for preserving images that might otherwise be lost to time. The AI Assistant provides genuinely useful guidance without trying to replace human judgment. And the ecosystem removes friction from multi-device workflows in a way that feels natural rather than gimmicky.
None of these tools are magic. Light Depth can't fix fundamentally broken compositions, Restoration occasionally struggles with extremely severe damage, and the AI Assistant sometimes makes suggestions that don't align with your creative vision. But each tool does what it promises, does it well, and does it quickly enough to integrate into a working photographer's actual process. That's a higher bar than it might seem. Too many software features look impressive in demos but prove impractical when you're trying to work through a real assignment on deadline. These tools pass that test.
If you want to try Luminar Neo's new features yourself, Fstoppers readers can use code FSTOPPERS10 for 10% off. Learn more and get started with Luminar Neo here.


Join the Fstoppers community for free
-
Post comments and join in the discussions
-
Browse the site ad-free
-
Share your work and get featured in the community
-
Compete in the photo contests for fun and prizes
No comments yet