
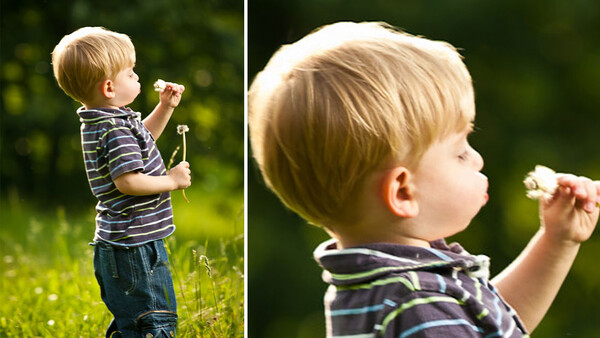
It's a very mixed feeling: you are happy they like the shot, but you are also disappointed that it's not sharp. I'm going to share my way of dealing with the situation, but I am also curious about your way of handling the problem.
Self-Assessment
My first reaction is to see the reason why it wasn't sharp, so that next time, I won't make the same mistake. There are four main cases when that happens.
You've Missed the Focus
That's the most obvious case. It happens when your depth of field is so shallow that any slight deviation from the best sharp-focus position results in a blurry image. It may be you or the client who moved. Sometimes, it's the autofocus that failed. A shallow depth of field is not only when you shoot at f/1.2, but also if you use a long lens (like a 135mm or a 200mm) even at f/4.0 or f/5.6. The longer the focal length, the shallower the depth of field is and the easier is to get an out-of-focus image.
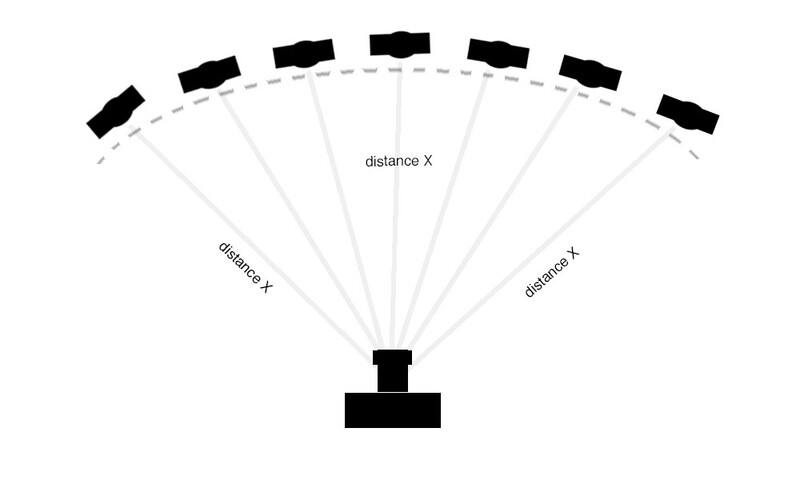
When photographing more than one subject, it's even trickier, because they have to be all within the depth of field for your current settings. If you can arrange them so their faces (if you're photographing people) are on the same plane, it will be almost as safe as if you're photographing one person. Beware of too shallow depth of field, because the distance from the sensor to the person in the middle is shorter than the distance from the camera's sensor to the persons at the ends of the group, and they may become blurry despite the fact they are all on the same plane. If the advice has to be technically strict, you have to arrange the subjects in a curve so everybody is at the same distance from the sensor. If there are subjects one behind another, your depth of field should be broader either by using a shorter focal length or a greater aperture value.
Autofocus Has Missed
Depending on the lighting conditions and the movement of the camera or the subjects, the autofocus may not work flawlessly. One of the cases in which my autofocus fails is when I have a strong light facing me that the autofocus struggles to find high-contrast areas. I deal with that by temporarily blocking the light with one hand while I half-press the shutter with the other to get the focus locked.
Your Lens Is Not Sharp at That Aperture
Even the most expensive lenses are not perfect and have flaws. In general, the cheaper the lens, the more the imperfections there are. The good news is that all lenses have apertures and focal distances where they show their best performance. Usually, the sharpest images are obtained when shooting at aperture values that are in the middle of the aperture range. Some lenses are sharp at all apertures. If your lens can be adjusted from f/2.8 to f/22, setting it from f/4 to f/16 or so will give you very crisp results. There are exceptions, of course.
Your Shutter Speed Is Too Low
This is when the image doesn't look sharp but in a different way. There is a ghost-like effect. That's when your shutter speed was too low for your current focal length. The general rule of a thumb is that your shutter speed (as a reciprocal) should be greater than your focal length. For example, a focal length of 70 mm will require a shutter speed of at least 1/70 of a second. If your hands are not steady, make sure the shutter speed is above twice the focal length or, in this case, above 1/140 of a second.
Saving the Image in the Edit
Back to the greatest blurry image from the photoshoot. I will try to save it somehow using known and not so known methods for sharpening.
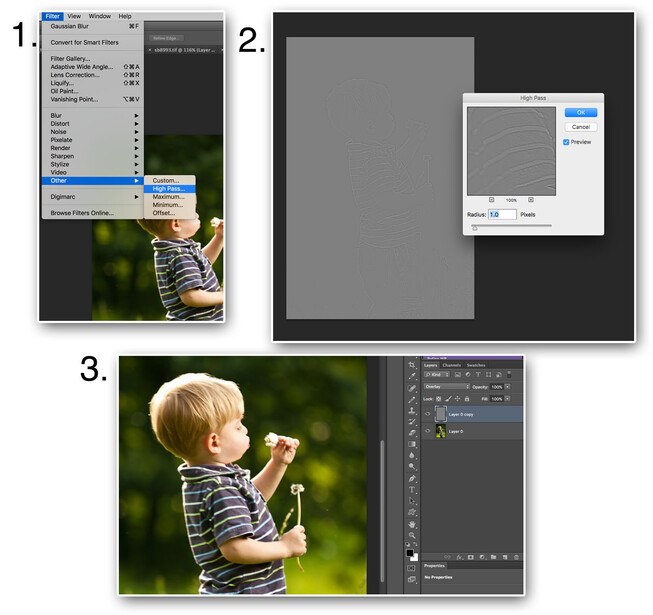
High Pass
The technique consists of applying a High Pass filter over a copy of the image layer. Then, the blending mode of the layer copy is set to Overlay. I may repeat the procedure depending on the level of sharpness I would like it to have. After applying that technique, the image may become grainy. You can smooth it by applying noise reduction over certain areas, like parts of the skin when it's a portrait of a person.
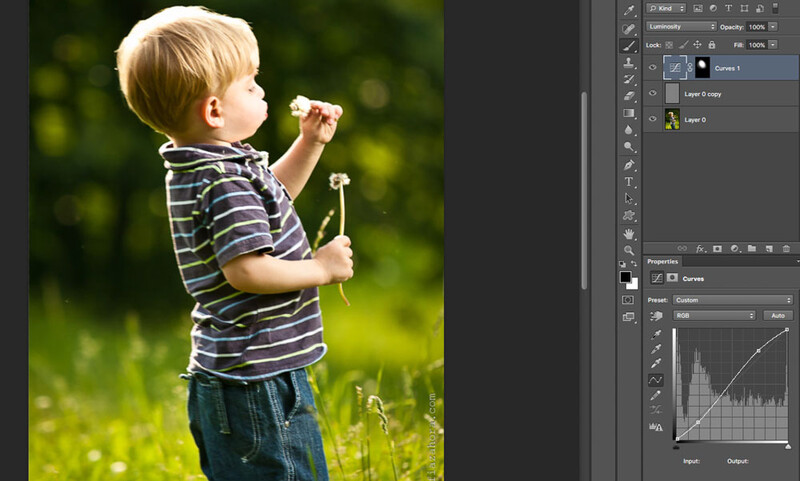
Use Contrast to Fake Sharpness
Together with the High Pass, I may add a Curves layer with an S-curve and apply contrast over areas that I want to look sharper. Technically speaking, this won't sharpen the image, but to the eyes, it feels like it's more in focus. Apply a Luminosity blending mode to prevent it from altering the colors too much.
Using Another Image
Another option I have used is to get the face or part of the face (or part of the subject I want to be in focus) from another photograph and replace it over the blurry one, carefully blending it. I may ever blur it just a little to prevent it from looking like a patch.
Fixing a Low-Shutter Speed Shot
There may be more hope fixing a low shutter speed than dealing with an out-of-focus shot. Not always, but sometimes, the ghosting effect can be fixed by patiently working with the Clone Stamp tool to remove that effect from the edges.

Blurring the Background
Tricking the eyes into thinking that something is sharper than the background is the core of this technique. If the background is more blurred than the foreground, this may feel that it's a sharper image. It requires blurring the background and then manually masking out the foreground.
Drawing
If you have the skills, you may grab a (digital) brush and a few colors and paint over the areas you want to be sharper or hire an artist who is capable of doing that if it's a really important photograph.
Low-Resolution Image as a Saver
If your agreement with the client is for delivering low-resolution images, this can serve as a relief, because the smaller the image, the less noticeable the lack of sharpness is.
The Unfortunate Case
As a last resort, I would ask the client if they would like to choose a different shot, because this one is technically imperfect. Even if they insist on having the photo, I may not charge them unless I can (somehow) save it in post. I feel guilty of charging someone for a defective product. The worst case is when you have a faraway background in focus while your subjects are very blurry. I will not even try to save such an image.
Conclusion
To have fewer cases, you need to know your gear, know how it acts in different lighting conditions and environments, and shoot at least two images per arrangement or pose, because one of them may have better focus. The last advice is especially applicable if you shoot handheld. Fixing photographs in post is not the best way, but sometimes, it's good to know a trick or two. Please share your experience with saving blurry photographs in the comments below.


Join the Fstoppers community for free
-
Post comments and join in the discussions
-
Browse the site ad-free
-
Share your work and get featured in the community
-
Compete in the photo contests for fun and prizes
54 Comments
Shooting tethered is a very good reason to shoot a little and shoot very focused (both mentally and technically). This way almost every shot will be a technical keeper.
I don't know what "shoot a little and shoot very focused" means.
When I shoot people, every shot is not a keeper, but usually they are almost a keeper and I know what I am working towards. So by showing all exposures there is a chance that the client will pick the "wrong shot" not the "best shot".
If technical keeper means in focus and sharp, that is usually true. Hell that's the easiest part of photography. :)
if they like the shot despite it not being critically sharp then what's the problem? If the usage requires that the image be critically sharp then i guess you just have to find another image. Also, when is any lens not sharp enough at any aperture? I know some really crappy/defective/old lenses may be a little soft wide open and all lenses definitely have an optimal aperture range where they are at their sharpest but 99% of glass that is commonly in use is at least usably sharp throughout the aperture range. Obviously there might be some exceptions for very technical images where things need to be super duper sharp but for most types of photography. I've never seen an image at f1.8 or f22 and thought it was so soft as to be unusable. If that's the case I'd say you probably just missed the focus or your lens is broken.
Personally I don't think sharpness equates to a good photo, and a lack thereof doesn't equate to a defective product either. The goal of someone who photographs people's kids should be to produce an image that the parents love and feel a great emotional connection through the photograph. Especially considering that it's their favorite shot, it doesn't make sense to me that the photographer would learn this information and respond by telling their client that their favorite photo is "defective". You're shooting yourself in the foot by reducing the value of your skill and your product. Just my thoughts though.