
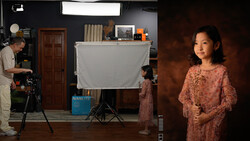
Whether you’re using Adobe Lightroom, Capture One, or any other raw-processing software, odds are, the default settings aren’t right for you. By taking just a few minutes to consider what you typically shoot, you can save yourself hours in processing and create better-looking images.
This article isn’t going to look at presets, which can generally refer to those groups of settings that create significant changes to the look of a photo or even a one-click edit. Instead, I want to take a look at the settings you should consider changing to provide a more customized baseline for beginning your editing process.
Customizing your default settings provides a number of benefits: saving time by not making repetitive edits, creating a more consistent starting point in edits, and developing your understanding of what you’re actually doing to your images in post. Also, if you’re like me, you can fall into an editing rut, so taking some time to look through all the options your software offers may help you discover a new feature or two.
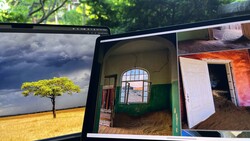
While the examples given will be drawn from Lightroom, the features and their impacts on images should apply to every major program. You may need to apply these defaults in a different manner or consider their exact implementation and effects on your particular software, but the concepts still hold value. Above all, each of these settings will be of varying importance based on what you shoot. The defaults for an action photographer are going to look very different to that of an astrophotgrapher, for example.
Profiles, Defaults, Presets?
Editing software provides a number of different options for saved settings: recipes, profiles, presets, defaults, or actions. While all of these have their use, I want to look specifically at what Lightroom calls the “default develop settings,” the settings applied via the develop panel to every image you import from that camera.
Importantly, Lightroom allows for different defaults on a per-camera model basis. If you want to create multiple, very customized baseline settings for the same camera, you may instead want to apply those via presets (which is possible at import). Also, remember that these settings are applied without respect to ISO, so when setting things like sharpening and NR, aim for a happy medium that will work across the ISO range.
In other raw processors, this functionality to change default settings may not be present. Instead, consider creating a custom preset or “user style” that you can apply to all of your images. I’d recommend using a naming convention that highlights the camera model and ISO it’s intended for to make it easy to match up when applying it.
From the Bottom Up
Lightroom’s Develop panel, right near the top, features a small menu option that has a big effect on the look of your image. The profile button, which may read Adobe Color, Adobe Standard, Camera Standard, or similar, actually impacts almost every aspect of your image. Raw profiles have existed in Lightroom for years, but only recently were they brought to the forefront of the editing process. Importantly, these profiles do not “move” the sliders in the rest of the develop panels.
For my editing workflow, I like to start with as neutral and flat of an image as possible, preferring to build up an image rather than try to jump ahead with an aggressive default look. As a result, I’ve changed from the more contrasty Adobe Color to Camera Flat. Along with profiles, the rest of my defaults are based around this approach.
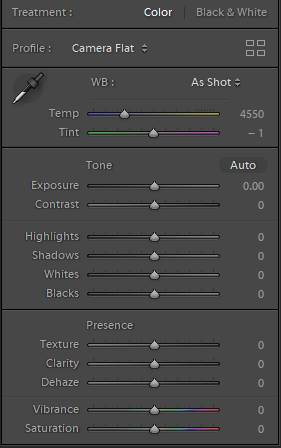
If you’re used to the punchier look of Adobe Color or another contrasty and saturated default, this change may take the most getting used to. However, I find that it is worth it. There are a huge number of tools to add back that contrast and saturation, but with greater control. HSL, the tone curve, texture, clarity, and dehaze all let you apply these adjustments in a more measured and purposeful way.
Details
Once I’ve established that clean starting image, I like to keep it that way. While you can add a touch of highlight reduction or vibrance to these defaults, I don’t. Remember, these settings get applied to every image. Instead, consider some of the settings beyond the basic light and color adjustments.
One of the first things to adjust is the detail, sharpening, or noise reduction settings (depending on what your program refers to them as). Raw files need some amount of sharpening and noise reduction performed to every shot, but these defaults often aren’t well tailored to your camera.
For example, on my D810, Lightroom defaults to an unnecessarily high amount of color noise reduction, zero luminance noise reduction (even at high ISOs), and non-specific sharpening settings. Each one of these values can be better configured.
On my D810, I prefer to have the noise reduction set very low, adjusting it on a per-image basis. Since I frequently shoot at or below ISO 800 on this camera, I very rarely have to dial this setting in. Instead, I get more resolution with my more conservative NR settings. By contrast, my typical camera settings give me more headroom for aggressive sharpening. Also, Adobe’s preset doesn’t take advantage of the masking feature, which my preset adds.
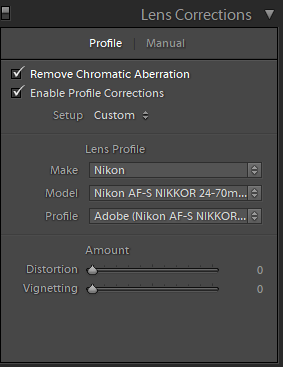
Furthermore, there are a few settings changes that I know I’ll make to almost every image. By having these on by default, I’m saving myself time toggling them on for 95 images, and instead only have to toggle them for 5. For me, these are Remove Chromatic Aberrations and Enable Profile Corrections, with the amount of correction set to 0. While not every shot needs the vignetting or distortion correction, it simply saves a click to be able to instantly adjust the slider (not sure why this isn’t on by default, frankly).
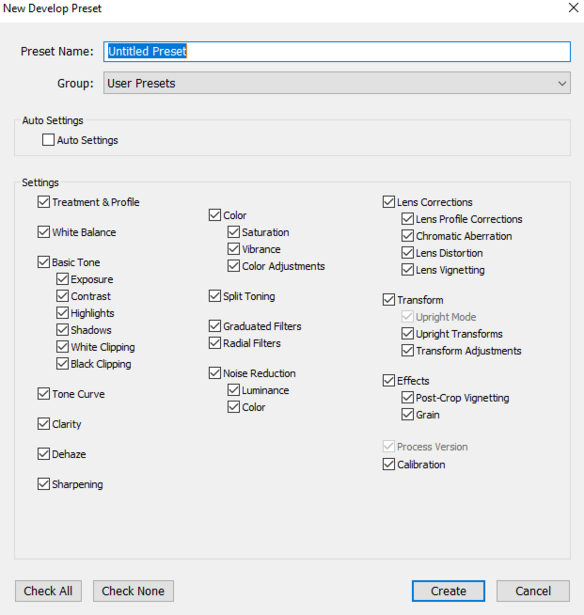
To determine what your defaults should be, get together a few images. I’d recommend a couple high-ISO images and a couple low-ISO images, covering a few different subjects. By creating a Develop preset with your intended new defaults, you can easily test your changes across a range of images without impacting your existing default.
Making the Switch
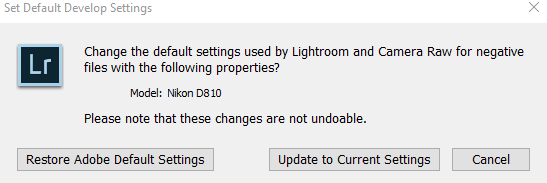
When you’ve created a group of settings that you’re happy with, Lightroom makes it easy to set it as your new default. Just reset an image from that camera, then apply all the relevant settings that you want as a default to an image. Next, hold ALT or Option on your keyboard, and click reset. This popup lets you update the defaults to your current settings, as well as restore Adobe’s defaults if you don’t like the changes you’ve made.
If you’re using another processor, check if there is a way to alter their default settings or just make use of the preset feature that should be present by creating your own “defaults.”
While the software companies that make raw processors put a lot of effort into their program’s look, they don’t know what you shoot or what camera you use. Since you know the look you prefer and the settings you always reach for, why not tailor those defaults to you? Spending just a few minutes creating these presets can save a lot of time over the long run.
Have you tweaked the default processing settings in your software of choice? What changes did you make?


Join the Fstoppers community for free
-
Post comments and join in the discussions
-
Browse the site ad-free
-
Share your work and get featured in the community
-
Compete in the photo contests for fun and prizes
23 Comments
Good tips, thanks!
Glad you liked it!
First of all, I am not missing anything... maybe the lack of respect of writers towards there readers.
Add "might"... changes the tone.
Also, if you make an open statement with a Lightroom, Capture One at start... you should wright about CO also. In CO you can actually save a preset depending on camera that you import files from. And lets you choose recipes, presets and lots of stuff at the moment of import.
"but only recently were they brought to the forefront of the editing process."
What I found amusing about lightroom... is it feels like Adobe just put camera raw with all its features on top of a browser and was done with it. As if they never actually thought about usability of it all. In this Capture One looks like more polished program imho. Later Lightroom became better... but still so much room to grow.
If you really rely on presets and fast work-flow I found combination of Camera Raw and Bridge (they crippled it in 19 ver though, but 18 still works fine) much faster and flexible solution. Have you tried them?
Capture One definitely has a more flexible interface than LR, something I've mentioned in past articles. As for whether or not the heavy ACR emphasis is a good or bad thing is up for debate - it can offer value because of the consistency between LR and PS IMO.
While this article covers LR specific terms, the same advice applies to almost every raw processor. Unfortunately there isn't enough space to provide app-specific terminology, but I'm sure the majority of readers can "translate" these concepts into their program of choice.
As for Bridge, I've used it in the past, but didn't find a huge benefit to my workflow over LR and PS. I'm not heavy into preset use, beyond configuring a preset for a starting point, like mentioned in the article.
*write
*write
Great write up, I was thinking of writing this up just yesterday. So many people don't use this and should.
It's worth setting up. I found myself changing a number of the defaults in pretty much every image I opened, so I realized i should just set those as the new defaults!
This is great information. I never thought about this Lightroom feature before.
It's one of a number of features that Lightroom has hidden behind a modifier key shortcut - happy I could share it with you!
Where and how can I find the camera flat in the profile browse?
The profiles available (beyond Adobe Standard, Color, etc) may depend on which camera you're using. For Nikon, it imitates those Picture Controls that are available. If you have another brand of camera, check for a Camera Neutral or similar named profile. Otherwise, you can just mouse over the different profiles and select the one closest to a flat and neutral profile.
Other commenters have mentioned that RNI makes some great profiles, but I haven't tried them myself.
Thank you. I use Fuji GFX50r and I did not see “ camera flat” anywhere in LR. I will look for “ pro neg std”.
Sounds good. From what I remember of my time with Fuji cameras, that may be more significant of a color and contrast adjustment than Camera Flat.
Also, as was just pointed out to me, Adobe has an "Adobe Neutral" available under the Adobe Raw group in the profile browser, which should work very well. You might want to try that too.
Thank you very much. Another thing I want to look for your comment is the sharpening. You seem to do sharpening the file very early stage of PP but in the past there was recommendation to do it last. Any advice?
For Lightroom, you don't really have a choice of when the actual sharpening is performed. Applying sharpening as part of this default preset won't leave your image looking any different compared to moving those sliders after all the other processing steps - just to clarify. The best way to think about this is a cooking metaphor - add some salt to the recipe in the beginning, but don't finish salting the dish until all the ingredients are added.
I prefer to have that small amount of sharpening and NR applied from the beginning so that I can accurately gauge things like contrast and spot adjustments. This is one area that isn't perfect with the current way of setting defaults - the same value is applied for an ISO 100 image from a D800 as a ISO 6400 image. As a result, I select a low value for both sharpening and NR that works across most of the range.
Depending on subject, ISO, and the medium I'm outputting to (IG, small print, large print, etc), I'll either tweak these default values or perform additional sharpening/NR, especially if the image is important.
What you said makes good sense and thank you for such prompt reply. Much appreciated.
This is probably the most informative and useful information you're likely to find on this site.
Thanks for the compliment, Marc!
Fascinating article, lots of things I barely know about, and really haven't done much about.
I now have several programs to do this processing, Lightroom (which I use the most), Photoshop (that I haven't used for years, and just got it again) Capture One (because I've got a Fuji X100f), and the newest one, PhotoLab 3, which perhaps is the best of all from what I've read. Too many variables, and too many cameras.
Is there any "beginning" article for someone who is not aware of all these settings, let alone what they do, to help them learn what settings might be best for them?
Since I shoot all kinds of different photos, I used to just leave the default settings alone, thinking I could adjust them later. From what you wrote, I understand that will work, but I might be able to make a better choice.
I like Photo Mechanic to bring my photos into my computer (now a Mac, before a PC), and allow me to dispose of the "junk". PhotoLab 3 support people feel it's best to bring photos "into" the computer, before working on them. At some point I feel they should be transferred into Lightroom, which will store them and keep track of them.
I've only recently decided to record in RAW, and skip JPG until later. I think I understand the basics of what you're suggesting, but as I'm writing this, I don't know where to start.
Things were just as complicated, but different, when I developed the film and then made prints. I thought digital would simplify my life, but now it's getting more and more complicated as time goes on.
I've got four cameras I actively use, my Nikon D750, my Fuji X100f, my Canon G7X Pro Mk II, and I better include my iPhone 11 Pro. I also have, and intended to use a lot, my Leica M8.2 camera. Each camera has advantages, and disadvantages.
Thank you for your article - it's a good starting point for me.
I'm in India right now - I might wait until I get home, to start trying out the different settings.
Thanks for the comment. Fstoppers has a great tutorial covering the basics of Lightroom: https://fstoppers.com/product/fstoppers-intro-lightroom-ultimate-crash-…
I'd recommend creating a Lightroom catalog with all your shots imported into it. Assuming you don't have 50,000+ files, this should remain plenty fast. It'll be the easiest way to take a look at all your files in one place.
From there, you can practice editing any file you want, since Lightroom doesn't "apply" those edits permanently. Test things out, reset the image, and try something else. Lightroom has a lot of depth, but the basic develop panel will get your images 90% of the way there. Feel free to contact me if you have any questions!
Thanks for the reply - I will start by going through the link you posted, as that may answer most of my questions, at least where Lightroom is involved. I already have a catalog of "all" my photos, but I now have such a catalog on my MacBook Pro, for when I'm traveling, and on my iMac (for when I'm home). I also have a huge number of photos from "before", which I copied from my old Windows desktop to another iMac. The computer was barely running at the time, and while I lost any work I did in editing, at least I got back all my photos. (They were also copied to an external drive, "just in case".
Once I do all this and figure it out in my mind, I'll either write you directly, or post as a question here, depending on whether it's a "general" question of something that just applies to me...
Sounds good. Unless you're traveling the majority of the time, look into having your iMac catalog be the "master", since Lightroom doesn't make 2 way syncing between catalogs super easy.
My workflow when traveling is to create a catalog for that trip on my MacBook, importing and working on it throughout the trip, then importing that catalog back into my desktop's catalog when I get home. The big thing to watch with this is not losing track of your actual raw images.