
Photo editing is a powerful tool that allows you to transform your images in many ways, from enhancing the atmosphere in a photo to increase of image quality. However, common editing mistakes can negatively impact the final result. In this article, we'll explore five of those.
Relying on Just One Exposure
While aiming to get as close to the final result as possible with a single exposure is a good idea, you should not limit yourself to it. If you're shooting landscape, seascape, and architecture images, it's beneficial to capture additional photos. Bracket your exposures for the highlights and shadows, and use focus stacking when your scene contains a large depth of field. At the coast, take several photos of the waves and combine them for a more dynamic result.
You might say there's no need for exposure bracketing with modern cameras. And for many scenes and use cases, you are right. But if you like to create large prints of your photos, you'll always get better results if you have additional exposures for shadows and highlights. The same is true for focus stacking. While you might get everything acceptably sharp using f/16 and hyperfocal distance, a focus stack at f/8 or f/9.5 will give you superior results.
And don't worry about the space on your memory card while you're in the field. Nowadays, you can purchase fast 128 GB SD cards for less than $25. Such a card can hold more than 2,000 images in raw format, even from modern high-megapixel cameras.
I usually take a lot more photos than I use for the final edit. I delete the redundant images after the post-processing is done, so they don't clutter my hard drives. Sometimes, a single exposure is enough, and that's fine. But more often than not, I need more sharpness in the foreground and cleaner details in the shadows. And it's good to have additional photos for that.
Too Much Pre-sharpening
For many years, I made the following mistake: I applied pre-sharpening in Lightroom. Why is that a mistake? Sharpening amplifies the high-frequency components of an image by adding contrast to its very fine details.
If you zoom in on contrast edges like the horizon after applying sharpening, you'll notice tiny sharpening lines. Those are often hard to see at the pre-sharpening stage. But if you continue to add contrast, adjust colors, and apply filters afterward, those changes will influence the sharpening artifacts, making them quite prominent. To avoid the tedious work of cleaning them up, move all sharpening to the end of your photo-editing workflow.
If you still end up with sharpening fringes at the end of your edit, you can try the following if you are using Photoshop: create an empty layer at the top of the layer stack and set its blend mode to "Darken." Select the "Clone Stamp Tool," set it to sample "All Layers," and use it to clone out the sharpening lines. It works great at the horizon, where you can sample from the nearby sky. Because of the "Darken" mode, the cloning will not affect the foreground, which is typically darker than the sky.
Not Removing Chromatic Aberration
While you shouldn't apply sharpening at the start of your post-processing, other adjustments are crucial in the beginning. Removal of chromatic aberration is one of them. Those colorful fringes that appear at high-contrast edges in the outer areas of a photo are easy to remove during raw conversion. Don't forget to do so because they can be a pain to deal with later.
There is a remedy, though, called frequency separation. I show how to apply it in the video below.
Adding Micro-contrast Too Early
Micro-contrast is a great tool to draw a viewer's attention. But don't add it too early. It might be tempting to use clarity and texture in tools like Lightroom. But if you do this, you rob yourself of the chance of a more controlled adjustment later on.
How much micro-contrast you want to add and where depends on your taste. But refrain from adding it too early. Then, you'll be much more flexible, and as with sharpening, you'll not alter it through other adjustments that come afterward.
Starting Too Dark
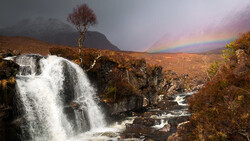
Dark and moody photos can be very appealing. Especially for photos taken on cold and rainy days, darker editing better represents the atmosphere. But what you should try to avoid is starting your edits too dark.
What do I mean by that? During raw conversion, aim for a photo brighter than the result you're after. If you use Photoshop for your final editing, the starting material should contain clean and detailed shadows. If necessary, use multiple exposures to achieve that.
If you start your edits in Photoshop too dark, you'll have much less room to play. The quality will deteriorate quicker, and it'll be hard to recover details you already sacrificed during pre-processing.
In a recent article, I show several techniques you can apply to your images to create a moody look.
Conclusion
This was just a small selection of easy-to-avoid mistakes. In an upcoming article, I'll share five more with you. Revisiting those regularly helps to hone your editing skills and prevent flaws in your photos. What also helps to avoid such errors is pixel-peeping at multiple stages of the editing process. Try to keep a balance between focusing on the overall look of an image and the details. Then, you'll be able to achieve high-quality results.


Join the Fstoppers community for free
-
Post comments and join in the discussions
-
Browse the site ad-free
-
Share your work and get featured in the community
-
Compete in the photo contests for fun and prizes
1 Comment
This another good example of how to draw readers in and read/watch the video. The title has no detail to what the mistakes are. A quick scroll through the article revealed the 5 mistakes, so I went back to the top and read the article. If they weren't there, I would've closed the article and moved on.