As you learned in my articles about editing mistakes, too strong image transformations can harm the quality of your photos. But if you use them selectively, they can be of great help. In this article, I show how to use selective image transformation in Photoshop to fix compositions.
I use a photo of the Nauyaca waterfall in Costa Rica as an example. I went there early in the morning, just after it opened, and spent more than one hour looking for compositions. Since this is a popular waterfall, the area directly beneath the lower cascade gets crowded quickly. My goal was to find a composition further down the stream that would allow me to hide the other tourists in the photo.
As the sun rose higher, I eventually found a beautiful section of the stream I could use as a foreground with the lower and upper waterfalls still included in the composition. Everything seemed to fall into place except for the upper part of the frame.
The area above the second waterfall showed a washed-out sky if I pointed my camera too far upward. That's why I framed the photo very narrowly at the upper end. Too narrow, as I realized when looking at the image on the screen of my laptop later.
As a rule of thumb: It's better to shoot wider and crop during post-processing than composing too narrow. I can't count the times I wished for more space around the edges of a photo, yet I still make the same mistake. Here, I was photographing at 22mm and could have easily included more of the landscape in the image.


The Problem with Lens Corrections
I still liked the photo and salvaged it with the help of selective image transformations. Before showing you this technique, I want to mention another important thing you can do if you framed your photo to narrow: deactivate the distortion correction under lens corrections. Especially when using a wide-angle lens, activating those in software like Lightroom will compensate for typical barrel distortions by warping the image. For the Canon RF 15-35 lens, this correction sheds quite a few pixels around the edges.
This correction is not necessary for a landscape photo without straight reference lines. If you can't afford to lose any pixels, deactivate it.
Selective Image Transformations
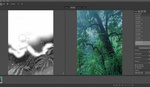
I used selective image transformations to create more space between the second waterfall and the upper edge of the image. You cannot apply those in Lightroom or other software that focuses on raw conversion. Use Photoshop or another software that allows you to select and transform specific parts of a photo.
I first duplicated the original layer and selected the narrow part above the upper waterfall. By pressing "Cmd/Ctrl + T" I activated the transformation tool and stretched this area upward and create more separation. Applying a stretch with a factor of 1.3 or 1.4 usually doesn't deteriorate the image quality too much. For nature images, it's usually not noticeable.
If you work on architecture photos, you must be much more conservative when applying such a stretch. Because of all the geometric shapes present, a viewer can often spot the changes.
In addition to stretching the upper part of the photo, another tweak I applied was to compress the lower area. Because I wanted to show the flow of water through the foreground, I positioned my camera high on the tripod. Had I gone too low, the rocks in the lower part of the image would have become too dominant.
Because I was looking down on the stream, it took up too much space in the composition. It also looked less dynamic than in a photo captured with the camera further down. I solved that problem by selecting and compressing the lower part of the image. It's not the same as getting down with the camera - the perspective is still different - but it makes diagonals more prominent and the composition more dynamic.
Once the selective image transformations are complete, it's important to merge the transformed layer with the original or to create a merged copy by pressing "Cmd/Ctrl + Alt + Shift + E". The reason for that is the way Photoshop interpolates pixels. If you were to put a white or transparent background behind a photo on which you performed selective transformations, you would sometimes see fine lines where you made the selection. Those have a width of less than a pixel and are hardly noticeable. But if you want to print such an image, it will become a problem.
Having the original as a backdrop hides those lines.


Selective Perspective Correction
Besides stretching and compressing parts of an image, you can also apply perspective corrections selectively. I used this technique in the photo of the Sekumpul waterfall in Bali. I had pointed my camera upward while capturing it. It created keystoning, which is noticeable in the upper half of the image, where the large waterfalls are tumbling down.
Perspective transformation can solve this. But if you apply it to the whole photo, you will also lose pixels in the foreground. For the example photo, I didn't want that. So instead of using Lightroom to correct the perspective, I brought the image into Photoshop, selected just the upper part of it, and removed the keystoning there. The foreground remained untouched.
To use this technique, make a selection of the area you want to transform, press "Cmd/Ctrl + T", right-click into the selection, and choose "Perspective". Then, drag the upper handles of the selection out or inward based on the nature of the correction you want to achieve. You can do the same for the lower part of an image. Then you would manipulate the lower handles of the selection. Instead of choosing "Perspective" to perform the transformation, you can drag individual corners of a selection by holding down "Cmd/Ctrl".
For all these transformations, the line connecting the selected and unselected part of the photo must remain fixed.
Conclusion
In the feature video, I show more ways of using selective transformations to tweak your compositions. It doesn't mean you should always rely on them. Try to get your composition correct in the field and ask yourself the three questions I shared in my article about how to make retouching easier. But, there will always be situations where you have to compromise while on location, and this is when the technique I showed in this article will come in handy.


I prefer getting it wrong in camera.