Removing distractions from a photo can be the difference between a polished image and one that looks amateur. Clean edges, believable textures, and consistent lighting make or break an edit. Photoshop’s new tools make that process easier, but knowing how to combine them is what takes your work from casual to professional.
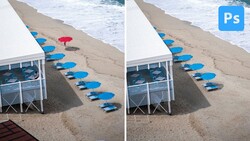
Coming to you from Jesús Ramirez with the Photoshop Training Channel, this thorough video walks you through removing anything from an image using Photoshop’s updated Remove Tool and Generative Fill. Ramirez starts by demonstrating how to use the Remove Tool on a new blank layer to keep edits non-destructive. He emphasizes enabling “Sample All Layers” so that Photoshop can read data from the original image while keeping your corrections separate. He also recommends turning off “Remove After Each Stroke” so you can refine your selection before committing to a change. You’ll see how the Remove Tool works in auto mode, allowing Photoshop to decide whether to use AI or local processing. The results are often instant, especially for simple distractions like traffic cones or random objects in the background.
Ramirez explains when Generative Fill becomes more useful. The Remove Tool can struggle with complex textures or fine details, like sunglasses or hair, where the AI needs more context. Using the selection brush, you can isolate the object, hit Generative Fill, and let Photoshop create realistic variations without typing any prompt. You can then cycle through the generated options and pick the one that looks most natural. This feature saves time compared to traditional cloning or patching, and it’s particularly useful when working with patterns or overlapping elements. Watching how each result is placed on a separate layer reinforces good workflow habits for advanced retouching.
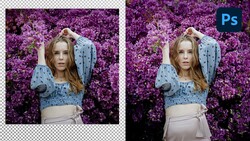
The second half of the video moves into professional territory with Ramirez’s “clean plate” method. This is the kind of technique you rarely see demonstrated clearly, and it’s the same approach used in commercial poster work. The process starts by removing the subject entirely to generate an empty background plate, giving you full control over the edges later. Ramirez uses Quick Mask mode, the Maximum filter, and precise brushwork to expand selections cleanly around flyaway hairs and tricky outlines. Once the clean plate is generated, he duplicates and merges layers, builds a layer mask, and paints the car out from behind the subject using the background plate to patch everything seamlessly. The method feels counterintuitive at first, but the results are strikingly clean.
Ramirez finishes by fine-tuning edges using the brush and Shift-click technique for straight strokes, cleaning up imperfections without visible seams. The workflow demonstrates why understanding Photoshop’s logic matters more than memorizing tools. You see how every setting builds on the next and how small technical decisions affect realism. Check out the video above for the full rundown from Ramirez.


Join the Fstoppers community for free
-
Post comments and join in the discussions
-
Browse the site ad-free
-
Share your work and get featured in the community
-
Compete in the photo contests for fun and prizes
No comments yet