Lightroom and Photoshop solve different problems, and knowing where each one shines saves time and gives you cleaner results. If you juggle hundreds of files from a shoot, the choice you make here changes how quickly you get to selects worth sharing or printing.
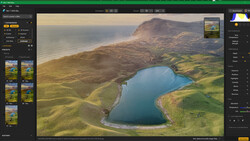
Coming to you from Aaron Nace with Phlearn, this practical video breaks down the Lightroom family and shows how it handles bulk work without getting in your way. You see Lightroom Classic used on desktop while Nace explains how Lightroom and Lightroom mobile lean on cloud-based storage. The demo moves through culling with flags and star ratings, quick compare views, and the grid and loupe tools that make side by sides painless. You watch him filter to only five star picks and then batch edit, which is the real power move when you want a consistent look across a set.
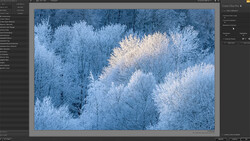
Lightroom is not only about picks and filters. You watch global edits hit a whole series at once using Sync Settings, from exposure and contrast to color grading tweaks that push cooler shadows or warmer midtones. There is a clean example of turning a mini set black and white and exporting new JPEGs to a dedicated folder with custom file names, so your originals stay untouched while your deliverables land exactly where you expect. Renaming to something human like “Mongolia 1” through “Mongolia 16” makes later searches painless. You also see how creating folders inside Lightroom mirrors your actual Finder structure, which keeps projects sane when deadlines pile up.
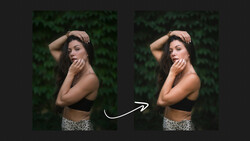
Photoshop enters when one file needs deeper work rather than fast consistency. Nace takes a single image from Lightroom into Photoshop 2025, selects the sky, and drops in a clouds layer behind the subject with a mask. A quick blend mode change to Screen and a Levels adjustment shape the composite so it sits naturally. Layers are the headline here, because once you need graphics, text, mockups, or multi-image layouts, you are outside Lightroom’s lane and into the territory where one file can carry dozens of elements. You could do high-end retouching here, add type, or set a poster layout that would be clumsy anywhere else.
The handoff between apps matters as much as the tools. You see the edited PSD saved back to the project, then pulled into the Lightroom catalog with Synchronize Folder so nothing lives in a mystery location. That keeps your contact sheets, exports, and layered masters together while you continue to sort and deliver. The video also shows how nondestructive Lightroom edits stay virtual until you export, which protects your raw captures and keeps you free to try bolder looks without fear. If you often fix white balance, lift shadows, or push a subtle grade across a day’s coverage, batch edits in Lightroom hit everything in one move, and then you reserve Photoshop for the hero frames that deserve extra polish. Check out the video above for the full rundown from Nace.


Join the Fstoppers community for free
-
Post comments and join in the discussions
-
Browse the site ad-free
-
Share your work and get featured in the community
-
Compete in the photo contests for fun and prizes
1 Comment
I spend a lot of time in LR developing my photos, but always found the file organization a bit maddening. These examples will definately help with organization.