
With modern HDR-blending algorithms making exposure blending so quick and easy, manual exposure blending may seem like an outdated skill for landscape photographers. However, automated software doesn't always produce the cleanest results. In this article, we'll discuss a foolproof workflow for manual exposure blending that will give you total control over your images and ensure results of the highest quality. The good news is that this workflow doesn't require any third-party panels or difficult luminosity masking!
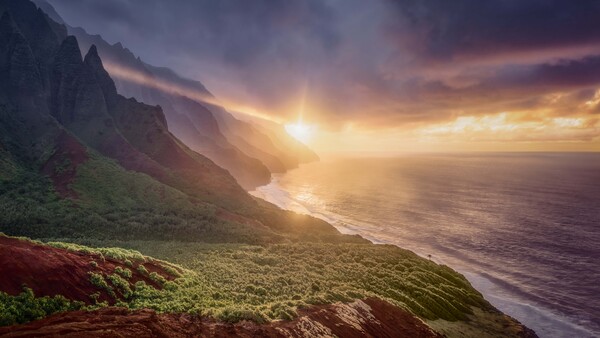
Below is a set of exposure-bracketed images, straight out of camera with no edits applied, that were captured as a single frame in a larger panorama. These images were all captured at base ISO to ensure maximum image quality.
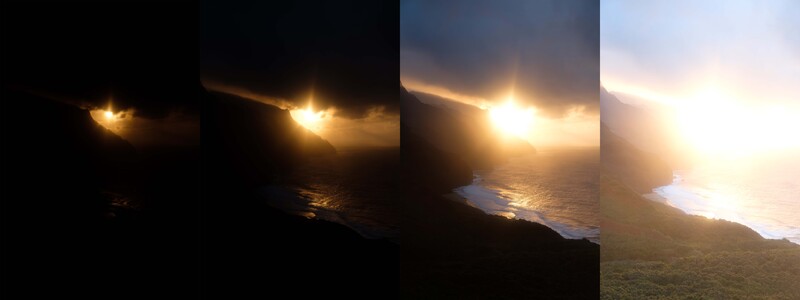
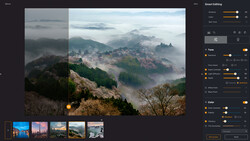
As you can see, the light in this scene was very difficult to capture, and even the best modern sensors would have required exposure bracketing to capture the full range of light without introducing noise into the shadows or clipping the brightest highlights. We will use this difficult exposure blend as an example of the occasional shortcomings of automated exposure-blending algorithms, such as Lightroom's "HDR Photomerge" feature. The image below is the result of Adobe's HDR blending. Admittedly, Lightroom typically does an excellent job with exposure blending, and I use it on the majority of my exposure-bracketed images. However, as you can see, it doesn't always produce the best results when difficult light is involved. When processed with the desired final settings, the blended output file produces a harsh transition in the bright highlights. Additionally, there is no way to be certain whether the algorithm is blending noisy data into the shadows and midtones that could come back to haunt you later in your processing.
Luckily, for those photographers interested in developing a fine level of control over their exposure blending, we have created a workflow that is predictable, repeatable, and foolproof. This method will guarantee the best image quality and blending possible for difficult scenes such as this one.
Step One: Process the Base Image
To start with, we need to identify our base image. This will be the image with the brightest exposure, in which the shadows were fully exposed to the right side of the histogram. In my image sequence above, this would be the fourth image, on the far right. Please feel free to follow along with your exposure-bracketed images. The first step in this workflow is to maximize the dynamic range of the base image by dropping the highlights and whites sliders down and raising the shadows and blacks sliders up. This step is critical to ensuring we don't leave any exposure data behind when we bring these images into Photoshop for manual blending. We are essentially aiming to create a low-contrast, blended image that will serve as an excellent base for processing the image to taste later in your workflow. Next, we will make any other adjustments that need to happen while we have access to the raw image data, such as temperature, tint, and sharpening.
Step Two: Sync Settings and Match Exposures
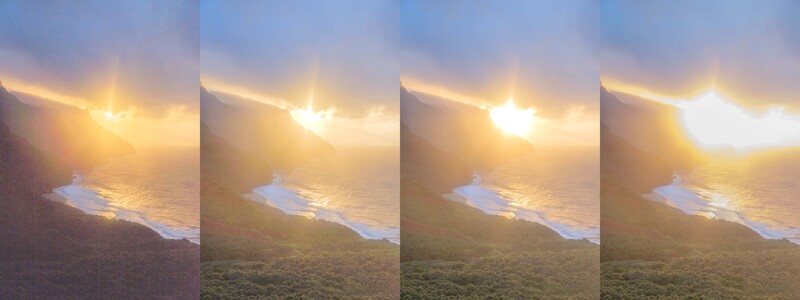
Next, we will sync these settings across all of our images in the exposure bracket. To do this, first select your base image in the loupe, hold shift on your keyboard, and click the image at the opposite end of the bracket to select all of the images. You must select the base image first for the Sync feature to work properly. Next, simply click the sync button below your editing panels in the bottom right corner of your screen. In the dialogue box, choose "Check All" and click "Synchronize." Next, we need to match the exposure level of each image. To do this, with all of the images still selected, go to Settings > Match Total Exposures. See the series of images below to get an idea of how your bracketed images should look at this point in the process.
Step Three: Open and Align Images in Photoshop
It is now time to bring the images into Photoshop for manual blending, which is not as scary as it sounds. With each image still selected, right-click on one of the images and click Edit In > Open As Layers In Photoshop. All of your images will now be imported to Photoshop as individual layers within one project. Make sure that your layers are arranged so that the base image we identified earlier is at the bottom of the layer stack and the rest of the layers follow the sequence of the exposure bracket. If you are paranoid like me or if you shot the exposure bracket handheld, align the images now by selecting each image and going to Edit > Auto-Align. In the dialogue box, select "Auto" and deselect "Vignette Removal" and "Geometric Distortion." Feel free to skip this step if you used a sturdy tripod and are confident that your images are already aligned to the pixel. I never skip alignment because you never know if the images shifted at the pixel level during the capture process.
Step Four: Manual Exposure Blending Using Blend if
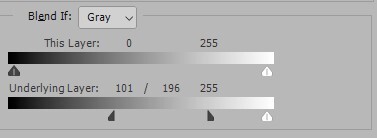
Next, we will begin our manual blending process using an underutilized Photoshop feature called Blend if. First, turn off all of your layers except for the base layer and the one directly above it. Next, right-click the layer above the base layer and click "Blending Options." You can also double-click the space to the right of the layer name. In the Layer Style dialogue box, in the bottom center, you will see a box with the heading "Blend if." Make sure that "Gray" is selected in the dropdown list. Next, move the dialogue box to the side so you can see your image. Finally, we will use the "Underlying Layer" slider to blend lost highlight data into the blown-out base layer. Grab the black slider and start to drag it to the right until you have blended out all of the noisy shadow data. There will be a clear delineation between the data in the base layer and the layer above. To smooth this transition, hold "Alt" on your keyboard and click either half of the black slider to split the slider in two. Once split, the slider will feather the transition between the two layers. See below for an example of how your sliders should look at this point in the workflow. Once you are happy with the blending transition, click OK.
Step Five: Repeat for All Layers
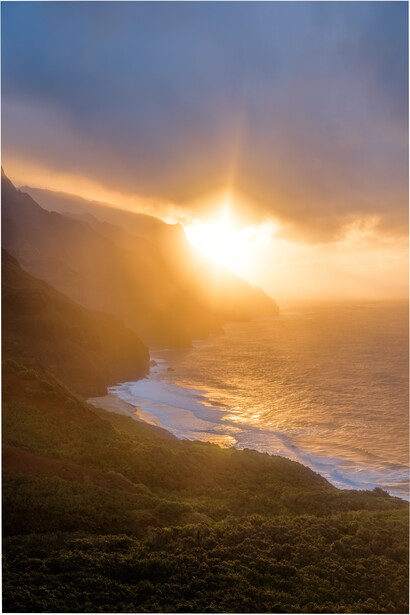
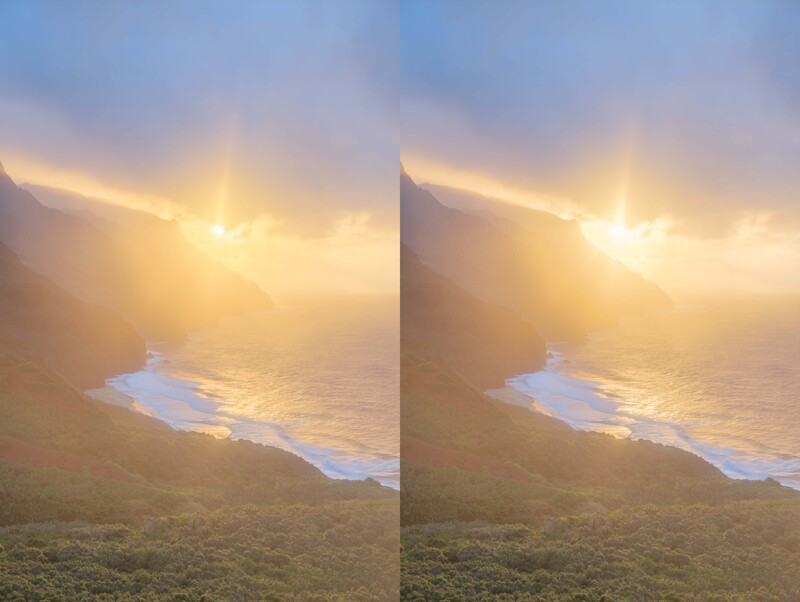
Next, we will repeat this process for each layer in the exposure bracket, making sure to turn on each respective layer as you go. Do not turn off the layers below. Be aware that the Blend if sliders will require different values for each image. You will need to rely on visual feedback to achieve smooth blending between each layer. This is where we gain control over the blending process compared to the automated HDR blending in Lightroom. After you have successfully blended all of the layers, if desired, you can adjust the opacity of each layer to get the final result you are looking for in the brightest highlights. The image below on the left is the result after blending, and the image on the right shows the final result after I adjusted the opacity of the layers to produce a more natural final result.
Congratulations! You have just completed a manual exposure blend. Remember that this technique isn't necessary for all exposure blending and only the most difficult scenes will require it. Still, the beauty of this workflow is that it is predictable and repeatable while offering total control over the blending process, which you may appreciate even for easier exposure blends.


Join the Fstoppers community for free
-
Post comments and join in the discussions
-
Browse the site ad-free
-
Share your work and get featured in the community
-
Compete in the photo contests for fun and prizes
24 Comments
Great article more people should use the blend if feature it’s not that scary.
I would like to add a comment based on my experience,
Blend if has always been a great go to for Global adjustments, then unfortunately the luminosity masking process must begin. However if your not going to print it has been my experience that using the radial or graduated filter brushes in LR work well, cation you will likely see the use in large prints.
Blend If can also be combined successfully with luminosity masks..
Thanks Barry for the kind words. I actually use blend if for local adjustments more than for global adjustments. All of my dodging and burning is done with a brush on a layer that has blend if applied. Rather than using luminosity masking, I'll often ctrl click the RGB channel for an even more refined selection, or just use color range to select the color rather than the luminosity
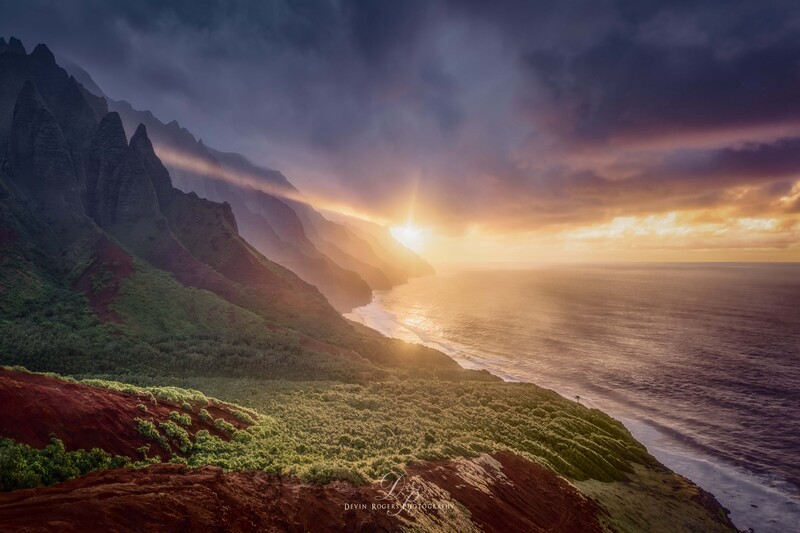
Bad form Joe Coffee, this scene is 100% real and is shown here exactly how I saw it with my own two eyes. I worked hard to get this shot and it represents the true natural beauty of the Na Pali coast and the crazy light that one can encounter there. Sometimes nature produces something so surreal that it's almost unbelievable and it's my passion to seek out those moments so I can share them with others.
I like the image overall and also enjoy these kinds of shot! I often say what you have said here about the purpose of exposure blending to overcome the limitations of camera exposure, as opposed to 'faking' an image - however i am curious, did you do extra work on the cloud layer in the upper most part of the image? The light ray no longer seems to be bouncing off the lower layer of clouds as it appears in the original exposures, these are artistic choices of course either way. In any case, it should also be ok for photographers to be transparent about the things that are manipulated if they are :)
Hey thanks man I appreciate it! Not sure which area specifically you're referring to but when I posted the image to my instagram you can see a before and after that should give you a good idea of what edits were made. I definitely darkened down the entire image quite a bit, but keep in mind that the "before" image is the result of removing as much contrast as possible from all of the original raw files and blending them together to get a very flat, super-exposed base image, which serves only the purpose of providing as much exposed-to-the-right data as possible as a working canvas to maximize image quality in the shadows. So darkening back down and reintroducing contrast is only an attempt to get the image closer to how things looked in reality. To my naked eye, the clouds were about the brightness they appear in the 3rd SOOC image in the series above. That being said, it's easy to get lost in a complicated image such as this one and it's entirely possible that I over-did it in some places, so I appreciate the CC.
IMO, the camera will never be able to render the scene we actually saw. That's why processes like these are necessary.
Joe, I appreciate the concern for the integrity of a place that is close to my heart as well as yours. I really do. But I saw this sunset with my own two eyes, and my wife was right next to me. The lightrays are real, and have not been enhanced in any way. Nothing has been altered in this image, aside from basic adjustments to contrast, saturation and luminosity. Does it always look like this out there? Of course not. Of course we got incredibly lucky with this display of light. Again I'd invite you to check my post on instagram, where I've included a before and after for healthy skeptics such as yourself. I want you to feel good about this image so you can enjoy nature's spectacular display as I did.
Nothing fake about that image produced using this very neat workflow. If anything this workflow removes some of the limitations inherent in the camera and moves closer to what we actually see. At best a camera will do just 15 stops while the human eye is up over 20. This method boosts the dynamic range up nearer to that of reality, so in fact it’s anything but fake. It kinda blows out the water all those photography Luddites and anti photoshop brigade who always bang on about getting it right in camera!
I know a lot of people prefer the article approach to the video one, but this is one occasion where' I would have preferred to see video. Interesting technique, though.
Yeah I had the thought while writing it that it would make a great video. Unfortunately producing videos is not in my skillset. There are definitely plenty of youtube videos out there on how Blend If works if you want to delve a bit deeper on the subject!
No no no, you did a great job, clear, well written, why bother with a video?
Funny, I was actually perusing the comments to comment on the fact that I preferred the article approach here and likely would not have clicked on a video.
Thanks for the feedback Josh. I'm quite happy with the fact that my lack of ability or interest in creating video content turns out to be a win-win for many readers here! Writing is much more enjoyable on both ends it seems :)
The article, I’m my opinion works best for the more experienced users, in that you can produce your own ‘ in head’ video as you read. For me this article was a breath of fresh air, well written clear and to the point with good examples. Though I can’t quite figure out why Lightroom was involved….. possibly blend-if doesn’t work with smart objects! ….I’m off to find out.
Thanks Devin, for sharing your tips and tricks. I’m gonna have to give this a try.
Good article and nice approach…. However the one question I have is why use Lightroom at all? as these first adjustments are baked in to the images exported to Photoshop. Is there any advantage to be gained from performing these initial edits in Lightroom?
Great point Eric! This workflow can definitely be done with smart objects. Personally, my editing style doesn't typically make time for a non-destructive workflow but that's really just my personal preference and I have a lot of respect for people who can maintain a creative flow-state while editing non-destructively.
I will say though that the main benefit of starting in Lightroom is the "match total exposures" command, which as far as I know, has no counterpart in PS or ACR. Without that command it would be guesswork to get the exposures perfectly matched, and without the exposures perfectly matched, the "blend if" workflow doesn't blend very well.
The closest match to that command in PS I've found is "match color", which also makes an attempt at matching exposure and contrast. But the kicker is that command doesn't work on smart objects :/
…Nice final image by the way. It really takes you there. Congrats.
Thanks so much Eric! Really appreciate it.
Regarding step 3—I shoot a lot of real estate, on a tripod... Often merely turning the dial on my camera will cause a mis-alignment between composite frames, so of course I use auto-align layers—BUT, I can't tell you how many times Photoshop screwed up the alignment and made it worse. Be careful with this feature...
You can check/tweak the alignment by setting each layer above the base layer to "difference" mode one at a time and bumping them around using the move tool and your keyboard arrows. Often the misalignment will only be a few pixels when your images were captured using a tripod.
This is a very good article and educational for me. I'm a beginner w/Lr & Photoshop (Scary Software!!), and the HDR imagines I have made just don't match the more natural effect I see with this nice process you have made at a level that I can understand (a little). Thank You!!
I hoe you will continue to provide useful novice level content and workflow topics like this. I will of course practice this workflow you have provided in this article and hopefully become proficient in its application.
Thanks again! - - Carl