
In a recent article, I showed you how to create mist and atmosphere in Lightroom using a clever combination of masks, contrast, and dehaze. It worked great for woodland photos yet involved some manual masking. Today, I show you an even simpler technique for adding atmosphere in Photoshop.
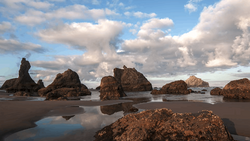
The editing trick I show you works best for architecture and cityscape photos. Those contain geometric shapes and clearly defined objects. They allow for more precision than in typical landscape photos.
Depth Blur Neural Filter
Real atmosphere, haze, and mist are more intense toward the background of your images. When adding atmosphere in post, you should try to mimic reality and increase the intensity from foreground to background.
Often, it means a lot of manual masking, like in the Lightroom technique I showed. But with the help of the "Depth Blur" filter, which you find under "Filters - Neural Filters ...", you can automate the creation of your masks.
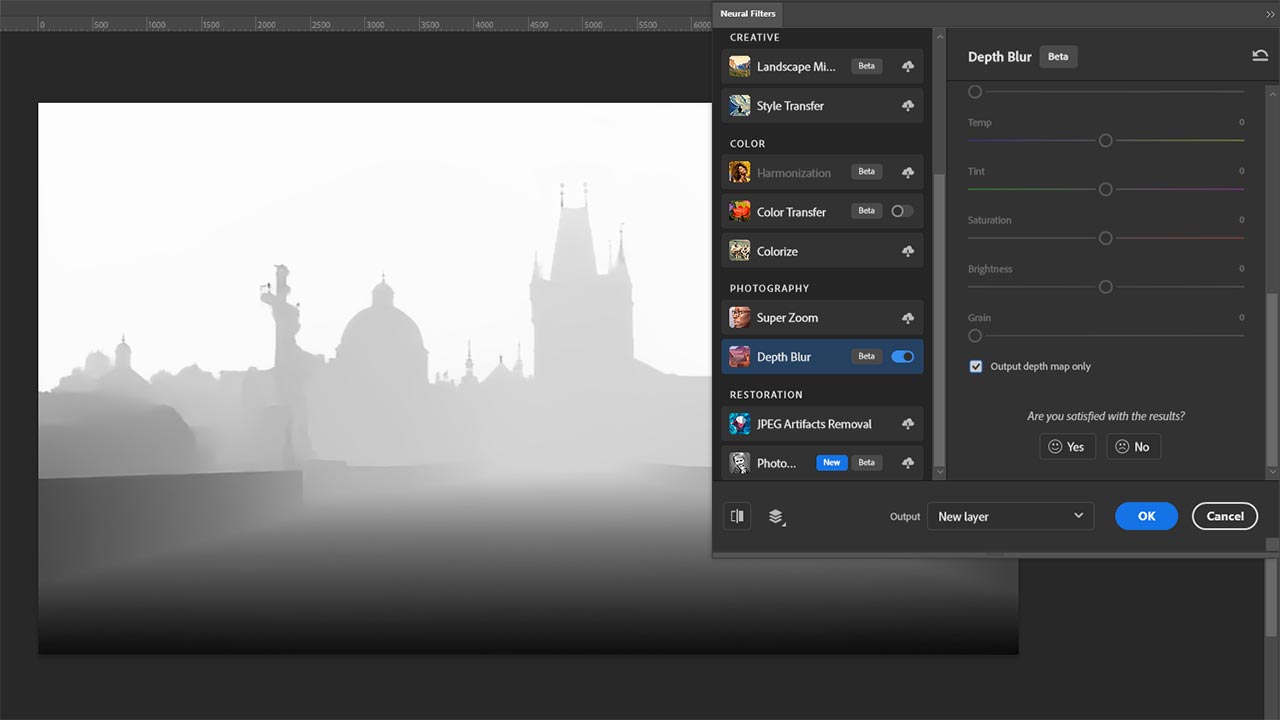
- With your image layer active, scroll to the "Depth Blur" filter under "Neural Filters..." in Photoshop.
- Activate it.
- Scroll down and activate the "Output depth map only" checkbox before pressing "OK."
The result is a grayscale image on a new layer. It represents the depth in your photo, and although it is seldom perfect, it's mostly good enough for architecture photos.
Adding Atmosphere
The next step is to use this depth map to add atmosphere. Head to the "Channels" palette and "CTRL/CMD + Click" on the RGB channel. It will load the grayscale image as a selection. Back in the "Layers" palette, add a "Solid Color" adjustment layer and give it a warm or cool color, depending on the mood you want for your photo.
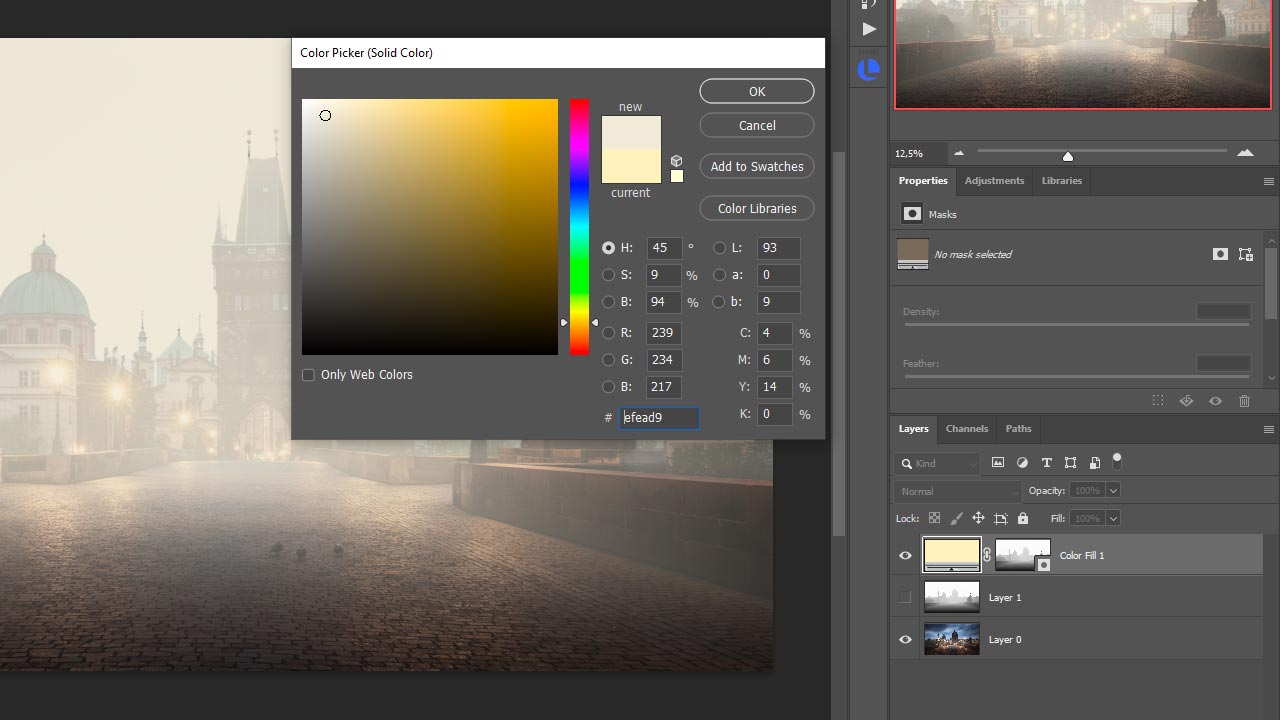
At first, it will look unnatural, but we are not finished yet. Delete the layer containing the depth map, as you no longer need it. Select the mask of the "Color Fill" layer and head to "Image - Adjustments - Levels...". Moving the dark and midtone sliders to the right, you can push the effect more into the background.
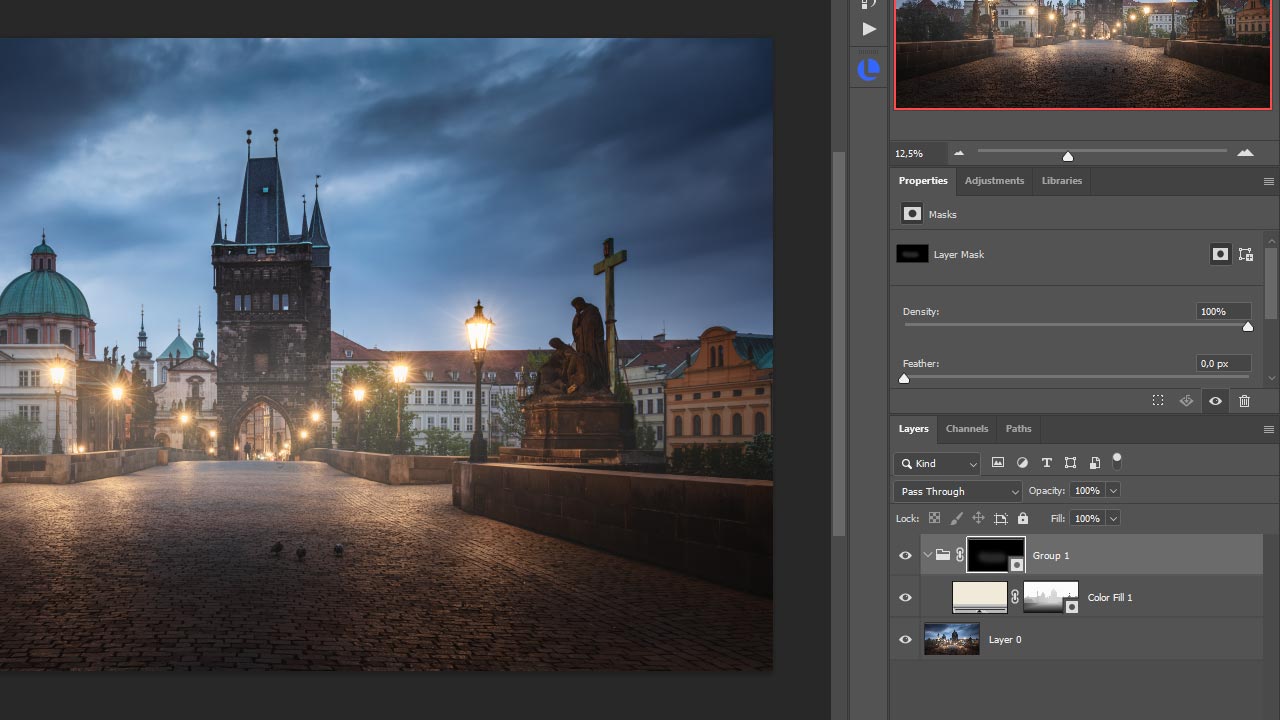
Then group the "Color Fill" layer. You can now apply a black mask to the group and completely hide the effect. With a soft white brush of 10-20% opacity, you can now draw in the mask to gradually bring back the effect.
It might be tempting to add a thick layer of fog to your photos using this technique. But try to be more subtle and aim for a dreamy look that doesn't deviate from reality too much.
Finishing Touches
If the atmosphere looks too intense at first, use a "Curves" layer on top of it to give the image back some contrast. I prefer this technique to reduce the opacity of the atmosphere group because it brings everything together. Parts of the photo where you didn't apply atmosphere will also be more dramatic now. It is great for the sky, which you should usually exclude when adding mist.
If you have city lights in your photo, you can emphasize those by adding a soft glow. Create an empty layer and set the blend mode to "Soft Light." Select a bright, warm color that fits the lights and draw around the streetlamps. I show all of this in the feature video above.
Conclusion
This technique is once more bending reality, so use it carefully. What I found is that I'll typically overdo the effect first. The image then needs to sit for a few days before I come back and apply some finishing touches that often include reducing the opacity of the effect layer. You should also refrain from applying this technique to all your cityscape photos. I find that historic architecture benefits from it, while modern architecture usually needs a different treatment.

Join the Fstoppers community for free
-
Post comments and join in the discussions
-
Browse the site ad-free
-
Share your work and get featured in the community
-
Compete in the photo contests for fun and prizes
18 Comments
also remember, techniques like these should never be used for editorial photography. As the other stated, they're bending reality and as such, should be used with a light hand in the appropriate places...
They should be used as and where the photographer who took the shot wants to use them. Not where you think they should be used. Stop gatekeeping others, it's not your job.
I love fancy terms like "gatekeeping"... but Brad is right. If you don't like being told what to do, Matt, take your camera and go home... leave the discussion to the adults. There are indeed ethical rules to documentary / editorial photography, and guess what, we are allowed to talk about them!
All these photos faking it in software should come with a warning it's not real so as to distinguish them from genuine photos.
Better yet, this site should come with a warning that some articles may trigger some envious angry bitter wannabe purists still stuck in the past.
Take a photo under available light and current weather conditions and then do some basic editing of the RAW files in software. I'm certainly not 'envious, angry or bitter' but if my preferred workflow makes me 'stuck in the past' then I'm happy to be there instead of embracing all this software fakery.
--- "I'm certainly not 'envious, angry or bitter'
I would disagree. Your constant sniveling at every other photo editing article says otherwise.
--- "Take a photo under available light and current weather conditions and then do some basic editing of the RAW files in software."
Sounds very boring. You do you. Ultimately, shows how little you know. Well known photographers have been pretty heavy handed at processing their photos. One comes to mind, Ansel Adams. You may have heard of him.
To take editing to extreme, check out Jerry Uelsmann. He was creating "fake" images decades and decades well before software. Below are some of his images.
'Your constant sniveling at every other photo editing article says otherwise.'
A few negative comments is certainly not 'constant snivelling'. Besides, your very rude responses to me and assumptions about who I am are not at all warranted and I've no idea why you've decided to direct such vitriol towards me. I'll try to be less negative in future so as not to be on the receiving end of any more of your wrath.
When folks with a narrow view condescendingly disparage other genres and editing styles, I may sometimes, sometimes, unsheathe my smite hammer. {not to be confused with my smitten hammer} :D
Okay okay. I've made my point. I'll leave it be.
Dude, you can't accuse someone of constant negativity when a quick look at your comments history shows you have taken an abusive tone with commenters on a number of occasions. Disagree with someone (or be the bigger man and say nothing at all) but no need for personal insults.
Dude, you can't just glance at someone's comment history and assume you've come to an informative conclusion. You would need to read the entire thread(s) so you'd have an understanding of why was said the way it was said. We call it context.
Nothing justifies the nasty tone and insults in a lot of your comments. Besides looked up a couple of those threads and you certainly rub people up the wrong way.
--- "Nothing justifies the nasty tone and insults in a lot of your comments."
That is most contestable. I apply the amount of bluntness what is necessary. If you feel otherwise, consider growing some skin. And/Or, apply your Karen Whiteknight preachings "be the bigger man and say nothing at all" to the whiners that initiate the thread. Do you understand me, boy?
--- "you certainly rub people up the wrong way."
This may be true with wannabe elites, gatekeepers, AND those that enable and embolden them. To which, I don't care. If you've just emerged from your safe space bubble, know this, snarky comments begets snarky comments. Sometimes, it's tit for that, sometimes, it's not.
I completely agree with you.
I see loads of stuff I hate, but the onus is on me to scroll on by, not to gatekeep what others should do with an image they shot. Why is it photographers in particular feel like they can dictate the artistic limits of other people. Apply your standards to your own work, mind your own business about everyone else. Pious bunch...
I check this site all the time but it is god-awful to use in Chrome mobile because of these incessant ads and the horrid video player that pops up from the bottom right. I'm pretty much forced to use an ad blocker just to be able to check out these stories. Come on guys, you don't have any control over your ads?
Back to the article. I prefer to do effects in raw, that way if I have to change the main file I don't have to go back into Photoshop. Only in certain situations I used to use analog effects to smooth out out of focus areas. But those weren't files that were being mastered those were just for social media.
"This Photoshop Technique Will Blow Your Mind"
This clickbait article I will never read.
PS: If this technique was interesting at all, the author had given a hint at what it is in the title.
This Title just shouts: "I have nothing to say, but please, please click on my article!"
Great article, with genuinely useful information and ideas about new features, thanks
Thanks, always fun to learn new photoshop techniques.