In beauty and portrait retouching, one of the most important goals is to retain skin texture and keep the image from looking soft. We often however face a situation where the existing texture is unflattering and harsh. While we could heal out each pore or patch manually, this often leads to sub-par results and takes a long time. In this video I'll show you a unique, precise and fast way to target a particular texture frequency and offset it in a largely automated way.
This technique may seem somewhat unintuitive at first since we'll be using sharpening to smooth out a particular texture frequency, as opposed to blurring which is more commonly seen. The problem with blurring is that we're introducing softness by not distinguishing good texture from bad. What we'll essentially do is sharpen a particular type of texture and then create an offsetting layer to remove the effect. The process involves a few steps and a correct application of the Apply Image tool so I've created an action for you that will do all the heavy lifting. The required steps as demonstrated in the video boil down to selecting the right sharpening settings and masking in the offending area.
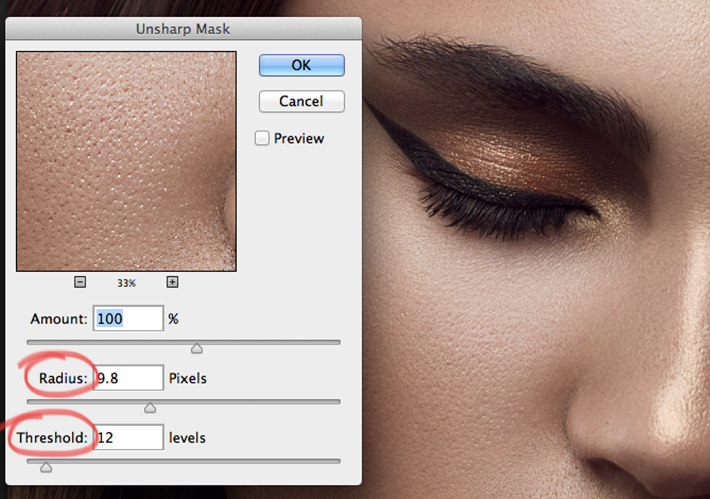
Start off by zooming into your desired area at 100% and run either the "VS-Texture-Reduce-8Bit" or "VS-Texture-Reduce-16Bit" action depending on your image's bit depth as shown in the video. Using Photoshop's Unsharp Mask tool (found in Filters > Sharpen > Unsharp Mask) we have the ability to target a specific type of texture by utilizing the threshold and radius sliders as shown below. Unsharp Mask has been around since CS3 and perhaps even earlier, so odds are that this technique will work for your version of Photoshop.

The amount slider should remain untouched at 100% as this tends to produce the best results. The radius slider effectively allows us to target the size of the offending texture elements we're looking to reduce, while the threshold slider helps to target a particular degree of contrast.

The correct radius setting is achieved once we we no longer see any added sharpening effect on the pores or texture that we're looking to reduce. Start at a low radius and nudge the value up slowly until you stop noticing any further change in the texture.

The threshold slider is critical to targeting the bad texture while leaving the good texture untouched. The good texture is generally of much lower contrast than the bad texture, making it a perfect candidate for what threshold is meant to address. Start at a low threshold and continue to increase until you notice the good texture no longer being sharpened while the bad texture remains sharpened. Try to find a happy medium and use the "Preview" checkbox to visualize the before/after sharpening amount. Once you chosen your desired settings, click OK to apply the sharpening and the action will complete by creating an inversion layer using the Apply Image tool (details in the video). After that, all you need to do is mask in the area of bad texture and adjust the layer opacity to taste.

Above you can see a 100% crop after applying this technique to an area of rough texture. The harsh elements have been balanced out to better fit with the remainder of the image while the smaller bits of texture remain intact. The whole process for an area like this took about a minute and we can of course apply some light healing brush work to refine things a bit further if needed. In case you missed it above, the action can be downloaded here.
Connect with me here for more tips like this: Michael Woloszynowicz | Facebook | YouTube | Twitter


Damn Michael this is some legit material!
You're like a retouching Jesus!
That's what I call him too!
Thank you Mike.
Excellent tips and action Michael!
I surely can't be the only one that thinks Michael's voice sounds like melted butter caressing the side of a beautiful slice of juicy cinnamon loaf can i? Great voice, great article, thanks Michael!
Michael amazing tutorial again ,thank you thank you !!
This works well. I also like the Surface Blur, and then mask out at around 30%
Respect to you Michael. Very well done!
Do you mind typing the apply image settings for 16 bit here? Thanks in advance.