
Poor image quality cameras such as drones or older DSLR cameras benefit particularly well from this technique, but it does work with any camera.
It came as a bit of an epiphany to me, when I realized how big of a difference this technique makes to my drone images and old DSLR photos. The technique does come with a few drawbacks, so use it only in certain situations.
The technique is simple and mainly known from astrophotography to reduce noise in photos shot at high ISO values such as ISO 3200. The technique requires you to shoot and stack multiple images and equal out the noise, which can be done in Photoshop or other software applications. The result is cleaner images without sacrificing sharpness. I am normally very heavy-handed in my editing phase, which usually brings out a lot of noise even from photos shot at base ISO, such as ISO 100. With this technique I can effectively reduce my ISO to something like ISO 7 (yes, seven) dependent on how many photos I stack, giving me a bigger room for pushing the pixels without making the image particularly more noisy.
How to Do It
Many cameras come with a burst mode. In this case, I use an example from my DJI Mavic Platinum with a burst mode of five images but you can get seven in one push. If I want even cleaner photos, I can simply keep pushing the shutter in burst mode until I have the desired amount of photos.
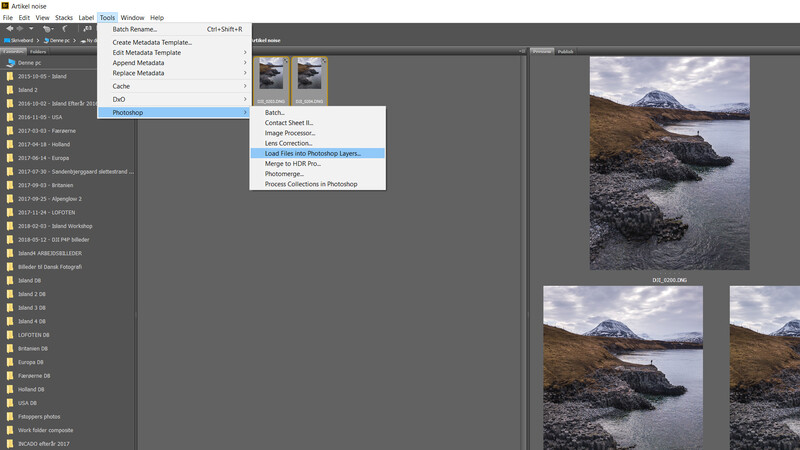
After you have edited your raw files in any raw file editor such as Lightroom, Camera Raw, or any other application you need to “Load Files into Photoshop Layers.” Personally, I use Adobe Bridge as you can see in the photo below.
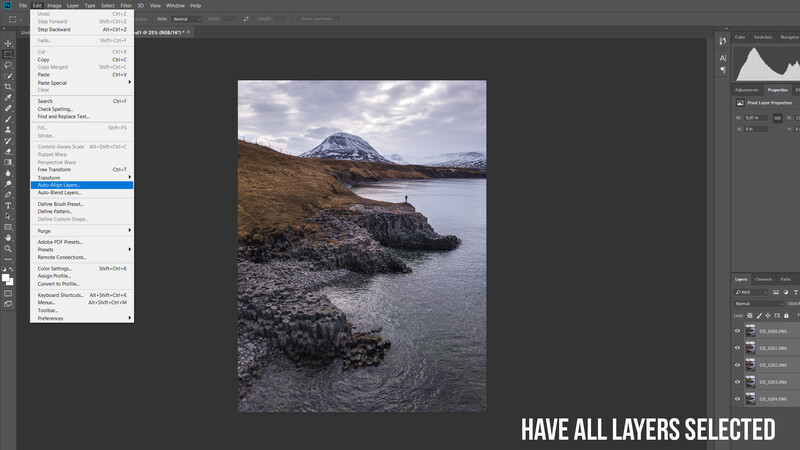
When you have opened your photos in Photoshop, be sure they are all perfectly aligned. If this is not the case, you will experience weird ghosting. Just select all your layers and go to Edit > Auto-Align Layers and select “Auto” as the projection. Be aware you need to crop your photo a couple of pixels as Photoshop warps, screws, and moves the photos into alignment.
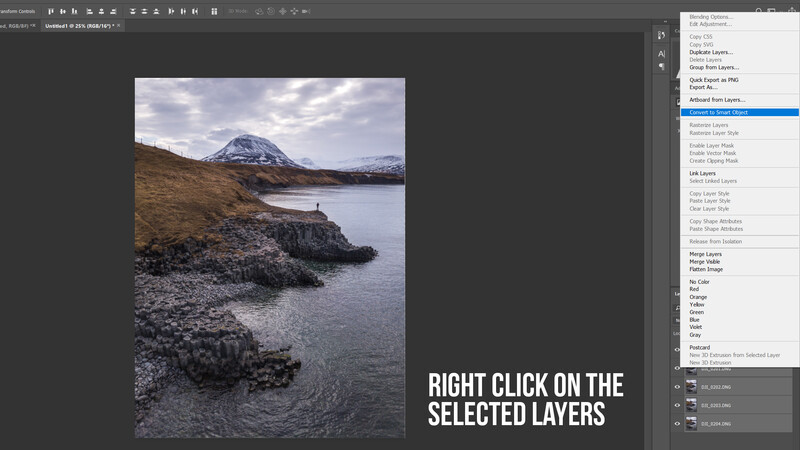
When the layers are aligned you select them all and right-click and choose the function “Convert to Smart Object.”
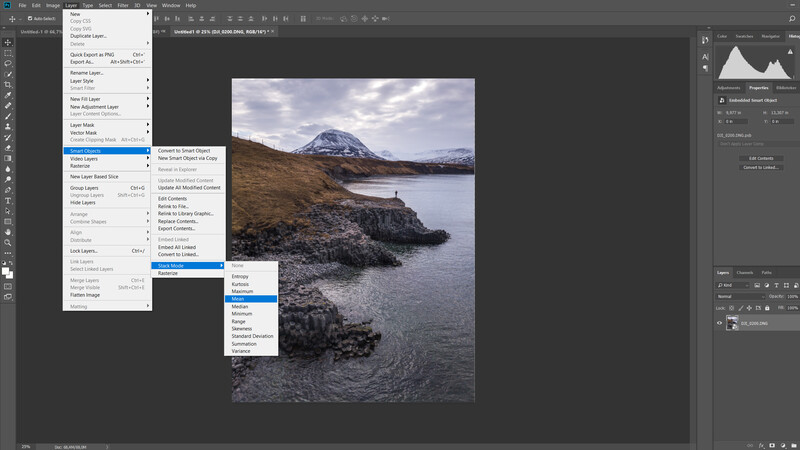
When the separate layers are collected into one, which often takes a little processing time dependent on the amount of layers you combine, you select the new Smart Object and go to Layer > Smart Object > Stack Mode > Mean.
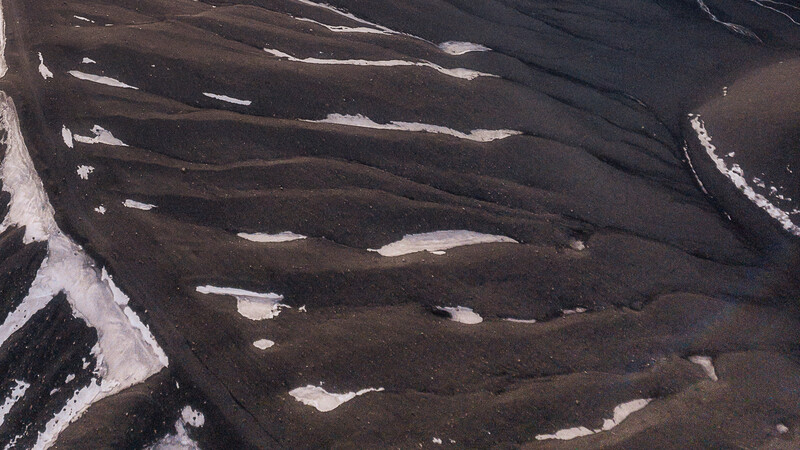
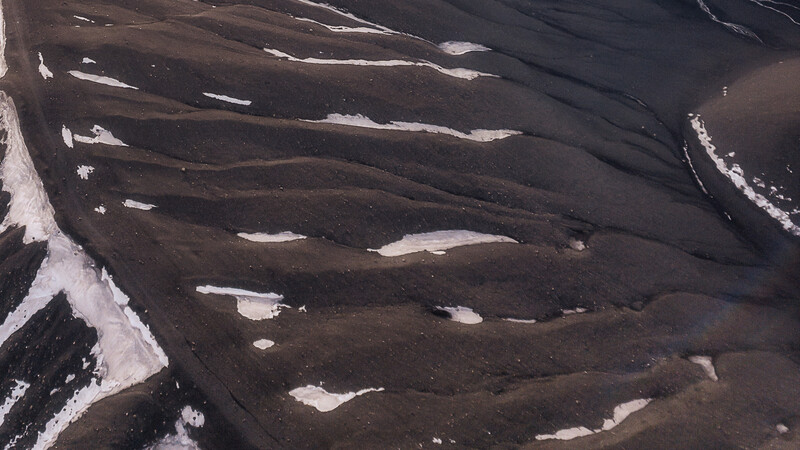
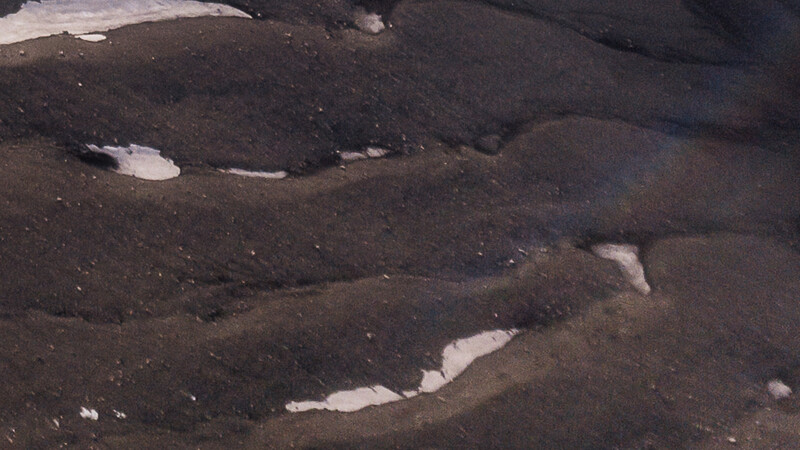
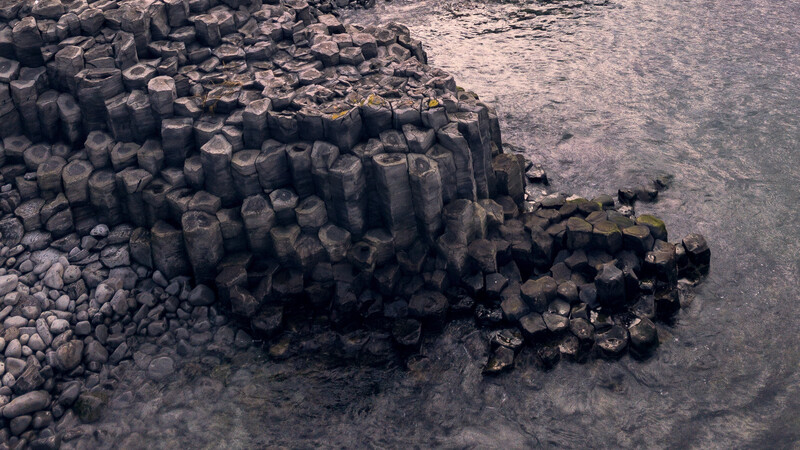
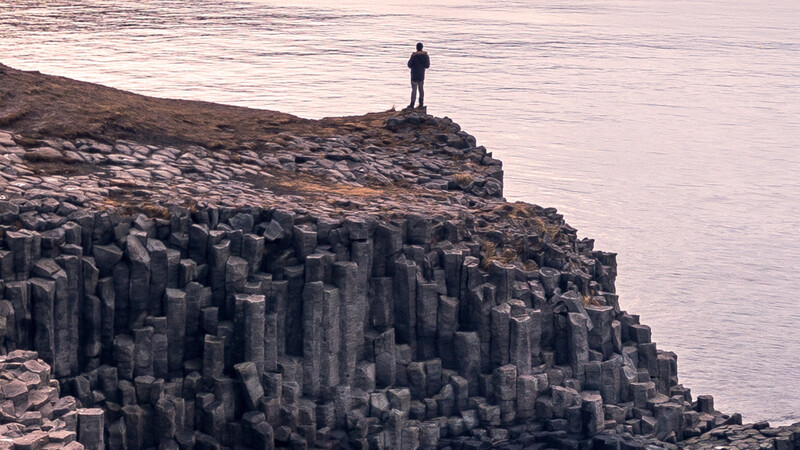
After another round of processing, you now have an image with greatly reduced noise. In the below images where I zoom to 100 percent you can see the comparison between the images with the effect applied and not. You will see a huge difference in how the water is interpreted, however in the basalt columns you will observe the interesting part.
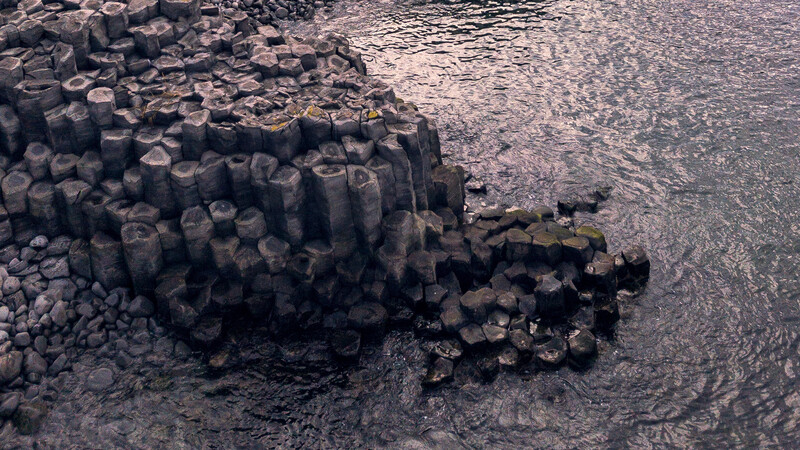
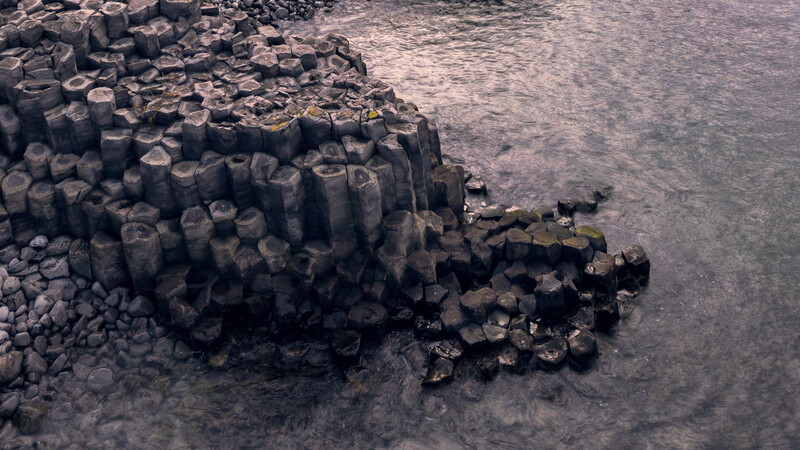

In areas with movement, such as the water, there is a huge difference between the mean stacking mode and the original photo. You will have to decide yourself what works for your particular photo. If you prefer the original effect of the moving object or subject you can always do a bit of masking. Here is a full version of the photo below.
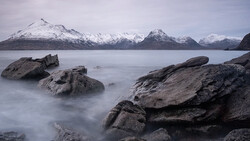
Another example where I underexposed the shadow area of the original the technique is even more visible. Here is a comparison of the straight out of camera photo and the finished edit. The difference is striking since I had to really bring up those shadows.

Zooming into the edited version (100 percent) and switching between the stacked and unstacked, the technique really proves itself. If it is hard to see on these small images, also check the 200 percent zoom below.
And the 200 percent zoom:

Mean or Median?
In all practical sense, there is no real difference between mean and median in areas without movement. Zooming all the way in the mean stacking mode averages everything out creating a softer less contrasty look, while the median stacking mode removes differences between the layers keeping the contrast.
There is only a subtly difference in the areas without movement, which you will not be able to see zoomed all the way out. The movement in the water is interpreted very differently and I prefer the softer look of the mean stacking mode. This is also a simulated long exposure effect.
You Cannot Just Copy the Same Photo
As I initially stated in the title you need to know about this technique before you start photographing. You need different photos as you cannot just copy the same photo multiple times and combine those. Doing so does not give you the difference in noise between the individual photos, which is necessary for this technique to work.
Super Duper High Quality
For even higher quality photos, you can combine burst mode and manually bracket your photos; Make a five exposure burst underexposed, five normal exposures, and five overexposed photos. Alternatively, make several AEB exposures on the drone. The result should in theory be the same, but it will require a bit more work in post-processing.
Check out the video above to see the results and a few more drawbacks where I compare some old night photos from my Canon 5D Mark III photographed at high ISO.
Is this a technique you know about? Have you already used it, or are you going to use it in the future?


Join the Fstoppers community for free
-
Post comments and join in the discussions
-
Browse the site ad-free
-
Share your work and get featured in the community
-
Compete in the photo contests for fun and prizes
75 Comments
Can't believe people are hearing about this for the first time now.
Image Averaging has been used for ages by still life and astro photographers.
I would expect anybody who claims himself a "professional" or even "enthusiast" photographer to know this and many other tricks.
It is important to remember this is only relevant for photographers who are shooting motionless subjects. Any photographer who is always working with a primary subject that cannot remain still is likely to have never encountered this technique as it simply isn't helpful to them.
True. I remember one afternoon many moons ago experimenting with this technique and never remembering it again. I shoot people so this is not the best way.
Sometimes it's ok to get knowledge from multiple/new sources. Professionals should never consider themselves to "know it all". As technology improves and creativity continues to push us forward then you can expect to learn things all the time; even if you are a professional with decades of experience.
I focused on film until fairly recently, and still shoot a fair degree of film, and I still shoot as though I'm shooting film.
I prefer to use good primary technique over spending more time in front of the computer than I have to. It's really nice having to do little or no editing.
This technique is simple, makes perfect sense, and I'm unlikely to ever use it.
You can actually do it even with Film,
However proper alignment is both crucial and hardly possible.
I did it once trying to avoid reciprocity failure.
Not everyone who reads this site is a professional, and every photographer has to learn this trick (and all the others) at some time. Even you did at some point. If a photographer is accepting money for work when they don't know basic techniques, that's one thing, but I would never make a student of any craft or subject feel ashamed for not knowing something when they want to learn.
Agreed.
Although I consider this method along with many others "basic knowledge" for any self-proclaimed "pro" photographer.
I've seen "pros" who can't even frame their subject properly, so... :D
Not meant to "shame" anyone ;)
You do realise that "professional" means 'runs a business', and that amateurs are some of the best photographers and artists there are?
As Alex wrote some people are just getting into photography now. So it might be relevant to them. I learned about this technique when I needed it for Milky Way photography. At first it didn't occur to me to use it with my drone photos. When I tried it out it made a world of difference.
I've used this technique for simulating long exposures when I didn't have the equipment to reduce my shutter speed as much as I'd wanted, and to remove people and other moving objects in cityscapes. It never occured to me to use it as a noise reduction tool.
I photograph for a living for over ten years and still have much to learn.
There are new photographers coming into photography every day. This is a great tip for them and a nice reminder for seasoned shooters.
Can't believe people are reading about this for the first time now.
Redundant photography information has been used for ages by every photo site ever.
I would expect anybody who claims himself a "professional" or even "enthusiast" photo site reader to have already seen this and many other such articles.
Not many people actually go back into the archive to find old articles. Until you learn something new, it's hard to actually "find" what you don't know about. It might be redundant to those who've already learned it, but to those who haven't learned it, it might be of great value.
That was my point in replying to the first comment... Missed the sarcasm ;)
Ah damn! Always so hard on written text 😖
Appreciate the irony :D
It's so crazy that everyone doesn't know everything I know!
Maybe it's because I don't do astro photography and it's pretty rare that I'm taking photos of completely still objects where I have to turn my ISO up enough for noise to be an issue (I usually just use a tripod and a really long exposure), but this is the first time I've heard of it... :/
Anyway, this is a nifty trick, but I question how useful it would actually be given the fact that even in a landscape, aspects of a scene are often shifting ever so slightly due to wind... I feel like you're liable to end up with a hazy mess and if that was the case, why not just use a long exposure?
If one can do a long exposure, then that would be the solution. As the article states, it is somewhat equivalent to a long exposure shoot …but with some technical differences.
A long exposure shoot requires a tripod for steady objects to remain steady. I do not care how many gyroscopes are on your drone, that is not possible, hence the use of the layer alignment tool. Shoot at high enough shutter speeds —and perhaps, then, high sensitivity— to freeze movement, then align and stack to achieve low noise.
For still-life or landscape, a low Sv setting and long exposure would be the better bet. …But there is also an advantage to hand-held shooting and stacking for those shots, even at short exposure times and low sensitivity; extra detail from artificially increasing the resolving power of the lens.
By off-setting each shot slightly, and re-aligning & average-stacking, one captures more detail than a single shot (and reduce shadow noise also). This is what “Dynamic PixelShift” does on the new Pentax K-1 II.
As you pointed out, this technique depends on little to no movement of the main subject, and is definitely not suitable to sports/wildlife/etc., …or landscape on a windy day.
For starters, and because you are playing the smart guy, a long exposure induces noise that a short exposure doesn't...
Actually, a “long” exposure only introduces “noise” from heat, and that is normally taken care of in modern cameras. I put ‘long’ in brackets, because it is a relative term. most long exposures are not long enough to induce noise from heat.
Most noise in digital cameras come from low exposure areas, just as it did in film, based on the randomness of photons and the size of their targets to produce a result on film, (whether emulsion or semiconductor).
In this, Michael is speaking of landscape photography, and, if he even does a 15 second exposure, that will probably not introduce any significant noise.
If, for example, one shoots at Sv=100/21°, Av=16, and Tv=¹/125s, (sunny sixteen rule), and everything is just peachy, exposing at Tv=16s, Av=16, and Sv=100/21° with a 10ND filter, the same amount of noise will be seen. But at Av=16, Tv= ¹/60s, and Sv=512,000/48°, the sensor is now underexposed by ten stops, and their will be much noise from little light hitting the sensor.
I usually use the long exposure noise reduction feature on my D850 and I've not noticed any noise... Then again, I'm not exactly shooting in the desert or super high temperatures either so even with the feature turned off, I still don't notice noise when I'm set to ISO 64 even with fairly long shots (several minutes). I guess YMMV...
At 100% magnification you don't notice noise in a long exposure? You must have a very special D850 compared to mine 😂
if you are talking about the noise reduction feature that automatically shots another long exposure with the shutter closed then you are just wasting battery because you can do the same thing manually and with less exposures.
Anyway, I'm not going to waste any keystrokes trying to educate people who are resisting and reluctant to hear and learn a few things like our friend above.
I can't say that I do. I also didn't notice noise when I shot my D810 either. As far as the number of exposures, when I'm going out to do long exposures I'm generally only doing a small handful at a time (maybe 4 at most?) so it's really not that much of a waste of time either way. The only time I'm generally doing long exposure photography is if I have a pretty specific idea in mind in the first place.
It's entirely possible that I'm just not as sensitive to digital noise as you are, but in a colorful scene, I'm not exactly hunting around all over the frame at 1:1 trying to find a few pixels here and there that might be a bit off. I can get that it's probably an issue in astrophotography because you've basically got a bunch of bright dots on a black sky so noise will likely stick out like a sore thumb, but for typical landscapes or urban scenes? Nah...
Maybe if you told me what kind of photography you're doing with (or in what conditions) your long exposure photography that you're noticing noise like that, it might help me understand. Are you doing like 30-minute exposures or something? Are you shooting in a hot climate? My longest exposures might be something like 5 minutes on my digital cameras (they obviously get longer on film due to reciprocity issues) with the vast majority of them coming in at well under that so if you're talking about extreme long exposures or doing multiple long exposures back to back where you're going to really be working your sensor, then I can't really relate to this.
Out of curiosity, could you post some examples of the noise you are experiencing at ISO 64 on your D850 along with the exposure time and shooting conditions? It would be interesting to see what you're referring to.
You might simply not pay attention to noise as much as I do.
Technically speaking ( and visible in photos in 1:1 or a little higher magnification ) there's noise even at ISO 64 with a fast shutter speed exposure.
Every CMOS and any other sensor type have their own noise even at base ISO and in the best conditions.
Seems like this is most likely the situation.
My first ever down vote.
One of my favorite stories is of a highly regarded Navy Commander who every morning would come in to the bridge, pull a key from his pocket to open a little box mounted to the wall. He'd take out a piece of paper, unfold it, read it, and stick it back in. After he retired someone was finally able to see what it said: "Port is Left".
When asked about it later he said that it's always the small mundane stuff that we all know that will trip us up.
Even when I know something, and for me this goes back to stacking negatives in enlargers and E6 in glass slide mounts (and a bunch of us urging Paco to create mounts just for 2 films thick), I still enjoy reading about it, learning new ways of doing things, and being reminded about something that I might have forgotten. And more importantly, to see knowledge passed on to the newest generation who may not ever even hear the word film.
Bill- I have been proclaiming to be a "professional" photographer for 30+ years. Never, ever needed to use this technique. I doubt I would ever use it.
I know plenty of other tricks and tips that apply to my work.
Do you know all the pips and tricks that apply to every genre of photography? iIf you do, High Five, bro!
If you "study" photoshop, it should find its way to your eyes.
It's not necessarily genre related.
This is far from a pip.
It boils down to how many books, seminars, etc you've taken, starting with Photography 101 & the basics ( and a little further down the road ) for all genres of photography.
The niche stuff are the ones that usually are within the arsenal of the dedicated to 1 or maybe 2 categories of photography.
However, it is becoming rather common for newcomers to just dive in to one category and stick to that, disregarding all others and without having a single bit of knowledge in anything other than their "favorite" ( most of these people are the ones who say/do "I want to do nude & boudoir photography :p )
«…it is becoming rather common for newcomers to just dive in to one category and stick to that, disregarding all others and without having a single bit of knowledge in anything other than their "favorite"….»
♩ Are you taking a swing at Henri Cartier-Bresson, or Ansel Adams? ♫ …Maybe some other famous, well respected, bulwark of the industry? ♯♬ There is so many who are just like this. ♮♩
[Hope you got the note of sarcasm].
Ansel Adams was a master of nearly everything, he's known for his landscape work, but he knew how to develop film, how to compose a portrait, etc etc.
Yeah, I remember all his sports shots of Pele in Brazil…. No,… wait….
But I do remember his still-life images of…. No,… wait….
Ah! I do now recall his wildlife shots of…. Hold on….
….gimme a second….
…I got nothing.
Stop playing the know it all because you are far from it.
http://www.loc.gov/pictures/item/2001704608/
OOOOOOH! A portrait by Adams! WOW!
How many, exactly are their in his repertoire?
Don't answer that, because you have missed the point. Adams was not a master of every genre, and you know it. Most people are not.
Most Photojournalists have done nothing (or little) more than photojournalism. Every one of Cartier-Bresson's images which look like a portrait is actually a “street photography”. C-B did two things; street photography (a style he basically invented), and landscape.
Adams did basically one, (landscape), although he did do some portraits. I would never call Adams a portrait photographer and I would argue that most wedding photographers know more about portraits than Adams.
But even that is not the point. It is simply that most photographers, including the Greats, fall into a genre they like early, then stick to it.
Take you, for example; you are a landscape photographer who also does performing arts photography (dance photography, you say), and that is about it. If you started at 15, you have been doing it for 15 years. Question: how many years experience do you have with portraiture? how about still-life? Abstract? (I think you have some there). Wildlife? Flora? Sports? (Dance does not count). Product?
You may have dabbled in these while learning photography, but you most likely quickly moved to landscape and performing arts. You probably never learned too much about macro photography, and what you did, you have forgotten most of it, as it does not appply to you.
Yes, you can always help someone with some little gem which you never forgot, because it was so clever, it stuck in your brain, but the mundane, (the heart of it) is now gone. That is what happens to most of us. It is the teachers who remember, because they are forced to remember. They still deal with it everyday.
P.s., I am not a know-it-all and never claimed to be. I only claim what I posted, but I dare to say, after 36+ years of photography, including teaching lectures & workshops, that I probably do know quite a bit.
Your afters look worse to me. They're hazier and soft. Are these sample images mislabeled?
No, they should be fine. My guess is you're seeing the limitations of the Mavic lens when you remove the noise and zoom to 100% or even 200%.
That makes no sense. The before, "unedited" pictures look sharper.
In general removing noise reduces sharpness/detail. I think you'd typically compensate a bit by adding some sharpness/high pass sharpness back into the images.
«In general removing noise reduces sharpness/detail.»
True, but not with this technique. This technique actually preserves detail, and saves more detail than a single shot could.
What is happening here is that noise is being interpreted by the brain as texture. When the noise is removed, the ‘texture’ disappears, and it seems like we lost detail. The loss of the texture makes the ‘after’ images seem less sharp.
Affinity has a particularly easy way to stack photos. PS used to be very unweildly, but is getting better.
I believe some cameras have stacking capabilities built right in, but I haven't used any of them.
Olympus and Pentax have average stacking builtin when on a tripod, Pentax has Dynamic PixelShift for average stacking when handheld.
Truly useful tips and easy to follow video. Great work Mads!!
You're most welcome, Aritz! :)
Thanks for the video. 12:15 - the noisy corners are from the vignette lens correction. If you start with it dialed down or off, depending on the original falloff, then you’re less likely to encounter purple noise in night shots. Yeah I had a couple of 5DM3’s too. That’s where I realized what was happening. The Mark 4’s are thankfully better.
Yes, it's even worse on the 5Dm2 and in this case, I used the Sigma 20mm Art, which has terrible vignetting. On my Sony a7rIII you can hardly see a difference because of the ISO invariance.
maybe i'm missing something - i prefer the before pictures above.
Me also
It's always up to people themselves to decide whether or not they'll use a specific technique or not. In this case, I think the softness you get when removing the noise is a combination of the limitations of the Mavic lens + the layer alignment in photoshop.