
Embarking on a journey to capture the night sky can be both exhilarating and challenging. In this article, I will share essential tips and insights from my own astrophotography adventures, guiding you through the intricacies of planning, gear selection, and settings to capture images of the cosmos.
I have spent so much time living beneath the orange glow of city lights, where, on a clear night, I might see a dozen stars. However, when I stand under the vast expanse of the night sky, away from light pollution, it becomes more than just a view; it feels like a living presence.
Here is what we are covering:
- Planning
- Gear Guide
- Focus Techniques
- Manual Settings
- Editing Tips
1. Planning Your Escape
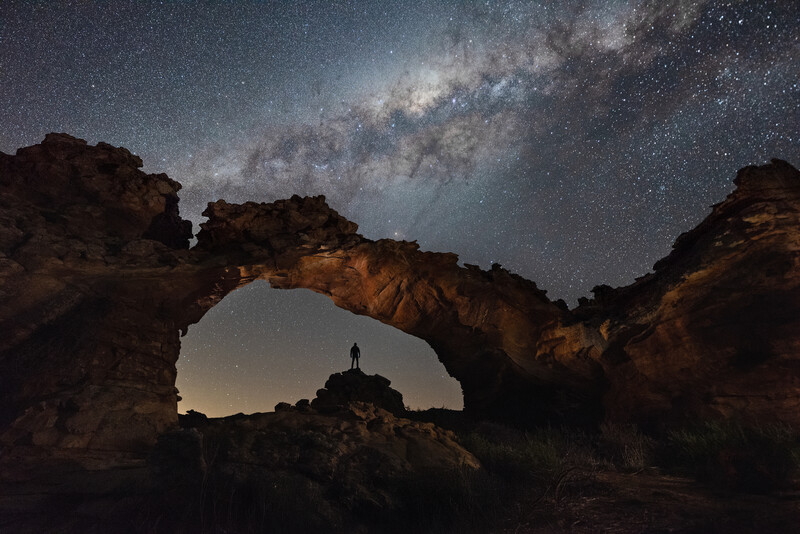
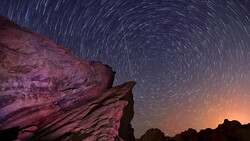
If you just point your camera at a random patch of sky, you are basically just taking a photo of dots. To make a real impact, choose a location that inspires you. A place not far from my home is the Cederberg, which is famous for its rock formations and mountains. I use these rocks as a foreground, and in the backdrop is the Milky Way — creating a connection between Earth and the universe. Find a spot away from city lights with interesting elements, such as ruins, mountains, or trees. This will help you create images with interesting compositions that resonate with the viewers.
Timing the Galaxy
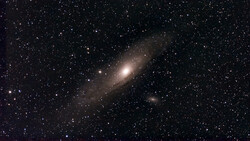
The Milky Way is not a static backdrop; it's seasonal. The Galactic Core, that bright, colorful center everyone loves, is only visible during specific months depending on which hemisphere you are in.
- Northern Hemisphere: March to September is the core season, with peak visibility from May to August.
- Southern Hemisphere: February to October, with peak viewing during winter months from June to July.
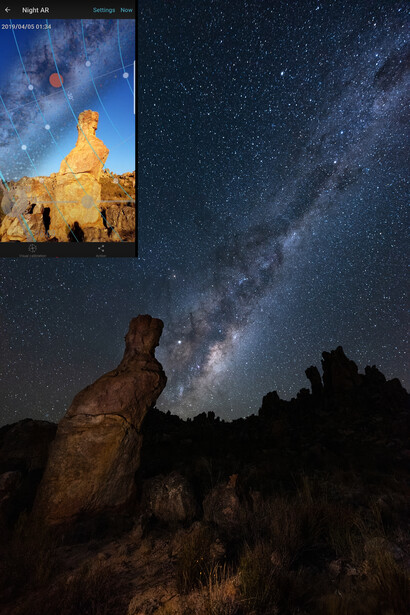
I use the PhotoPills app to avoid driving for hours only to find the core is hidden behind the horizon. It tells you:
- Where the core will rise: Crucial for lining up your shot with a specific landmark.
- Where the Celestial Pole is: Essential if you are planning to shoot circular star trails.
2. The Gear
Camera
For night photography, investing in a camera with good high ISO performance is highly recommended. Because minimal light reaches the sensor in the dark, you will need to significantly increase the ISO from typical landscape settings, such as ISO 50 or ISO 100, to ISO 1600, 3200, or even 6400. High ISO introduces noise, resulting in grainy, less sharp images. While it is unavoidable, a camera that produces less noise and preserves more details is better.
Lenses
Wide angle lenses help capture the sheer scale of the sky and an interesting foreground. However, do not ignore your 24–70mm or a 50mm lens. A telephoto lens with a focal length of 200mm or more is a great choice for capturing the core of the Milky Way. The speed of your lens — i.e., the aperture — is non-negotiable. You want a wide aperture, something like f/2.8 or wider, to allow as much light as possible.
Other Essential Gear
- Tripod: This is a crucial piece of gear. You need rock-solid stability because even a tiny vibration from a breeze will turn your stars into blurry smudges.
- Headlamp: Essential for safety and for seeing your camera buttons.
- Microfiber cloth: Dew is a silent killer; it can fog up your lens before you even realize it.
- Timer/shutter release: Either use a 2-second timer so your finger's shutter click does not shake the camera, or invest in a simple shutter release cable. I prefer a shutter release cable because I can use it for star-trail photography as well.
3. Getting Sharp Focus
Hyperfocal Distance
First, you need to know your lens's hyperfocal distance for your lens and camera combination. The hyperfocal distance is the focusing distance that provides the maximum depth of field. When you focus your lens at the hyperfocal distance, everything from that point to infinity is in focus.
I use the PhotoPills app to determine my lens's hyperfocal distance. For example, if I put a 14mm lens on my Sony a7R IV and set the aperture to f/1.4, the hyperfocal distance is 3.7 meters. This means that if I have a person or a natural element, such as a rock formation, in my composition, it should be at least 3.7 meters away, and from that point onward, everything will be in focus.
How To Focus
Always shoot in manual focus for night scenes. This ensures the camera does not hunt back and forth for an object to focus on in the dark.
- Foreground priority: Shine a torch on your subject, use the back buttons on your camera to digitally zoom in on your camera's LCD screen — not the lens — and adjust the focus ring until the subject's texture is pin-sharp.
- Star priority: If there is nothing in the foreground, find the brightest star in the sky, zoom in on your screen, and twist the focus ring until that blurry blob becomes a tiny, sharp pinpoint.
4. Camera Settings for Night Photography
Here is a quick guide to capturing the night sky.
- Aperture: Open it as wide as possible (f/1.8, f/2.8, etc.) to let in every bit of ancient light.
- ISO: I usually float between 1600 and 6400. Start with ISO 1600 and evaluate if you need to go higher.
- Shutter speed: This is a balancing act. If you leave it open too long, the stars will blur because the Earth is rotating. I use the NPF rule in the PhotoPills app to calculate the exact moment before points turn into trails.
- White balance: Never use Auto White Balance (AWB). I set mine to 4,900 Kelvin for a cooler, natural night look.
Example: As per PhotoPills' NPF Rule calculation, using a Sony a7R IV, a 14mm lens, at an aperture value of f/1.8, requires 11.81 seconds of shutter speed for "barely noticeable star trails" and 5.90 seconds for "pin-sharp" stars.

Learn About ISO Invariance
I strongly advise understanding ISO invariance. In brief, this concept revolves around your camera's sensor characteristics, where the level of image noise is essentially the same whether you brighten the photo with a high in-camera ISO setting or by boosting the exposure in post-processing. This sensor property is beneficial because it allows photographers to use a lower ISO on location and then brighten darker areas in post-processing. By shooting at a lower ISO, you avoid clipping highlights, and shadows can be recovered without significantly increased noise compared to shooting at a high ISO.
5. Building the Image in Post-Processing
The secret to post-processing night scenes is masking. Do not edit the whole image globally. Create layers for the sky, foreground, and elements within the foreground. I even create a separate layer for the Milky Way core to give it a pop.
- Cool down the stars to make them pop.
- Warm up the rocks to bring out the texture.
- Keep your blacks rich: you want the night to look like night, not like a weirdly lit day.
- Use the clarity slider on elements like the Milky Way, but do not push it so much that it doesn't blend in with the scene.
- Use AI noise-reduction features in software like Adobe Lightroom to remove noise.
- Keep an eye on the histogram and do not let the graph touch the black pixels completely. Turn the clipping feature on to visualize the black pixels.
If you want to deepen your skills in post-processing landscapes and night scenes, the Fstoppers tutorial Photographing the World: Landscape Photography and Post-Processing is an excellent resource, as is Photographing the World 2: Cityscape, Astrophotography, and Advanced Post-Processing.
Final Remarks
Night photography is an all-encompassing adventure for photographers. Every phase — from the initial planning of the location to selecting the right gear, determining the settings, perfecting the composition, and finally, the editing process — is equally critical and demands meticulous attention with very little room for error. While it can be an exhausting and often freezing experience, it is ultimately a rewarding one that allows us to capture and showcase our position within the vast universe.

Join the Fstoppers community for free
-
Post comments and join in the discussions
-
Browse the site ad-free
-
Share your work and get featured in the community
-
Compete in the photo contests for fun and prizes
3 Comments
I am wondering why you chose:
"PhotoPills' NPF Rule calculation, using a Sony a7R IV, a 14mm lens, at an aperture value of f/1.8, requires 11.81 seconds of shutter speed for "barely noticeable star trails" and 5.90 seconds for "pin-sharp" stars,"
...and yet chose to display screen captures that don't match your stated example? 14mm and 17mm are not the same.
You are absolutely right. I realized that later on, after publishing the video. As you can see in the video, my friend suggests: "20 seconds". The only reason is that it was my first attempt at using a 14mm. There was a meteor shower happening, and as I turned my phone on to calculate the shutter speed for a 14mm lens for the first time, he asked me to use 20 seconds. It was his lens that I had borrowed. So instead of calculating, I trusted him, as I also didn't want to miss capturing the meteors.
All Good information BUT one does not need to head out to the darkest of skies! Also yes a wide open 1.4 or 1.8 etc. is great But not really needed because it only makes the capture faster. Now about a lens MM the wider 10mm, 12mm or the 14mm is great but a must for the treasured MW Arch where you do a panorama say 200 degree from SE at start to NE and using a less than $100 panorama CAVIX PH-720B Gimbal Tripod Head it has a degree choice at it base for the wider the lens the higher the degree choice But I have found 30 degree setting good for all the way to 12mm but the new 10mm f/2.8 45 or even 60 degrees because of more overlap of images you may find yourself spending hours linking to several images in the king of apps PTGui but there are others. To get down to the real reason for the widest of wide lenses is when doing a panorama and getting the images merged is to have stars above the arch so that you have more of an image above and more like a 3:2 image vs a narrow pano like image.
Now a little help with a great little lens the 2013 APS-C Sony E 10-18mm (15-17mm in 35mm) F/4 OSS that even has threads for filters up front it can be used in Full Frame mode from 12mm to 18mm (18mm if you remove the light shield) compare (you may already have, sad) the FE 12-24mm F/4 G or F2.8 GM lenses these are big and heavy compared and you need a filter holder and large glass filters making for more $'s. I first used the E 10-18mm back in 2015 and not till 2017 did the 12-24mm monsters arrive. Yes a f/4 but using on a Sony A7SM1 and only needing ISO 3200 and low noise to boot hey no sweat!
You do not need to head for the dark places either most spots will be under lights.
A camera to cherish is the A7SM1 and M2 if you can find with app on them the main app is the "Digital Filter" reason is you can select sky and foreground separately each you can pick any camera selection and the camera puts them together first adjustable horizon the RAW or jpeg or both are sent to the SD card. No longer available for download from Sony Playmemories so find one with the apps and you have greater value.
There is no real need for the A7S's for the new A7RM5 will get your image just as good and at a low ISO. The A7S's yes have a very very high ISO but not ever going above 6400 and the A7RM5 has a two tier ISO and at 28000 just as smooth as 640. For MW arch's the the A7RM5 is a faster capturer say 5s vs 15s per capture so a 200+ degree pano can be done in less than 90s. Both the A7SM3 and the A7RM5 are just a sharp. Also due to a lens at F/1.4 or F1.8 makes for faster capture. What makes for faster also is moving to next degree click during in camera NR black screen YES use the Camera NR.
Do not worry about the brightness it is the camera!
One thing never mentioned or shown in reviews is "Bright Monitoring Sony" it is like night vision in the darkness of the dark where you want to get your foreground set up without having to do several captures. I and most assign to the trash button, easy to find in the dark.
I started in 2015 with the A7SM1 and spent whole nights from sunset to sunrise and never had to use a extra battery, always had one, battery hogs are the photographers doing time lappers.
If you can find a A7SM2 it is a great back up.