Are you a photographer or writer looking to upgrade your on-camera audio for basic video clips and interviews? Check out some basic hardware and software essentials to improve your basic audio workflow for transcribing interviews and simple video clips.
Keeping up with the evolving demands of technology can be wearing, and the rabbit hole into the world of audio quality is eternally long. Finding a simple starting point will let you begin the journey to better audio.
As a photographer first, I’ve been working to step up my audio game on two fronts. First, I'm a writer conducting a lot of interviews for my editorial and magazine work. Those interviews are always referenced and often end up transcribed. Clear audio is a time saver when using transcription services like Trint, which so far is my favorite online (paid) service for its follow-along features. Second, I want to create moving images with better sound if for no other purpose than for use on my own Instagram channel. DSLRs are not known for their built-in audio quality, on-camera audio isn't the pinnacle, either, but it is an upgrade. Attaching better quality sound to a video clip without much work is of value to me. Sure, a shotgun mic might look cooler but an audio recorder can serve both of my needs well, so that's where I started.
Hardware
Audio Recorder
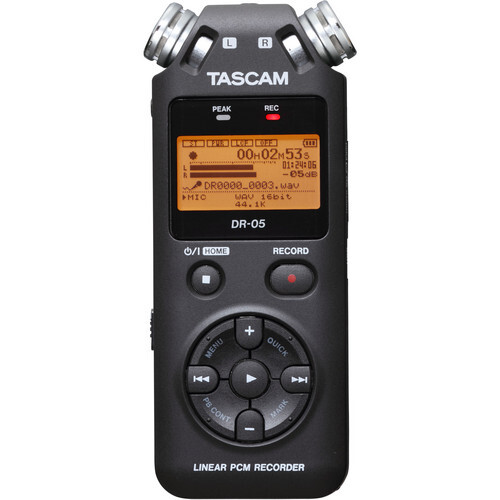
In the past, I've used a Tascam DR-07 (no longer available) until it had a sudden and unfortunate ending that crushed the display. The Tascam DR-05 Portable Handheld Digital Audio Recorder feels just as familiar in a slightly smaller footprint and is what I'm now using. For interviews, a favorite feature is the ability to add up to 99 mark points to return to later.
The Tascam DR-05 includes 4 GB Micro SD card, and only recognizes up to 32GB Micro SD memory cards. Capacities beyond 32GB will be unreadable by the DR-05, so check the specifications before buying an audio recorder and memory cards. A Micro SD to SD card adapter that is usually included when purchasing a Micro SD card is useful to import quickly to computers with a built-in SD card slot. Pelican's 0915 Memory Card Case is my favorite storage solution to keep from losing Micro SD and SD card adapters
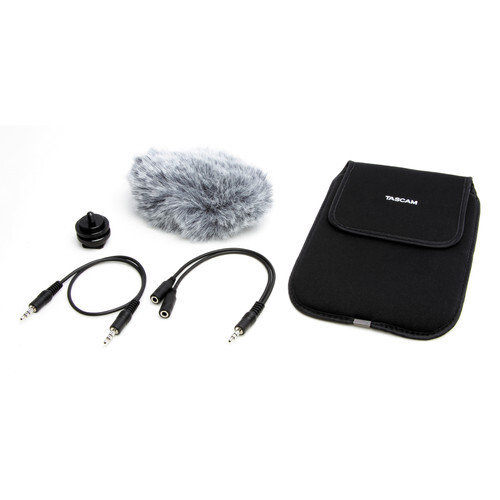
Attenuator Cable
A fancy word for a 3.5mm line to microphone cable, this lets you plug into a modern DSLR that can capture video. In this way, audio from the recorder is sent to the camera, overriding the built-in microphone for an external source providing better quality sound.
Headphone Splitter Cable
If you're interested in monitoring your audio as you record, a splitter allows headphones to be connected with a 3.5mm port while an attenuator is attached.
Tabletop or Mini Tripod
A small tripod can be helpful to elevate an audio recorder to a higher position for interviews or sound recording. I found two small Joby GorillaPod original tripods at a thrift shop for $2 each and thought they might come in handy some day. The gamble paid off and the 1/4" tripod attachment screw mount on the Tascam DR-05 is a perfect fit. I can wrap the GorillaPod around an object or set it on a table as a simple microphone holder. I may add a mouse pad as a base to reduce vibration.
Shoe Mount Adapter
A hot shoe mounted adapter with a 1/4” tripod thread can attach the Tascam DR-05 to a camera hot shoe, functioning like a boom mic in terms of on-board positioning for run and gun use.
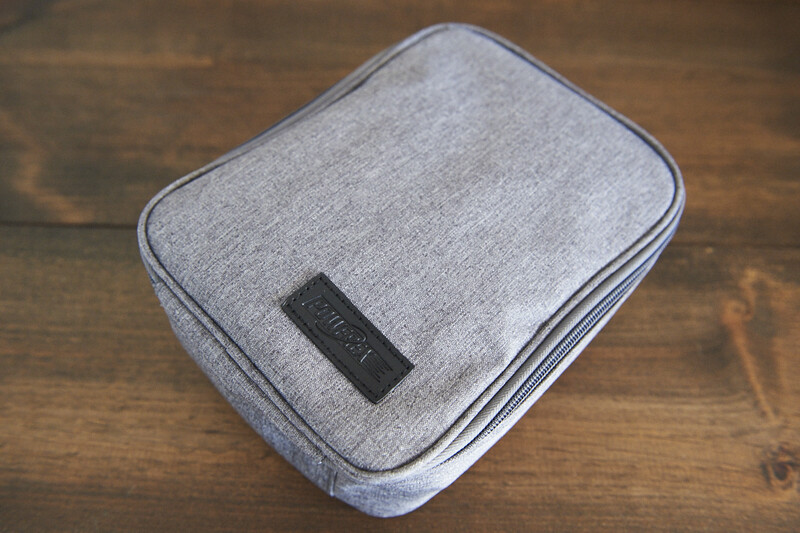
Powerex Padded Accessory Bag
Designed for flashes, chargers, and battery storage, the Powerex padded accessory bag makes the perfect home for a lean audio kit. It has room for cables, audio recorder, earbuds, and adapters to stay lean while keeping your audio gear safe.
Powerex's Accessory Padded Bag.
Powerex Pro AA Batteries
Powerex's new Pro Rechargeable AA NiMH Batteries (1.2V, 2700mAh) are my go power source to for all AA and AAA powered devices. 2700 mAh NMH rechargeable batteries have a long life and hold their charge for a long time. Toss in a couple of these with your audio recorder and you're set.
Audio Software
Audacity
While there are tons of paid applications out there, Audacity is a free, open-source application on Mac and PC, serving as a "multi-track audio editor and recorder.” It is widely regarded as one of the best free audio applications available.
GarageBand
While also basic and limited to a Mac, Apple's free GarageBand software can be helpful for adding in layered sound effects as well as splitting and merging audio clips.
This setup is almost certainly not where you’ll finish, but it is a start. Once you better learn the needs of your workflow, perhaps adding a boom or lavaliere mic, perhaps a field mixer, this kit will be just as useful. I'm just getting started in the world of audio, and this is what I've found useful so far as a photographer first and a writer second, with nominal motion capability in my toolkit. What tools are helpful for light and simple, yet effective, audio recording? Let us know in the comments below!
I use a Tascam DR-70D powered via USB with a 20,000mAh power bank. Screws onto your tripod socket, creates a signal to sync your audio easily later, provides 4 preamps with Phantom Power if you plan on using a Condenser microphone or Cloudlifter for getting some clean gain from a large diaphragm dynamic. It allows you to record each channel separately for mixing down later.
I find this to be a pretty versatile system that can handle the vast majority of situations involving video. If you're into podcasting, you can use it as a dedicated podcast recorder, too.
I use the 60D because I like the form-format better, but either one works wonderfully. I believe the 70D is able to maintain sync for a much longer period of time than the 60D, however. After about 30 minutes of continued recording, the 60D will have noticeably wandered out of sync from the video. Of course, that's not much of a problem with DSLR recording--not often we shoot a 30 minute single take.
Thanks for your remarks, Michael! They are quite appreciated and enjoyed. Shortly down the road, it seems a follow-up post is in order: taking the subject deeper while still focusing on enhancing skills for photographers and writers. I have a few ideas, and clearly still learning myself, but intend on taking your feedback into account. Thanks again!
I've found the Rode Wireless Filmmaker Kit to be invaluable. It costs a few hundred dollars for just one mic, but it puts you into an ecosystem that will save you time and grow with you.
I started with the $35 Aputure lav mic, which I recommend for people just getting started. But I recommend getting the Rode Filmmaker Kit as soon as its economically feasible. Going wireless makes even a simple interview of someone standing right in front of you much easier. You get way better results than using a shotgun mic and it's just as easy to use.
I also use the Rode Reporter handheld mic. It's perfect for situations where there's lots of ambient noise, like an event. It works great for one or two people and you get clean audio. I recently bought the wireless transmitter for that mic. Again, eliminating the cable makes everything so much easier. And that transmitter works with the receiver that comes with the Filmmaker Kit.
I also recommend investing in a Zoom H6, as soon as it's economically feasible. While you "can" mic two people using a cable splitter or a dual mic with the splitter built in, I don't recommend it. There's the whole wired thing, which is even worse when you have two people. More importantly, people speak at different volumes. So now you'll either deliver a video with that volume disparity, or you'll spend a lot of time editing the video to adjust the volume level for each person all the way through.
It's much easier to use a mixer and get the volume levels correct at the time of recording. The Zoom H6 supports 5 mic inputs out of the box and you can buy an accessory to support 6. It also comes with two different directional mics that can be used as shotgun mics.
The Zoom H6 is also an investment, but it will save time and money. I started out with a Rode shotgun mic that I no longer use. Knowing what I know now, I would never have bought that mic and instead saved a bit more and got the Zoom H6, which would perform the same function, plus do many more things I would need (but did not yet know I would need) going forward.
By all means, I encourage people just getting started to start low cost with that Aputure lav mic for about $35. But after that, I say go straight to the Rode Filmmaker Kit or/and the Zoom H6.
Regardless of what someone's intentions are when they start out, they will eventually find themselves needing to mic multiple people, so they might as well buy the right equipment for that at the outset because it really doesn't cost that much more.
I ended up, over time, buying an assortment of audio gear in the $30 - $150 range that I no longer use. If I'd known what I know now, I would have used that money to buy the equipment that I've recommended above.
The time and headache you save by getting clean audio at the time of recording is well worth the money it takes to buy the equipment necessary to do so.
And spend $150 - $200 on a good set of studio quality headphones. The earbuds that you use with your phone are not close to adequate for monitoring your audio.
That’s an excellent suggestion, Lenzy. Although I wouldn’t dismiss all earbuds. Definitely the free ones that come with your phone belong in the trash, but there are some good ones out there.
I’ve taken the reverse way around, and have been an audio engineer my entire life, and have only recently become something of a photography and video enthusiast.
Some years ago, all earbuds were worthless, and I used nothing but studio headphones.
But earbud manufacturers made great strides recently, as in the last five years or so.
I have the Triple Drivers from 1More, 100 bucks on Amazon, and they sound amazing, easily rivaling the low end muscle and high end sharpness of any of my headphones.
I’ll use them for video production shoots, as well as post-production, and mixing and mastering in tandem with my other headphones and studio speakers.
And the obvious bonus is that they’re so much less bulky and so much lighter than headphones, and I probably don’t need to tell you that this will absolutely make a difference when hauling around a bunch of equipment like a sherpa.
Brian, how well do those work at blocking out everything except what you're monitoring? I need that as much as I need sound quality. I use a set of over-the-ear headphones from Sony (that apparently don't cost as much as I remembered). https://amzn.to/2qq3NdB
They don't weigh anything, but they obviously take up much more space than earbuds. If I can get the same result with something that I can fit in my pocket, that will open up some creative opportunities for me.
They don't have any active noise cancelling feature, so it's just a simple matter of volume.
If need be, I can turn mine up loud enough where I won't hear a passing siren.
One thing that is often not mentioned about earbuds is the size and fit of the little rubbery silicone earpieces that stick on to the end, and this is one aspect where the 1More set is really great.
Most earbuds come with 12mm earpieces. I'm not exactly sure what that measurement is, but that's what they're called.
The 1Mores include silicone and foam earpieces in 12mm, 11mm, 10mm, and maybe a bigger set for larger ear canals. That dialed-in fit really helps in keeping outside sounds outside. I go for the 11mm silicone- best fit for me, and comfortable enough to wear all day.
That might be a fair critique, if you'd linked to a specific video relevant to the topic. But to link to a whole channel where any and all things video are discussed is pretty much a phoned-in effort, as well...better than nothing, but not as helpful to a beginner as a link to exactly what they need to know. I follow Curtis Judd and he does have videos that are specific to the topic in this article.
Not trying to be hostile in any way. Just making the point that if you're going to call someone out on their effort, you invite scrutiny of your own effort.
Also, comparing a single article to an entire Youtube channel isn't apples to apples.
I might have agreed with that BUT for the fact that the channel is pretty much about video/audio....kinda a given when the title of THIS article held " Step Up Your Audio". I'm not obliged to source out specific videos that match what this writer phoned in. If I HAD written this article I would have detailed the relevant info in addition to pointing readers to specific external articles etc.
This is my take on where I am personally in upgrading my audio for written work and short moving clips. Audio is massive technical subject, nor am I’m not an audio expert. I simply want to encourage photographers and writers to pursue expanding their skill sets, that getting started doesn’t have to be the end all, but these are some points to consider.
If you have something to contribute to growing the conversation, for the betterment of the craft and community, that’s why I take my time to write here and all that matters to me.
While I will agree that there's a lot of room for elaboration, audio is actually a pretty deep and complex subject so really getting into the weeds about the details would have not only necessitated a much longer article, but it would probably have flown over a lot of peoples' heads.
You can give someone general tips about how to get better audio without getting into details about preamps, headroom, balance vs. unbalanced signals, mic level vs. line level, SNR, dynamic vs. condenser microphones, microphone pick-up patterns, environmental acoustics, etc.
Going from knowing nothing to understanding the how and why of capturing good audio is probably well beyond the scope of a single article.
So hand someone a box of tools and tell them to build something?
It would have taken a handful of sentences after each item to explain what they do, how they are used and why....maybe a link or two to someone else who described it..why reinvent the wheel sorta thing.
No, it's more akin to giving someone a recipe or a suggestion for cooking utensils or ingredients without diving into the science of cooking because the average home cook is not going to need to understand WHY certain cooking equipment, techniques, or ingredient combinations work better than others. They just care about the end result and a recipe will often help them get a better end result even without providing them an in-depth understanding.


16 Comments
I use a Tascam DR-70D powered via USB with a 20,000mAh power bank. Screws onto your tripod socket, creates a signal to sync your audio easily later, provides 4 preamps with Phantom Power if you plan on using a Condenser microphone or Cloudlifter for getting some clean gain from a large diaphragm dynamic. It allows you to record each channel separately for mixing down later.
I find this to be a pretty versatile system that can handle the vast majority of situations involving video. If you're into podcasting, you can use it as a dedicated podcast recorder, too.
I use the 60D because I like the form-format better, but either one works wonderfully. I believe the 70D is able to maintain sync for a much longer period of time than the 60D, however. After about 30 minutes of continued recording, the 60D will have noticeably wandered out of sync from the video. Of course, that's not much of a problem with DSLR recording--not often we shoot a 30 minute single take.
Thanks for your remarks, Michael! They are quite appreciated and enjoyed. Shortly down the road, it seems a follow-up post is in order: taking the subject deeper while still focusing on enhancing skills for photographers and writers. I have a few ideas, and clearly still learning myself, but intend on taking your feedback into account. Thanks again!
I've found the Rode Wireless Filmmaker Kit to be invaluable. It costs a few hundred dollars for just one mic, but it puts you into an ecosystem that will save you time and grow with you.
I started with the $35 Aputure lav mic, which I recommend for people just getting started. But I recommend getting the Rode Filmmaker Kit as soon as its economically feasible. Going wireless makes even a simple interview of someone standing right in front of you much easier. You get way better results than using a shotgun mic and it's just as easy to use.
I also use the Rode Reporter handheld mic. It's perfect for situations where there's lots of ambient noise, like an event. It works great for one or two people and you get clean audio. I recently bought the wireless transmitter for that mic. Again, eliminating the cable makes everything so much easier. And that transmitter works with the receiver that comes with the Filmmaker Kit.
I also recommend investing in a Zoom H6, as soon as it's economically feasible. While you "can" mic two people using a cable splitter or a dual mic with the splitter built in, I don't recommend it. There's the whole wired thing, which is even worse when you have two people. More importantly, people speak at different volumes. So now you'll either deliver a video with that volume disparity, or you'll spend a lot of time editing the video to adjust the volume level for each person all the way through.
It's much easier to use a mixer and get the volume levels correct at the time of recording. The Zoom H6 supports 5 mic inputs out of the box and you can buy an accessory to support 6. It also comes with two different directional mics that can be used as shotgun mics.
The Zoom H6 is also an investment, but it will save time and money. I started out with a Rode shotgun mic that I no longer use. Knowing what I know now, I would never have bought that mic and instead saved a bit more and got the Zoom H6, which would perform the same function, plus do many more things I would need (but did not yet know I would need) going forward.
By all means, I encourage people just getting started to start low cost with that Aputure lav mic for about $35. But after that, I say go straight to the Rode Filmmaker Kit or/and the Zoom H6.
Regardless of what someone's intentions are when they start out, they will eventually find themselves needing to mic multiple people, so they might as well buy the right equipment for that at the outset because it really doesn't cost that much more.
I ended up, over time, buying an assortment of audio gear in the $30 - $150 range that I no longer use. If I'd known what I know now, I would have used that money to buy the equipment that I've recommended above.
The time and headache you save by getting clean audio at the time of recording is well worth the money it takes to buy the equipment necessary to do so.
And spend $150 - $200 on a good set of studio quality headphones. The earbuds that you use with your phone are not close to adequate for monitoring your audio.
That’s an excellent suggestion, Lenzy. Although I wouldn’t dismiss all earbuds. Definitely the free ones that come with your phone belong in the trash, but there are some good ones out there.
I’ve taken the reverse way around, and have been an audio engineer my entire life, and have only recently become something of a photography and video enthusiast.
Some years ago, all earbuds were worthless, and I used nothing but studio headphones.
But earbud manufacturers made great strides recently, as in the last five years or so.
I have the Triple Drivers from 1More, 100 bucks on Amazon, and they sound amazing, easily rivaling the low end muscle and high end sharpness of any of my headphones.
I’ll use them for video production shoots, as well as post-production, and mixing and mastering in tandem with my other headphones and studio speakers.
And the obvious bonus is that they’re so much less bulky and so much lighter than headphones, and I probably don’t need to tell you that this will absolutely make a difference when hauling around a bunch of equipment like a sherpa.
https://www.amazon.com/1MORE-Earphones-Headphones-Resolution-Smartphone…
Brian, how well do those work at blocking out everything except what you're monitoring? I need that as much as I need sound quality. I use a set of over-the-ear headphones from Sony (that apparently don't cost as much as I remembered). https://amzn.to/2qq3NdB
They don't weigh anything, but they obviously take up much more space than earbuds. If I can get the same result with something that I can fit in my pocket, that will open up some creative opportunities for me.
They don't have any active noise cancelling feature, so it's just a simple matter of volume.
If need be, I can turn mine up loud enough where I won't hear a passing siren.
One thing that is often not mentioned about earbuds is the size and fit of the little rubbery silicone earpieces that stick on to the end, and this is one aspect where the 1More set is really great.
Most earbuds come with 12mm earpieces. I'm not exactly sure what that measurement is, but that's what they're called.
The 1Mores include silicone and foam earpieces in 12mm, 11mm, 10mm, and maybe a bigger set for larger ear canals. That dialed-in fit really helps in keeping outside sounds outside. I go for the 11mm silicone- best fit for me, and comfortable enough to wear all day.
This article "sounds" phoned-in.
You list a bunch of stuff but not the how, where and why someone would use it to make an appreciable difference from whatever they are doing now.
Go See: https://www.youtube.com/user/curtisjudd
That might be a fair critique, if you'd linked to a specific video relevant to the topic. But to link to a whole channel where any and all things video are discussed is pretty much a phoned-in effort, as well...better than nothing, but not as helpful to a beginner as a link to exactly what they need to know. I follow Curtis Judd and he does have videos that are specific to the topic in this article.
Not trying to be hostile in any way. Just making the point that if you're going to call someone out on their effort, you invite scrutiny of your own effort.
Also, comparing a single article to an entire Youtube channel isn't apples to apples.
Well said Lenny! I found this article useful - thanks Jordan
I might have agreed with that BUT for the fact that the channel is pretty much about video/audio....kinda a given when the title of THIS article held " Step Up Your Audio". I'm not obliged to source out specific videos that match what this writer phoned in. If I HAD written this article I would have detailed the relevant info in addition to pointing readers to specific external articles etc.
This is my take on where I am personally in upgrading my audio for written work and short moving clips. Audio is massive technical subject, nor am I’m not an audio expert. I simply want to encourage photographers and writers to pursue expanding their skill sets, that getting started doesn’t have to be the end all, but these are some points to consider.
If you have something to contribute to growing the conversation, for the betterment of the craft and community, that’s why I take my time to write here and all that matters to me.
While I will agree that there's a lot of room for elaboration, audio is actually a pretty deep and complex subject so really getting into the weeds about the details would have not only necessitated a much longer article, but it would probably have flown over a lot of peoples' heads.
You can give someone general tips about how to get better audio without getting into details about preamps, headroom, balance vs. unbalanced signals, mic level vs. line level, SNR, dynamic vs. condenser microphones, microphone pick-up patterns, environmental acoustics, etc.
Going from knowing nothing to understanding the how and why of capturing good audio is probably well beyond the scope of a single article.
So hand someone a box of tools and tell them to build something?
It would have taken a handful of sentences after each item to explain what they do, how they are used and why....maybe a link or two to someone else who described it..why reinvent the wheel sorta thing.
No, it's more akin to giving someone a recipe or a suggestion for cooking utensils or ingredients without diving into the science of cooking because the average home cook is not going to need to understand WHY certain cooking equipment, techniques, or ingredient combinations work better than others. They just care about the end result and a recipe will often help them get a better end result even without providing them an in-depth understanding.