
Being a long time Lightroom user has helped me have a well polished workflow for my photography projects. So why should I bother trying Capture One Pro?
My Current Lightroom Workflow
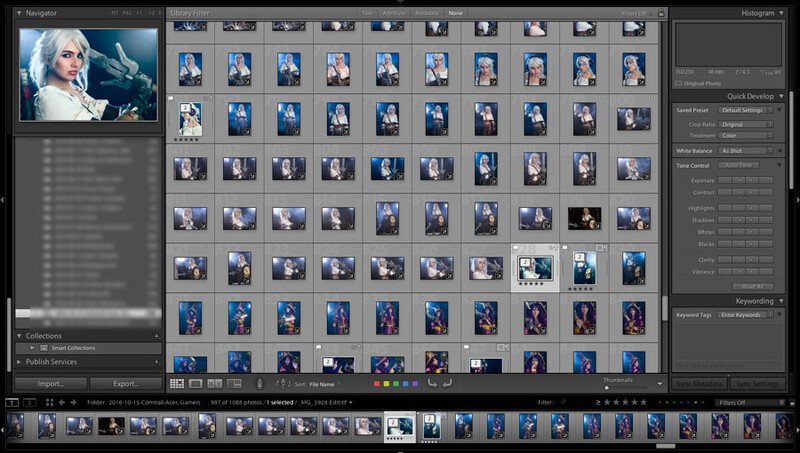
It's like a comfortable old pair of slippers. New ones do not feel right, so you frequently wear the old, stinky ones. Lightroom is the first software I've used for organizing my images and working with my raw files. I've also used it for clients to select their desired images, to tag images with keywords, for exporting, watermarking, and what not. It has shaped my workflow based on its user interface and functionality. I do not wonder if I need the same tools or functionality when I work with a different software. It's natural. Here is a typical photoshoot of mine:
- I tether to Lightroom via a USB cable (will come to this one in details further). Images are stored both on my laptop's hard drive and on the memory card in the camera.
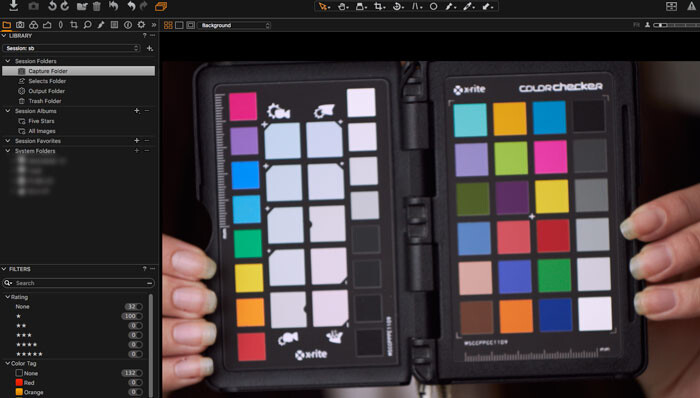
- I shoot a frame with the ColorChecker Passport I'd use for color correction later.
- After the photoshoot the client is allowed to select the images they want to buy. The selection is made using the built-in rating system in Lightroom.
- When I get back to my work desk, I copy the folder with images to a NAS device (a.k.a. backup file server).
- Then I use the ColorChecker Passport image to create a DNG profile which I use to color correct my images. I also use the white balance tool on the same file to set the correct white balance for all images in the session.
- I copy the image settings from the ColorChecker image and paste them on all images from that setup.
- I filter by the highest rated images and start retouching them one by one in Photoshop. When I save them in Photoshop Lightroom automatically stacks the newly created TIFF/PSD file with the original. This way I know this file is completed. I flag it with a "Pick" flag and I'm off to the next image until there are no unflagged highest-rated images left. This way I can't miss a file.
- I export the retouched files for the client and for my portfolio. Those for my portfolio have a watermark. This watermark I configured into the export preset.
With Lightroom I don't bother to work on a catalog that refers to files from the NAS device. The slowdown is only when I open and save the files in Photoshop.
That's it. Lightroom helped me to organize my images, easily filter those that I've already retouched and export the final files for the client. It's a very nice piece of software indeed.
Why Capture One Pro?
Main reason: Tethering. It's what annoys me many times using Lightroom with any client, especially a high profile one. I photograph them and at a certain moment they say, "The images are not changing on the computer screen." The reasons are various: faulty USB cable, or I'v unplugged the USB cable from the camera without noticing, or the camera went to stand by while I'm waiting for the client to change outfit or make up. When this happens Lightroom says it can't detect a camera, so I'm trying different remedies. Sometimes they work, sometimes they don't. Unplugging the USB cable from the computer or camera, the plugging it back in, restarting the tethering session in Lightroom, restarting Lightroom, restarting the camera. I even restarted the laptop several times (and sometimes it worked). When it's not working I simply continue shooting without being tethered. I'm using Lightroom 5, by the way.
Having painfully patiently worked like that, I've decided to give Capture One Pro a try. I downloaded the latest one (9.3) and tried it for 30 days working on several commercial projects. Here's what I think about it.
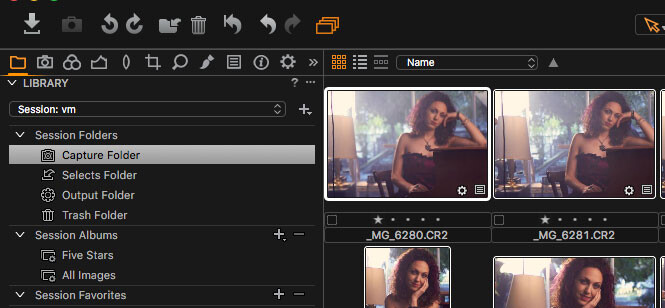
Catalogs vs. Sessions vs. Collections
I don't know why it needs to be so fragmented, but Capture One Pro has all those. A catalog is like a group. I have a "Tethered" catalog where I shoot all my tethered sessions into. I create a new session for each client and store it in that catalog. The session has a folder structure like the following:
[Project folder]
[session file]
Captured/ - all captured files are here
Selects/ - I don't use this one
Output/ - where the output files and folders are placed
Trash/ - the heaven for less important files
When I archive the project I simply grab the [Project folder] and copy it to my backup storage device.
In Lightroom I have a catalog for each year or for each quarter. For example I had a "2016-Q4" catalog. There I keep all archived projects for Q4 (so far) and if I want, I can go back and work on the projects' files.
In Capture One Pro, the only similar functionality I found is to create a catalog ("2016-Q4") an in there to import existing sessions (importing the session file for each project). It creates a "Collection" which is something like a folder and you can browse your images, search by keywords, filter by rating, etc. However, when your files are not on the local computer, it is quite painful to work with the archives. If you want to use Capture One for your archives, you have to have a fast network connection to your backup devices. Otherwise the interface freezes quite often as it (probably) reads those big TIFF/PSD files which over network means it transfers every single byte from them as you click.
Tethering
It simply works. I don't need to start or stop a tethering session. It automatically starts when a camera is plugged in. It recovers much easily when you happen to unplug your cable and plug it back in. It is way faster and more stable than Lightroom's tethering.
I have to mention an important note here: USB cable quality is a very very important thing. I thought USB cables are all the same, but they aren't. I'm not a cable guru, but I've seen "thin" and "thick" ones, so to say. The thicker ones have an extra screening around the cable. They work better for me. For those DIY-ers, here's the hack I did to keep my cable steady when shooting:
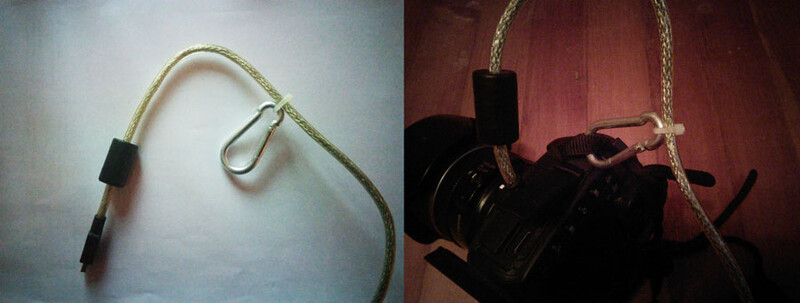
If you want to look more professional you can always buy the real one.
There were several cases when I had tethering problems with Capture One but I also found the solutions. One of them is you have to go in the settings and uncheck the Canon, Nikon, and Sony from the list of camera providers under the Capture tab. This is valid only if you use a DSLR. Sometimes the USB cable gets unplugged and plugging it in doesn't make the tethering work. I found that restarting Capture One with your USB cable unplugged and then plugging it back after the software loads fixes the issue. But compared to the experience I had with Lightroom tethering in Capture One works much smoothly and quickly.
Live View
I can't praise this functionality enough. It's a lifesaver when it comes to shooting from angles where you can't check your composition, especially when you shoot products straight down having your camera on a tripod. That's the second feature that made me like Capture One more.
Backup When Shooting
While Lightroom is able to store images both on camera's memory card and on the local hard drive, Capture One Pro can't do that. The reason behind this is Lightroom uses a hack to do so. In general, camera manufacturers provide means to store the files only on your hard drive when shooting tethered. Capture One works with the standard functionality, so this is the reason why files are stored only on your computer. If you need to have a live backup during the shoot you have to find your own solution. I am attaching an external hard drive and I run a small piece of software that copies the new files.
Image Adjustments While Shooting Tethered
Rating the Images
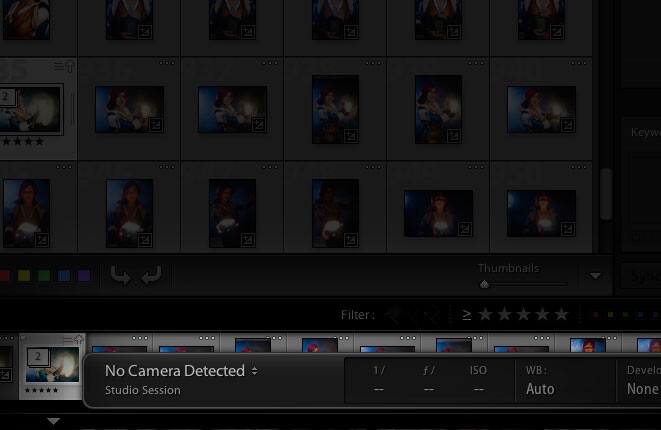
As I said I am trying to align Capture One Pro to my current Lightroom workflow, because this is what I'm used to. The next thing is to see if the client can go through the images and rate the ones they want to buy. This worked fine, although clients were frustrated when they rated an image and it disappeared.
In Lightroom, your filters are like "show me all images with rating > 2 stars." When you have a 3 star image, and you mark it with 4 stars it stays there. However, in Capture One you have a filter "show me images with exactly 3 stars." That's why when you rate an image with 4 stars it disappears from the filtered results. Anyway, my clients I can get along with that.
Color Correction
This is an issue for me. While Capture One Pro provides lots of great tools for color correcting and color grading your images, it doesn't support DNG profiles but only ICC profiles. ColorChecker Passport comes with a software that creates DNG profiles. This means with Capture One Pro, I can only use my pricey Color Checker Passport for picking white balance. There are tools to create ICC profiles but they come with other pieces of hardware. ColorChecker Password is not one of them. The reason Capture One uses only ICC profiles is (quoting their customer support) "The vast majority of our professional customers and institutions prefer our option." Currently I use the provided ICC profiles that come with Capture One Pro.
Applying Adjustments Over Multiple Images
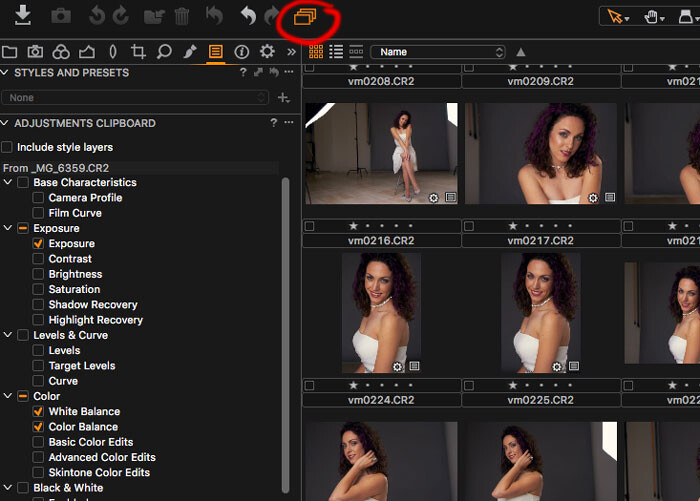
You may want to set the same adjustments to all images in a given set. By copying the adjustments of one image (Shift + Ctrl/Command + C) and pasting onto a list of selected images (Shift + Ctrl/Command + V) you copy all adjustments. If you need to copy only some of them you can go to the "Paste" panel and mark only those you need. This is similar to what I had in Lightroom.
See the icon I marked in red? When it's on you can apply adjustments and rating over multiple images. In the beginning it had me wondering why I could not apply rating changes to multiple images. So, you better have it on.
Retouching
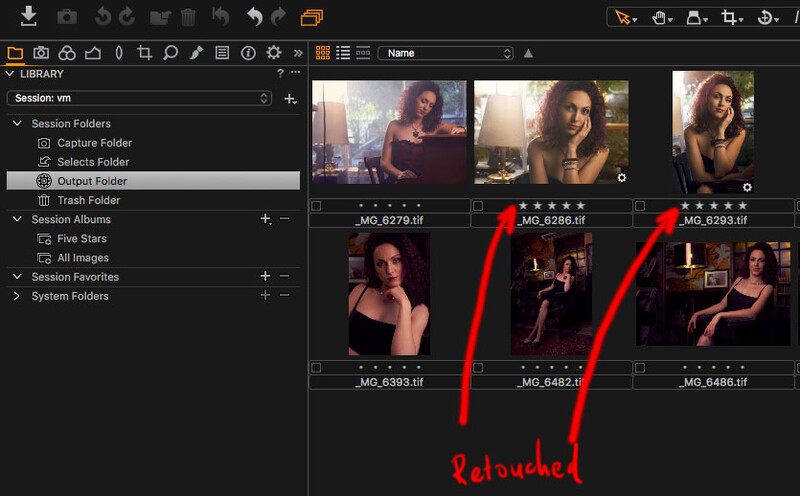
The client has selected several images for retouching. I need a way to differentiate between files that have been retouched from the non-retouched ones. The retouched files are in TIFF/PSD format. The presence of such file may assure me the image has been retouched. In Lightroom, it can group the raw and the retouched file together into a "stack." I can't find stacking in Capture One Pro. If I store the retouched file in the same folder where all raw files reside, I can easily miss to retouch some because I have to always check if every selected raw file has a double with a TIFF/PSD extension.
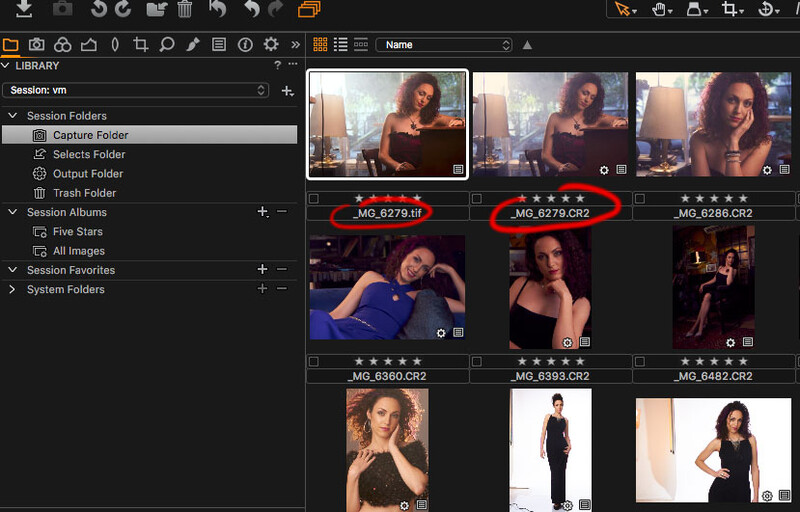
Too complex, too error prone, too lazy to do that. Any solution that visually keeps the retouched file and the original ones as different files in the same folder is too risky for me. Here's a better way:
- I list all highest rated images that have been color corrected.
- I select them all (Ctrl + A or Command + A), right click to choose "Export > Variants." It exports the selected files as TIFF files (in my case) and places them into the Output folder. All exported (now TIFF) files have no rating.
- I retouch the files and rate them with 5 stars one at a time.
- I continue retouching until no unrated TIFF files remain in the Output folder. You can easily check that by filtering by "None" rating and if your view becomes empty, all files have been processed. Simple and fool proof.
I miss a shortcut for editing a file in a default application. In Lightroom I press Ctrl/Command + E and it opens it in Photoshop. In Capture One I have to use right click and choose Edit > Open With > Photoshop (take notes, Phase One).
Again, I miss the Lightroom stacking functionality (*cough*, Phase One).
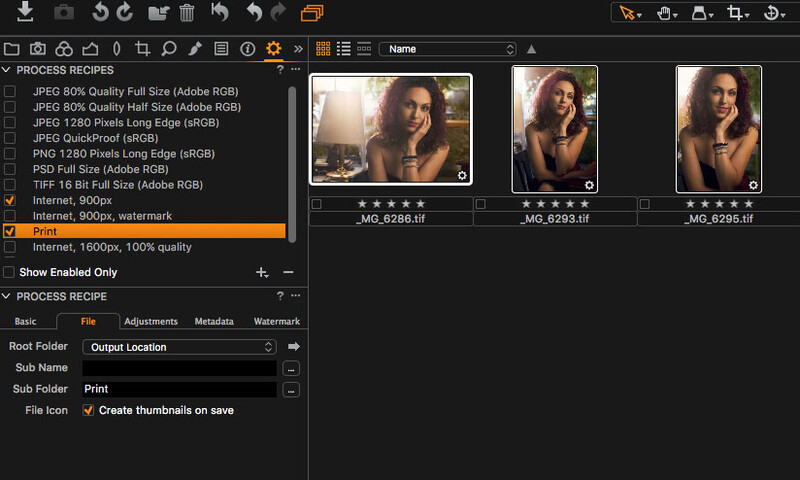
Presets / Recipes
As in Lightroom, Capture One Pro allows you to create presets for exporting. They call them "recipes" where you configure the output file type, output location, watermarking, and metadata. The cool thing is you can run several recipes at once while in Lightroom you could run one preset at a time.
When I first run several recipes on retouched files I got the following error:
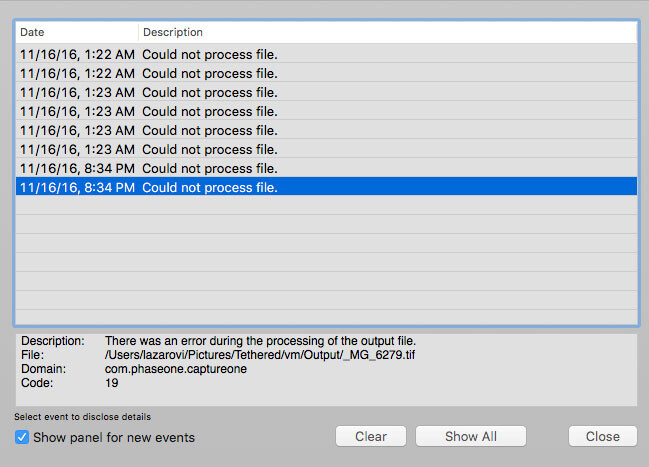
After some wandering around I found I had to "Regenerate the previews" (*cough cough*). You can regenerate the previews of a single image by right clicking and choosing "Regenerate previews." However, when you select several images and use the right click again, it won't re-create the previews for all of them but only for the one you've right clicked over. Not very intuitive. You have to choose File > Regenerate Previews instead. After that's ready you can successfully export your files.
Watermarking
I watermark the images in my portfolio. In Capture One Pro, I found you can watermark your images with a text or an image but the controls are far less than Lightroom offered. When watermarking with text you should be aware if the image is dark or light and if the text will be visible or not. In Lightroom, I had an option for text shadows. I used a lighter text with darker shadows. In Capture One Pro I don't have that, so I had to use an image instead. And, yes, I'm too lazy to watermark my images in Photoshop. Why? Because commercial clients don't want watermarks while I use them for my portfolio. It's much easier to put watermarks during image export than applying it manually in Photoshop.
Conclusion
I can do my job both with Capture One Pro and Lightroom. I can use them interchangeably but I feel better if I use only one application. The biggest issue for me using Capture One Pro is browsing files that are over network (e.g. NAS device). Apart from that it's a great piece of software that can surely replace my Lightroom workflow. Old slippers are still more comfortable but I decided to get a new pair too.


Join the Fstoppers community for free
-
Post comments and join in the discussions
-
Browse the site ad-free
-
Share your work and get featured in the community
-
Compete in the photo contests for fun and prizes
108 Comments
hi @tihomir lazarov,
Shortcut : Press ALT + the rating on the 1st tab (if you want 3* and 5* for example). Select 3* and then ALT + click on the circle of the 5*.
hope this helps,
Olivier
Great!
Thanks Oliver! That was very helpful indeed.
Most welcome, and welcome to C1 :) Good article, keep it up.
Huh??
It's a solution to my clients' confusion when rating images.
If I have filtered by 3 stars in Capture One Pro and my client marks a file with 4 stars, it automatically disappears hence the filter.
But with the solution Oliver gave I can Alt/Option + click on the 4 and 5 star filters and the image will not disappear anymore.
Thanks. I only use C1. Don't use it like you do, but still leaning. Cannot get my brain around LR. Learnt heaps from your article. Thankyou for going to the trouble of writing it.
Thanks, I'm glad to hear it have been helpful.
In more details: I ask my clients to go though the images and mark the ones they like with 1 star. Then I filter out those that haven't been rated. My clients continue filtering the images, now with 2 stars, and so on. At the end they have selected best of the best. They were confused when images kept disappearing when rating them.
hope you got the answer to my tip :) was relating to the sort functions which were "hidden" in C1.
Cmd/ctrl shoud work as well. Another solution would be to create a customer filter.
Yes, it works too. Thanks!
Custom filters are an option too, right. However I try to use all softwares as stock configured as possible. But this may be helpful for other readers also. Thanks.
Stock/default configuration is, in my opinion, definitely not the way to go with Capture One. It has so many features that can be customized and that are meant to be, that it would be a shame to use it as it is "out of the box". It can be used with its default configuration, but it truely shines once you customize it to match your needs. It can save you a lot of time – and trouble ;)
I'm sure you are right.
I just don't like working with software that much and I try to stay away from it... but it's unavoidable (until I can afford someone else to retouch my work).
One thing for sure: Clients love Capture One as they see every click on the screen.
I am also starting with Capture One.
At this point I am not that happy with the way Capture One handles kelvin value. While my Minolta color meter gives me 5300 kelvin and grey card in Lightroom also gives me same value +/- 100 kelvin, Capture one after gray card sets temperature to aprox. 6000 kelvin. I find that confusing. Support is telling me setting kelvin in camera is not the way to go, grey card is. As I understand this differs from camera to camera, I use Sony a7r.
I think Capture One better could use same behavior as with tiff files, not show kelvin but only + - values, that at least would be correct. Or make profiles for different cameras beside there own:)
This is a very interestng (and scary) observation.
Have you contacted their technical support? If there's a problem indeed and they fix it after your complaint, the world will become a better place.
Yes I asked them and then told me it was better to use grey card. They confirmed different cameras gives different reading.
In lightroom I get correct value after using the grey card but initialy it is of to.( Camera set to 5300 but shows 5000, while Capture One shows 5600)
I think Sony raw files specialy don't work good. Still shooting with manual kelvin might not be best way, it just does not work as expected with Sony. I will use grey card.
I usually use a grey card but it's scary that it's quite off from the real metering...
I rarely shoot tethered any more, but when I did, I used Aperture with my Canons and my partner's Nikons. It maintained the connection with absolute reliability. And, if the session was interrupted by, say, the camera powering off, it would resume automatically as soon as the connection was reestablished. Surprising that Apple succeeded so well where more photo-specialist developers like C1 and Adobe seem to be struggling.
At least Capture One works fine for now. Curious if Affinity software would go in the tethering direction too.
+1 on Aperture. I used its tethering capability extensively and it was always 100% rock solid.
I wish Apple would have sold it to another company to keep it going.
Is it just me or have there been a ton of Capture One posts here recently? I'm not complaining, I'm in the middle of switching from LR to C1 and it's super helpful. I know LR super well and know how to make the images come out how I want, so I'm nervous to fix what ain't broke. But I like the C1 workflow better and tethering is a joke in LR. Anyway, thanks for the info!
There are not many articles on Capture One on FStoppers lately that I know of. Maybe Phase One started a marketing campaign and I missed the chance to get some cash :)
I hope they fix their software, so it runs smoothly on remote files.
Thanks for the good article. After a very frustrating session tethered in LR yesterday, I will give C1 a try. I've also toyed with Nikon Camera Control Pro but that no longer works since I upgraded to OS Sierra. I almost always have one camera that needs to be controlled remotely on a shoot, and use the CamRanger for that, so I end up with the remote on one app and the wire tethered on another. Not ideal. I was testing Smart Shooter which tethers two cameras at once, but their focusing and viewing interfaces are not up to the job for me, which is too bad because I had no connection issues tethering with the app. I would then have LR pick up from a watch folder the images were downloaded to.
Very interesting. I guess you fire the cameras with a PocketWizard or a camera remote. The Live View functionality in Capture One may be of great help for you. Give it a try.
As a Fuji XT2 user, I'd say the files look much better in Capture One than in LR. I'm still hopeful one day we will be able to tether to Capture One, but I've lost most of my faith in that.
I didn't know Capture One can't tether with Fuji.
Fuji is quite conservative and apparentlky likes to keep everything in-house… which is one of the reason why we don't have a TTL flash trigger yet and no real tethering solution for it :( Hopefully, that'll change soon!
If all you want is a great tethering solution that works really well, check out Entangle. It's a Linux solution, so would require a Linux based host to work on, but it's very lightweight and works very well.
https://entangle-photo.org/
I'm looking for "all-in-one" solution. I barely can stand working in 2 applications (LR/C1 + Photoshop). I want to focus on the photography part, not fighting with softwares that are here to make our lives better, not more complex.
That's why I want either LR or C1 (in the current case). Whichever works better and saves me time, I'll use it.
I do agree with you with almost all the points. Please can you mentioned tools to create ICC profiles for our own camera ?
I don't have tools to create ICC profiles yet.
Currently I use the built-in ICC profiles and my pricey Color Checker Passport is just for setting a correct white balance.
I know. I would like to know if you can recommend me one...
Someone in the thread said something about i1 Display Pro. I remember I installed some X-Rite software that promised to create ICC profiles... but required their hardware in order to run. I don't remember but it may have been the same one.
I'm not sure what you issue is regarding the files on a NAS. I personally can browse through my archives just fine. I keep as session on my computer and use the library tool to browse through my system/nas files. It works just fine. However, placing a session on a NAS may slow things down depending on your connection/hardware.
If you are serious about colors an want to create your own ICC profiles, look at basICColor input 5 (http://www.basiccolor.de) to create them, and Digital ColorChecker for the target (http://couleureticc.com/store/product.php?id_product=28). Given, it's expensive, but if you need it, you probably can get over the cost.
When giving C1 to your clients for rating, don't activate any filter and the images won't disappear… Eventually, you may want to look at Capture Pilot so that the client experience is even better and they can rate the images as you go with an iPad (as long as the client is not the person being photographed…).
If you have any specific issue with the software, you should contact Phase One directly. Their customer support is second to none and they may take some of your ideas for future updates, who knows :)
About the NAS issue: I can browse through the raw files BUT when there are TIFF files and in bowser mode I click once (not twice) on a single item, the UI simply freezes for seveal minutes.
About the ICC profiles: If i1 Display Pro can do the job (it's actually their software), it's a cheaper solution for me.
About the rating: I'm telling them to gradually rate the images starting from 1 star, then 2 stars and so on. The nice thing about this approach is in case there is a 5 star image not in focus (but the client chose it and I didn't saw it), I could try to compensate them with a 4 star similar image or use a 4 star image to swap eyes/heads, etc.
I've already contacted their technical support like 3 days ago but I don't have an answer yet. Their customer support was quite prompt to help with non-technical (invoices, etc.). Honestly I wrote about my NAS issues with the secret thought Phase One will read this too (I've sent them an email too). There were similar complaints from other readers. That may help convince them it's an important problem to be solved.
I believe TIFF are the real issue here, probably not the NAS. TIFF previews require quite a bit of ressources to be generated and if they are placed on a NAS it probably won't help the problem. You'd be better off building their previews locally and then move them onto your NAS from C1 so that it keeps the previews linked. It might help. Another thing with TIFF files, the less layers and chanels they contain, the faster C1 will be at generating their previews.
How do I build the previews locally?
I am working on a local session until I retouch all files. Then I copy the session folder to the file server and import the session in my archive catalog.
I guess if the previews are built in the local catalog they would be stored in the session cache so it's pulled out quickly when it's on the file server. Is this the way to do it?
But stil Capture One could load the TIFF file into a separate application process thread so it doesn't block the UI and I can continue my work with the software (already told them that by email).
I'm a product photographer and need Live View for the stylist and client or art director to exactly what the shot will look like. The 10 year old Nikon Camera Control Pro is really showing it's age, but it's rock-solid. I may give C1P a try, there will probably be a Black Friday sale.
All the side topic comments were interesting. Two things to note, I never use a catalog, I don't need anything more complicated than Windows File Explorer with simply laid out folder names.
I haven't used a colored swatch card in years, I simply use a Kodak grey card, get it exactly even by dialing in the Kelvin temperature. Maybe it's because I only use 1 of 3 softboxes or umbrella all the time.
The colored card is just for fine tuning after the white balance setting. That's why I can currently live with the grey card for white balance.
And yes, I had to shoot products recently and the live view was the best thing in the shoot for me and the client. It sped the things up quite a lot.
I hope there will be a discount for Black Friday.
Yesterday I ran into the same problem - it was annoying af. But I had a workaround that worked perfectly: I installed Canon Eos Utility, told it to save on card and harddrive, then set an auto-import folder in lightroom. so, even the shutter was pushed several times in burst, it always synced after a few seconds and never missed an image or caused a freeze or an Error on camera (!).
That's a good workaround for those who already bought Lightroom and do not want to buy Capture One.
@Tihomir Lazarov - you can check multiple star-rating-filter with ctrl or cmd key. Then you will have more then only one kind of stars filter on. And there is solution for color checker, i have somewhere tutorial, but i dont have it on this computer and i didnt tested it yet.
edit: found it: http://www.colourspace.xyz/creating-camera-profiles-for-capture-one/
Thanks.
Creating ICC profiles requires the "i1 Profiler" software. I tested that before writing the article and it requires the appropriate hardware for it which was i1 Display as far as I know.
Did you try http://www.delt.ae/ which was mentioned in the comments to that article?
No, I haven't yet.
There is also http://www.dohm.com.au/coca/. Works with Wine if you're on a Mac (I am).
DNG camera profile (DCP) to ICC camera profile converter: https://sourceforge.net/projects/dcp2icc/. Haven't tried it myself yet, though. Windows or Linux, it seems.
When I have the original RAW and the edited TIFF in the same folder, I can't assign different color tags and ratings for each one, as C1 seems to interpret both as the "same" file, after I use "Edit With" command and the edited TIFF is automatically imported back. Did this happen to you too? I couldn't find a way to solve this =/
I haven't had that situation as I export the TIFF files into the "Output" folder from Export > Variants.
Other photogaphers I know, that use Capture One, do not use it after the TIFF files are generated. They use their OS file browser to navigate and edit those TIFFs. I still don't know how they manage to not miss a TIFF file (maybe they check the file size... if it's less than 100MB, it's probably not retouched). As I said, this is an error prone method for me and that's why I did what I explained in the article: the output folder and assigning ratings to the retouched files.
I spoke to Capture One's tech support and they said they are about to implement grouping of files (like the stacking in Lightroom) in the future versions.