
If you haven't noticed from my previous articles, I love Lightroom Classic. Lightroom has many powerful features that are easy to access, and I love its digital asset management capabilities. However, some powerful features are hiding in Lightroom that you might not know are there.
Many of Lightroom's features are intuitive, such as the simple, self-explanatory sliders and controls that are quickly learned. Other features are usually discovered by watching a few tutorial videos, like using the Alt/Option key in combination with many of the sliders.
Even as easy as Lightroom is, there is a limit as to how intuitive software can be. Advanced techniques aren't always evident, as there's often no way to make them visually obvious. As a software developer, I can attest that a great user interface design is much harder to pull off than it looks.
Unless you have been around Lightroom for a while, here are three Lightroom features that you probably didn't know existed.
Cycling Through Selected Images
Culling images can be a chore sometimes. Deciding on which images to keep can often be stressful. Viewing each image and comparing it with others to find the one that you like most is often a task of clicking, viewing, and clicking more.
I discovered this feature by accident while going through my images. I had two photos selected instead of just one when I tried to use the arrow key to go to the next image, it jumped to an image further down in my grid.
If you have two or more images that you're trying to decide upon, you can quickly cycle through those images regardless of whether or not they are next to each other, flagged alike, or sorted.
Select your images using the standard Shift-Click or Control-Click method of your system. Once you have multiple photos selected in the Library module, double-click one of the photos or press "E" to enter the Loupe view. Now that you're in the Loupe view, simply press the left or right arrow key to jump to the next photo in that selection.
You can also use the navigation arrows on the toolbar at the bottom of the loop window. If the toolbar isn't visible, select View->Show Toolbar or press "T" on your keyboard. Once the toolbar is visible, use the arrow on the right side to ensure the Navigation tools are selected.
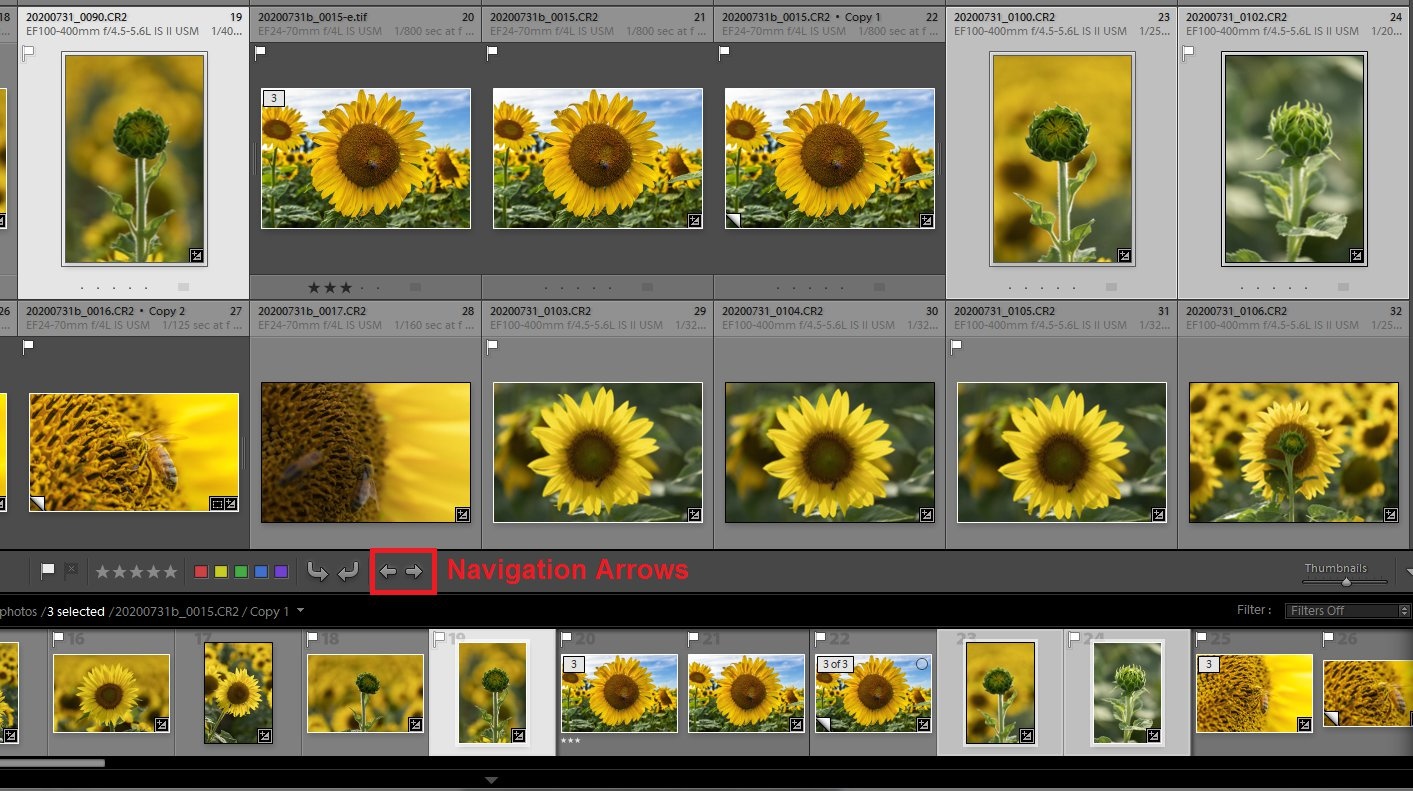
Cycle through the selected photos even if they aren't next to each other
This navigation feature is somewhat counter-intuitive, as usually, the arrow keys take you to the next image in the filmstrip or grid. You can now rate, flag, delete, or do whatever you want to each photo as you effortlessly navigate between them.
You can even turn on Caps-Lock to automatically advance to the next image when you set a flag or rating. Deleting or Removing an image will retain the selection, making your culling task a breeze.
View a Previous History Step as the Before Image
I use the before/after feature quite often to gauge how my adjustments look compared to the original unedited image. However, if the original image needed adjustments to bring it to a starting point, you may not wish the "before" view to be the original fully-unedited view. For example, if the image needed +1.5 exposure to be correctly exposed, you might want that to be the "before" step.
Another example might be that you want to see the first editing pass as the "before" and some additional experimental adjustments as the "after."
When in the Develop Module, after you have made some edits, right-click on a step in the History panel and select "Copy History Step Settings to Before" from the context menu. Now when you press "\" the before view will be that step, instead of the very beginning of the history.

History Panel context menu (right-click menu)
This little trick is often much easier than clicking back and forth in the history panel repeatedly to see your comparison before/after.
Here are the available before/after view keystrokes:
- Press \ to toggle the before/after view
- Press Y for a left/right before/after view
- Press Alt-Y for a top/bottom before/after view
- Press Shift+Y for a split-screen before/after view
Edit an image in Lightroom and Photoshop
Perhaps one of my favorite non-obvious features in Lightroom is the ability to edit an image in Photoshop, return it to Lightroom for additional edits (like cropping), and be able to go back and edit the original Photoshop PSD file (with layers intact).
For those unfamiliar with this Lightroom ability, Lightroom can handle Photoshop files (*.PSD files). The default file type for sending files to Photoshop is that Photoshop will return them as TIFF files (See the External Editing tab in the Lightroom Preferences). If this option is PSD, or if you choose Save As in Photoshop to save it as a PSD file, the file will be returned to Lightroom as a PSD file. You can then add additional edit adjustments in Lightroom, just like you would with a jpeg or raw file.
The magic here is that if you then choose to edit the PSD file, either by sending it to Photoshop from Lightroom (choose to edit the original file), or by editing it directly from Photoshop, Lightroom will pick up that change, update its preview, and apply the Lightroom edits to it.
The practical application is that you can have an image that you edit in Photoshop but use Lightroom for things like creating multiple crops via virtual copies, exporting, publishing, or other digital asset management tasks. You can have the best of both worlds, you don't have to strictly choose Lightroom or Photoshop.

The Library module showing the original raw image, the edited Photoshop file, and a virtual copy of the Photoshop file that was then further edited in Lightroom.
Conclusion
Learning just a few of the hidden features of Lightroom can make your editing experience much more enjoyable. Whether it's streamlining your workflow or introducing new editing capabilities like the Photoshop feature mentioned above, soon, you'll be editing like a pro. What are your favorite hidden Lightroom features? Let me know in the comments!


If you try them and find you were always looking for this exact feature, you will never ever forget it 😄
You can edit TIF, PSD and JPG in LR with roundtrips.
When the dialog box comes up asking "Edit a copy with LR settings, or Edit a copy of the File or Edit original" Choose "Edit original" or what ever makes the most sense for your project.
Maybe I didn't get the trick about this non-obvious feature, but I haven't noticed any difference between TIF and PSD while passing an "original" image from LR to be edited in PS !??
People are probably familiar with passing a TIF back and forth, but they may not have realized that Lightroom can render out (export) a PSD file which has more editing capabilities in it's layers.
???
I'm using TIF (as suggested eg by Matt Kloskowski), and I'm working with layers too. I thought the basic adavantage of PSD over TIF is smaller file size?
Thank you, especially love the third one, exchanging files between LR and PS, very helpful!
Mike, it would help if you called the app Lightroom Classic throughout the article. Adobe has Lightroom and also Lightroom Classic. When I see the word "Lightroom", I think you are referring online version of the software. And if you don't want to do that, say upfront that this article about Lightroom Classic only. I realize in the first sentence you said you love Lightroom Classic, but then I had to figure out if you were happy the new Lightroom has some of the same features. Other than that, I found the article helpful!
My bad, I'll try to specify that in future articles! Thanks!
No problem, thanks for listening!