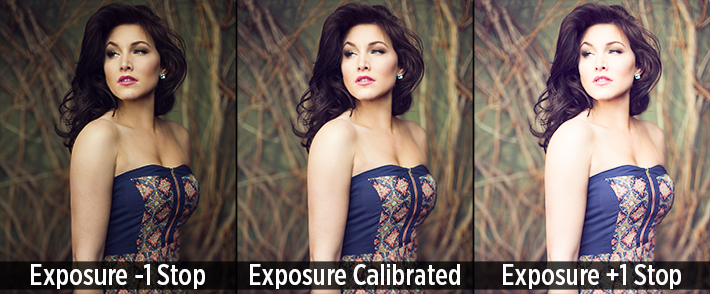
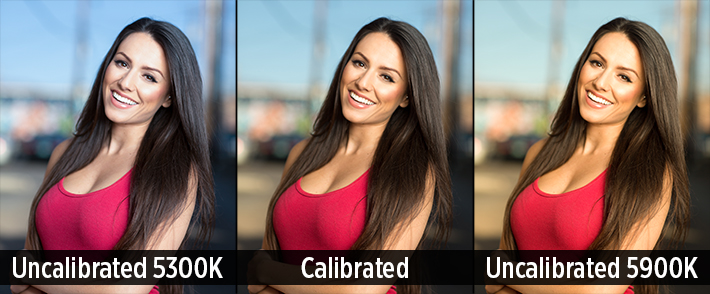
Talk to a photographer long enough and the question of screen calibration will be brought up. Often many will say it's an incredibly important tool in your post production workflow, and often many more disregard it all together. So what is screen calibration? Is it still a viable issue within photography today, or is it becoming more and more obsolete, like sync cables and light meters? I'm here to explain it to you.
First, I stand on the "It's exceptionally important" side of the coin. For the first 3 years of my photography career, I was working on an uncalibrated monitor. I wasn't printing my work, so I had really no idea how my photos looked to others. It wasn't until I finally borrowed a screen calibration system that I learned how important the tool really was. Suddenly all of my photos that I thought were beautiful turned out to be really dark, and really orange in color.
There are two main brands of screen calibration software - The Datacolor Spyder system and the X-Rite ColorMunki. While both of these system do virtually the same thing, I've never had experience with the ColorMunki personally. The general use of these systems is to attach them to your monitor, and run a series of diagnostic software. This will read the output from your monitor based on color and brightness, and adjust them when needed. What you're left with is accurate colors and brightness to insure your prints look just like your monitor output.
However, another incredible and important feature among these systems is the ambient light readout. Essentially, these systems also have a sensor built into the front of the unit, and will adjust your monitor's brightness depending on your environment. So whether you're working in a cave-like room like I do, or in front of some ceiling to floor windows with sun shining through, you can be confident that your monitor is accurately displaying brightness and colors.
And color and brightness are the bread and butter to these machines. For the sake of making this simpler, lets instead think of them as white balance and exposure. With the default settings on your monitor, you're likely over exposed by about 1/2 to a full stop of light. This means your images are going to appear much darker to those with a calibrated monitor, and in print. In terms of your white balance, monitors aim for 6500K, but often miss the mark by up to 200K in each direction for their default settings. So while a photo might look great on your monitor, it could be much cooler or warmer in tone to those with a calibrated monitor.
Misconceptions About Calibration
Apple Monitors Don't Need Calibrated
This simply is not true. While Apple (and many other brands) do calibrate all of their monitors in factory, this does not mean that stay calibrated, or are calibrated correctly. Most calibration software suggest that you calibrate your monitor(s) every 2-6 weeks to insure that everything is accurate. This is because color temperature and screen brightness will gradually change over time. So while the screen may be calibrated at 6500K white balance upon purchasing, it may be at 6300K after just a few weeks, resulting in incorrect color temperatures.
IPS Monitors Don't Need Calibration
IPS monitors are exceptional, and most preferred for graphic design and photography. However, they still need color calibration on the regular. The most important part of an IPS monitor is actually it's viewing angle. Most IPS monitors get their name for the ability to view them at wide angles without any color or contrast shifts, like you might see in an LED or LCD monitor. This just means more accurate color readings, even if you're a little off axis with the monitor. For an exceptional breakdown of monitor types, check out Pye Jirsa's article over at our friends from SLRLounge. With this said, color temperatures and brightness will still shift on IPS monitors over time, so calibration is still very necessary.
Calibrate To Your Phone/Tablet
Many people foolishly believe that a smartphone or tablet will have correct color temperature readings, and suggest that when in doubt, to calibrate to your phone's screen. However, more often than not, your phone actually has more color inconsistency than the average computer monitor. Aside from that, you're more than likely adjusting the brightness of your phone/tablet screen multiple times during that day, so how will you know what the correct brightness setting is for your monitor?
Why Bother Calibrating If I Don't Print/My Clients Don't Calibrate
The reason is simple, because it will result in better photos on both your screen, theirs, and look great in print if you choose to do so. The general idea is that all monitors try to get 6500K temperature and about 100 cd/m² (brightness) for their default settings. However, due to making manufacturing as efficient and cheap as possible, they often miss the mark slightly. So your monitor may be 5300K (cooler color cast), and your clients may be 6750K (warmer color cast). If your monitor is uncalibrated, the photos will look significantly cooler in color temperature to your clients, which may make the photo less appealing. By calibrating your monitor, you're assuring your settings are correct to what the manufacturer is aiming for.
When printing, a calibration system is essential, regardless of you are printing at home or through a lab. Often, calibration system will also supply you with a calibration file that you're able to send with your print order to insure all the colors and brightness will look as accurate as they did on your monitor. Tools such as this insures higher print quality, and less overseeing of the print process (No longer do I have to send my print orders to me to double check before sending them to clients).
Truly, there is no alternative to just purchasing a calibration system for your monitor. Web applications might be able to help slightly, but it still doesn't correct any color issues your monitor may be experiencing. For about $100, you can purchase a basic calibration system for your monitor(s) to insure that all of your photos are correctly exposed and toned.
However, any sort of calibration is better than no calibration. If you're curious on where your monitor stands and not interested in buying a calibrator, I recommend you getting a photo of yours printed from a major print lab, without any color corrections done to it. When it arrives, compare it to your monitor's viewing of the image and adjust your monitor to best match the print brightness and color calibration. Certainly this isn't the best method, but it'll get the job done in a pinch.


This is crap. The author should be ashamed. There is almost nothing here that could even be considered a calibration guide, yet alone an ultimate one. If you want a guide just look it up on AVS Forum.
I have read several of the comments below and I see there is some confusion between the actual colour management and Monitor calibration which is just part of the colour management process. Monitor Calibration is the process of trying to get your monitor to show colours to standard. So the images are as close to what they should be. Alot of people have mention soft proofing. Soft proofing is done to so what the colour will look like when you output to a printer etc. which is usually the last part of the colour management system where you need a printer profile to use to soft proof your work. When you send your images to a photo lab, you are usually given a printer profile to install on your computer, by using this profile in your soft proofing you can see what your images look like when it is printed. If you are not happy with the what the output will look like you can make changes to the image until you get the results you looking for. This profiles are different to the monitor calibration profiles created when you do your monitor calibration. If you have a 3 monitor system you want each monitor to display the same colours and that is where calibrating your monitor and creating a profile will ensure that all 3 monitor display the same colours. As each monitor calibrated will have different user input in the preparation of producing the monitor profile. As the monitor brightness and contrast setting may well be different from one another. Monitor calibrator measure the brightness of the monitor in relationship to the standards set, and asks the user, to make changes to the monitors brightness until the brightness is at the standard. Once the brightness is set to the standard, that where the calibrator goes through it paces and does a colour analysis of your monitor, and sets up the profile, for that particular monitor. Soft proofing has nothing to do with monitor calibration, it for the user to see what the output of the image will look like when it is printed, using a profile created for the printer being printed on, and a particular print media. eg, Epson Expression printer with Reflex copy paper or a Canon Pixmia pro 10 printer with Lustre fine art paper. I could go throught this more but I hope you get what I am trying to say.