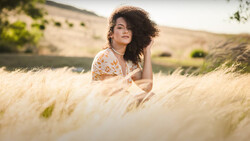
Golden hour looks forgiving, but it can be harsh on detail and contrast when the light is stronger than you think. If you rely only on ambient, backgrounds clip, faces flatten, and you lose most of what makes that time of day so special.
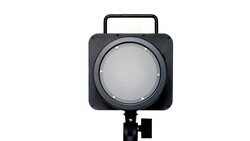
Coming to you from Julie Gayler, this practical video walks through how to use off-camera flash to keep that glowing background while still lighting a face cleanly. Gayler starts with scene selection, looking for spots where the light is either fully in sun or fully in shade so you avoid patchy exposure across the frame. She shows how exposing for the brightest parts of the scene first preserves the flowers, trees, and sky, then uses a strobe like the Westcott FJ800 to bring the subject back up without sacrificing those background details. She leans on your camera’s highlight alert to push shutter speed until nothing blinks, then lets high-speed sync handle the fast shutter so you can keep your chosen aperture. You get a clear sense of how to balance natural light and flash instead of letting the sun dictate your exposure.
Gayler also spends time on light quality and direction, using a beauty dish in white to keep contrast controlled but still crisp. She raises the light just above eye level, then feathers it slightly off the subject so the softer edge of the modifier rolls across the face and body. The goal is a gentle falloff that keeps the face bright but lets the light fade down the torso, avoiding that “lit from head to toe” look that screams obvious flash. Gayler reminds you to keep the nose turned toward the light so the eyes and facial features stay lit while the body can move more freely. There is also a simple trick for getting a subtle flare by placing the sun right at the top edge of the frame, which keeps the glow without washing out your subject.
Once the basic setup is in place, Gayler shows how you can stay flexible without constantly changing your lighting. She talks about working with primes and switching between a wide angle view and a tighter lens while keeping the flash in the same position relative to the subject. She adds depth by framing through flowers in the foreground so you get foreground, midground, and background working together instead of a flat scene. Later in the video, Gayler moves locations as the real sun drops and demonstrates how to fake golden hour with an Westcott FJ400 II placed in the background with a warm magnetic gel. She matches the real sun’s behavior by raising that backlight high, giving it objects to hit between the subject and the background so it feels like a natural source instead of a spotlight. You also see how she keeps her front light simple by continuing with the same beauty dish rather than swapping modifiers every time she changes a pose.
She explains how to position the subject so the golden “sun” in the background does not blow out the side of the face once you add flash and how to turn the face into shadow so the highlights stay controlled. She also works through standing and sitting poses without changing flash power, just adjusting light height and angle to keep everything consistent. Check out the video above for the full rundown from Gayler.
If you would like to continue learning about how to light a portrait, be sure to check out "Illuminating The Face: Lighting for Headshots and Portraits With Peter Hurley!"


Join the Fstoppers community for free
-
Post comments and join in the discussions
-
Browse the site ad-free
-
Share your work and get featured in the community
-
Compete in the photo contests for fun and prizes
1 Comment
Absolutely love Westcott.