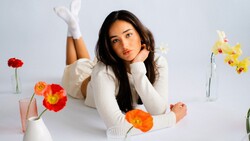
A bright portrait can look polished and still feel empty. When you know how to pull light down, shape shadows, and keep eyes alive, the same file turns into something with tension and intent.
Coming to you from Mark McGee Photos, this practical video shows how to take a studio portrait that starts “nice and bright” and steer it toward a darker, moodier finish using Adobe Lightroom’s masking and curves. You start by building a background mask and pulling the curve down to take the background into a calmer midtone, rather than leaving it loud and distracting. Then you deal with the annoying problem that shows up fast when you darken backgrounds: the mask edge can leave a halo that makes hair look cut out. McGee demonstrates a simple cleanup approach with a brush and Auto Mask, plus a softer density pass where the hair gets wispy.
Once the frame is darker overall, the video leans into an editing choice that a lot of people avoid because it feels risky: dropping global exposure hard, then clawing back the parts that should still read. You see how far McGee is willing to pull exposure down before the portrait starts to feel like night, not studio. Then the adjustments move into local control, so the face and eyes don’t sink into the same darkness as everything else. The eye work is the part that will either sell the look or make it look fake, and the video spends real time on keeping edges believable while still making the irises pop.
The most useful takeaway is the mindset: stop treating “moody” as a preset and start treating it like lighting you build after the fact. McGee uses multiple targeted masks instead of trying to solve everything with one global move, and that keeps the portrait from turning into a muddy mess. You get a look at how to isolate the eyes, lift shadows aggressively inside that area, cool the tone slightly, and add texture for detail, while still walking back the parts that read as overcooked. There’s also a clever moment where catchlights get their own attention so they don’t disappear, but also don’t turn into glowing stickers, using a hard-edged mask and careful subtraction. Later, the same dark approach gets pushed in a different direction by creating a narrow “shard” of light with a feathered brush, then repositioning it until it lands in the right place, using exposure, curves, and dehaze to shape it. Check out the video above for the full rundown from McGee.


Join the Fstoppers community for free
-
Post comments and join in the discussions
-
Browse the site ad-free
-
Share your work and get featured in the community
-
Compete in the photo contests for fun and prizes
1 Comment
Dark-O-Vision