Generative Expand in Photoshop lets you fix tight framing, rework aspect ratios, and build layouts you never captured in camera. If you often wish you had backed up, shot horizontal instead of vertical, or left more headroom, this tool gives you a practical way to rebuild that space with believable detail.
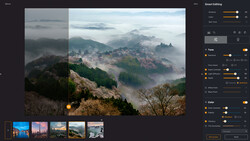
Coming to you from Aaron Nace with Phlearn, this clear video walks through how to turn a vertical portrait into a convincing horizontal image using Photoshop’s Crop tool and Generative Expand. Nace shows you where to find the Fill settings, how Transparent and content-aware options differ from the AI-driven choice, and why you should skip the older content-aware mode for this kind of work. You see how simple it is to grab the crop handles, drag the frame wider on both sides, and let Generative Expand invent extra mountains, water, or sky to fill the new canvas. The contextual taskbar lets you either type a prompt or leave it blank so the model guesses what fits the scene, which keeps the process quick when you just need more room around a subject. Nace is also upfront that the AI is fabricating scenery, so you are not getting real geography, only something that looks consistent with the original frame.
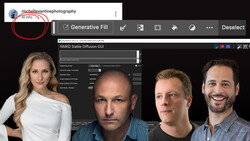
The tutorial then shows you what happens when you zoom in and compare the original capture to the generated edges, and you see the drop in detail in the expanded areas. Nace points out the quality shift at 100% view, then uses the Enhance Detail button in the Properties panel to run a new generation that tightens up texture and sharpness in the AI-built regions. At normal viewing sizes the difference becomes much less obvious, which makes this workflow far more usable for web, social, and moderate prints. From there, Nace moves into a second example, where you start with Firefly Image Model 3 to grow the canvas, then select the whole image and switch to Generative Fill with a prompt like “zoom out 10%.” That is where Gemini 2.5 Nano Banana comes in as a second model, refining the scene so faces, hands, and other tricky areas look more natural.
You get a practical workaround for a limitation that could otherwise slow you down. You cannot choose Nano Banana directly inside Generative Expand, so Nace shows you how to run your first pass with Firefly, then hand the entire frame to Gemini 2.5 Nano Banana through Generative Fill to keep pushing the zoom while upgrading detail. This gives you a layered approach where one model handles the basic expansion and another cleans up realism in people or busy backgrounds. Nace repeats the zoom-out process at 30% to show how far you can stretch a scene while keeping the subject and setting recognizable. Watching those iterations helps you judge where the results still feel believable and where you might start to see obvious AI artifacts in texture or structure.
Later, the video shifts from simply “more canvas” to changing how the scene is viewed, which is where things get especially creative. Nace selects the full image again, uses Generative Fill with Gemini 2.5 Nano Banana, and asks Photoshop to change the camera angle to a top-down or bird’s-eye view, all based on the original photo. You see the same background and subject reimagined from a higher angle, almost like you had a second camera floating above the scene during the shoot. This kind of perspective shift can help you build alternate product, food, or flat-lay angles when you only had time to grab one setup on set. Check out the video above for the full rundown from Nace.


Join the Fstoppers community for free
-
Post comments and join in the discussions
-
Browse the site ad-free
-
Share your work and get featured in the community
-
Compete in the photo contests for fun and prizes
No comments yet