

This is the second part of the article on how to learn to "read" lighting in photography. If you haven't read the first part yet, please start here: How To "Read" Light In Photography - Part 1.
And for those of you who have been waiting for the second part, let's jump right back in and see what other cues we can use to breakdown lighting in other photographers' work.
![]()
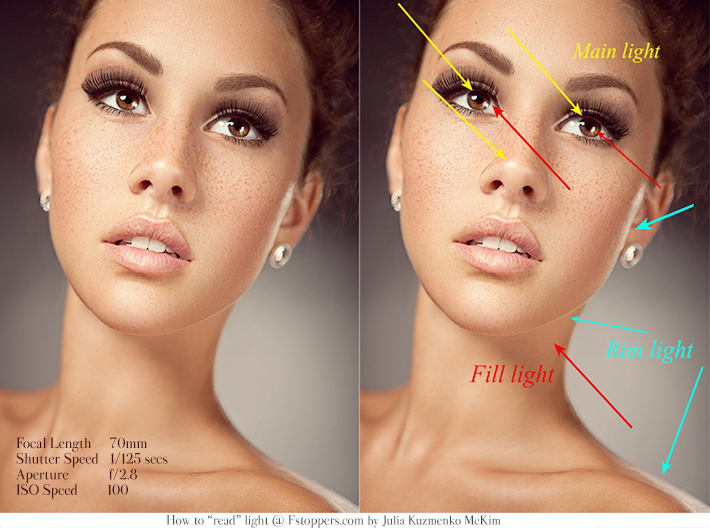
The Main Light: Placement and Modifier
I judge the placement of the main light and what type of light modifier was used on it by the combination of direction and length of the shadows on the model's face, their softness and size, the highlights on the nose, hair and body, and the placement, size and shape of the catchlights in the eyes. I've already talked about catchlights created by different light modifiers in Part 1, let's now look at the shadows.
I always start with assessing the shadows under the model’s nose and chin. Because those are the most prominent facial features, the shadows will be the easiest to "read" there. I also look for additional cues, such as shadows from the hands, highlights and shadows in the accessories, etc. These details help me identify the direction and degree of diffusion of the main light, as well as to understand whether or not there was any fill light used to soften the shadows in the setup.
Helpful cues:
- If the shadow is sitting right under the nose and is short – it means the light source is right in front of the model’s face and is placed a little higher than the model’s eye level.
- If the shadows are long and going down on the model’s face (the eyes may be even hidden in the shadows, creating the so-called “raccoon eyes”) and the catchlights are missing – the light source is placed way above the model’s eye level. This is something you can see in family pictures taken on a sunny afternoon (given there’s no educated photographer to take pictures in the family). Side note: missing catchlights usually make the eyes look less "alive" and are not desirable in classic Portraits and Beauty images, while Fashion photography allows more creativity and rule-breaking.
- If the shadows are going up – the light source was lower then the model’s eye level. Side note: this type of lighting doesn’t work well for Portraits and people photography in general, unless the idea is to create lighting, which is unpleasant to human eye.
- If the shadows are too soft to identify their direction – it means the photo was shot with a lot of very diffused lighting around. For example on a cloudy day or in a bright room with a lot of light bouncing off of bright surfaces around the model. Side note: it greatly depends on the idea behind the image, but very diffused lighting in Portrait and Beauty photography is undesirable because it makes subjects appear rather flat in still images.
Click on the photo to enlarge it:

In the example above you can also see how the distance between the subject's face and the light source with a beauty dish on affects the size of the catchlights in the eyes.
You can also work backwards based on the list of helpful cues above: now you know what shadow patterns are created by particular light placements, so try avoiding positioning the main light lover or much higher than the model's eye level, as well as using too much of diffused light.
Tricky Lighting Techniques
There are many interesting and tricky lighting techniques out there and if you are not aware of what effects they create, you might not be able to easily and correctly breakdown the lighting setup or camera settings in such images.
A couple of such lighting techniques that come to mind off the top of my head are shooting with neutral density filters (ND filters) and shooting with mixed continuous and strobe lighting. Check out my recent post on shooting with mixed lighting to familiarize yourself with this technique.
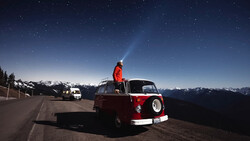
And here are a couple of examples of photos shot with ND filters.
In photography and optics, a neutral density filter or ND filter is a filter that reduces or modifies intensity of all wavelengths or colors of light equally, giving no changes in hue of color rendition. It can be a colorless (clear) or grey filter. The purpose of a standard photographic neutral density filter is to allow the photographer greater flexibility to change the aperture, exposure time and/or motion blur of subject in different situations and atmospheric conditions (source - Wikipedia). Read more about ND filters: The Must Have Tool for Strobe Users.
In other words, by placing an ND filter onto your lens, you "cut" a few stops of light from the scene, which allows you to either open up your aperture or prolong exposure time in a lighting situation where only an overexposed image could be produced otherwise.
As you can see in the example above, the light behavior remains the same, but the aperture setting maybe a little confusing here considering the amount of studio light. ND filter allowed me to open the aperture to f/2.8, which normally would cause an overexposed image because of the powerful strobe light.
Basically, it is not common to see very shallow depth of field in images photographed in studio with strobe lighting, so next time you see a similar image you'll know that an ND filter might have been used in it.
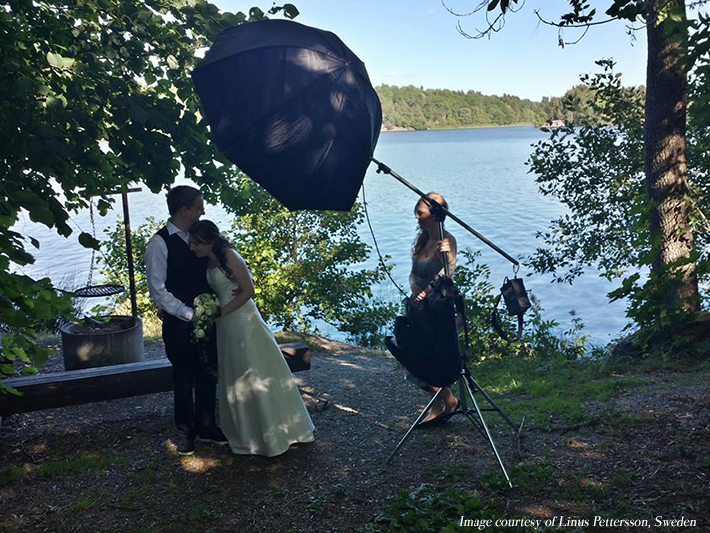
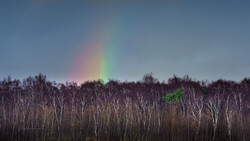
And here are a couple of images photographed outdoors on a bright sunny day with and without an ND filter on the lens.
Click on the photo to enlarge it:

You can see the significant difference in the overall exposure between the two images photographed with almost the same exposure settings.
Thanks to the neutral density filter, the photographer had the opportunity to use a strobe for clean controlled light on the subjects' faces (thus 1/100 - 1/125 shutter speed), open up the aperture to f/1.8 and still not overexpose the background on a bright sunny day (second image). The strobe was used in both scenes, only in the first image it acted more like fill light due to the lighting conditions and the exposure settings that were used.
But if you didn't see these two images side by side, it might not have been too easy to "read" the lighting and exposure settings in the second image photographed with ND filter. If you miss the fact that a strobe was used in this photo, you may very well mistakenly assume that the aperture was wide open while the shutter speed was fast enough to get the correct exposure.
However, if you take another moment to inspect the lighting in the scene you will be able to "read" it based on the subtle additional cues:
- The direction and length of the shadows on the faces suggest that the light source is on the side and slightly above the eye level of the couple, whereas sunlight on a summer day like this would be coming from much higher above. The shadows and highlights in the foliage behind the couple confirm that. You can also see the tiny catchlights in the bride's eyes, which confirm the main light's placement as well, and indirectly show that it wasn't the sun that was used as the main light. It is normally very difficult to get a human being comfortably pose with direct sunlight shining into their eyes on a summer afternoon.
- The consistency and "cleanness" of the light on the faces and upper bodies suggest the use of controlled light.
- The intensity of the sunlight spot on the dress shows that the sunlight is still more powerful than the controlled light used to illuminate the faces.
- So, now that we are convinced a strobe was used in this photo, we know that the shutter speed should be somewhere around 1/125 - 1/250 (regular sync speed). With such slow shutter speed the aperture should be quite small on a sunny day like this to avoid overexposure, but the shallow depth of field in the image suggests that the aperture was, in fact, wide open (smaller F-numbers).
- And the conclusion at the end of such a line of thought may very well be: the photographer might have used an ND filter.
Linus Peterson, the author of these examples, has also kindly shared this behind-the-scenes shot with us, so we can better understand the lighting setup in the images above.
Now, since you've learned a little bit about what ND filters are used for, you can put this knowledge into practice and shoot with them to get shallower depth of field in the light conditions where higher F-stop numbers would normally be used.
Exercise
Let's do one more little exercise together and then you can start practicing "reading" lighting and camera settings on your own.

Here's how you could "read" lighting setup in this photo:
- The softness of the shadows on the model’s face suggests slightly diffused light, most likely a reflector.
- The directions of the shadows in the background suggest that the photo was taken in the late afternoon or early summer evening: the sunlight is not very intense and the reflected light is even weaker. So, the reflector must have been brought up closer to the face, just outside of the frame.
- The catchlights in the eyes are pretty small, considering that the reflector was placed close to the face. So, a small reflector must have been used in this setup.
- The orange color of the reflected light also suggests that it could have been a golden reflector, not silver.
- The model’s hands and legs are not lit as well as the face, which confirms our guess about the size of the reflector and the low intensity of the reflected sunlight.
- I am showing you both the before and after pictures, so you can also see that the lighting in retouched images can be a little deceiving and harder to read correctly, so keep that in mind and rely on the more pronounced cues.
Conclusion
The rim light in this picture was created by the sunlight, and a small golden reflector was used to illuminate the model's face in this setup.
I hope you enjoyed this article and I also hope that it helped you to understand how you can learn and train yourself to dissect lighting and camera settings in other photographers' images.
From now on try paying attention to the mentioned above details in the photos you see in magazines, online and anywhere else you look for inspiration. The more you train your eyes and practice breaking down lighting in photos, the easier it will be for you to understand how to achieve the lighting you like or the lighting you are asked to create by your clients.
Check out more examples in my other article on the topic: 8 Tips On How To “Read” Light in Photography.

Join the Fstoppers community for free
-
Post comments and join in the discussions
-
Browse the site ad-free
-
Share your work and get featured in the community
-
Compete in the photo contests for fun and prizes
18 Comments
Should be titled "Awesomeness part 2". =) Glad you continued on such a great article.
Enjoyed the first installment and this is an excellent follow up. Regarding ND filters, sometimes they're used on strobes instead of over the lens. I sometimes do this in the studio because I can change lenses without moving filters (assuming you don't have an ND for each lens), and you can gel (ND) each head differently to further refine your exposure without backing it off (losing softness). It's also great when you're trying to balance strobe and low ambient and the strobes won't go low enough. But, the clues you suggest are the same and admittedly ND over the lens is probably more common.
Thank you Karl, that's a great point! I've never used those, but it would definitely help to have one ND filter for the light, so you don't have to have ND filters for each lens you shoot with!
I note you like to use colors though, so I assume you're using gels. A quick-and-dirty light ND is to stack opposite (complementary) gels like tungsten and 80A (blue). Cuts light without changing the color.
karlshreeves.zenfolio.com
I've seen people using ND filters on strobes to photograph paintings (with ot without glass on its front). It's something to try on lol
If the person knew what he was doing, it may have been a polarizer, plus one on the camera lens. You can eliminate (well, hugely reduce) glare from a strobe or hot light by doing this when you have to shoot through glass and can't angle the light to avoid the glare (due to space restrictions, wide lens on the camera, etc.). The downsides are that it doesn't work perfectly, and you lose at least two stops of light.
There is SO much photoshop in the last picture it's not really pretty.
Awesome tips none the less!
Yeah.. it is too much. One can pick a different model from the start instead. Also, I'm surprised by how nervous the bokeh is in the wedding photo.
Julia I just posted this same thing as a comment on another article but recently the quality of the articles on FStoppers has increased tremendously, your write-ups being a major contributor. Thanks heaps.
Thank you Bram! We want to share the best knowledge and tips we have with out readers here on Fstoppers :)
Linus rulez!
invaluable information...thank you
Awesome article.. thank you
as good as the 1st part!! thanks a lot!
invaluable information...thank you
thaQ dear julia
A year and 5 months later, I just read this article, and it STILL ROCKS!!!! Love it, I am eager to review your other articles..
I love your articles!