When we talk about on-location mixed lighting we usually mean shooting with light sources of different nature, such as natural ambient light and artificial, or shooting with lights of different color temperatures (tungsten, fluorescent, flash, etc.).
There are dozens of cool effects that one can achieve when mixing ambient light with controlled lighting, but today I would like to talk about mixing lights in studio - impulse (i.e. strobe or flash) and continuous. I love this technique and hope my article inspires you to try it out too.
Let's talk about the important things that we need to keep in mind to successfully mix strobe and continuous light and then move on to the fun things that we can do with this technique.
Why Mixing Studio Lights Is So Cool
- You can create awesome light & color effects in camera and they will look like you've spent a week in Photoshop.
- You don't have to buy additional lighting equipment if you'd like to use continuous light - the modeling lamps of your strobes will do the trick.
- These effects greatly depend on your exposure settings, the speed and direction of how you move your camera during exposure, the reflective surfaces you add into the frame, and the colors you mix into the equation. These options alone open the door to a never-ending exploration process, and one could probably stick with this one lighting technique for the rest of his or her life and never run out of new ideas and effects.

Important Things To Keep In Mind
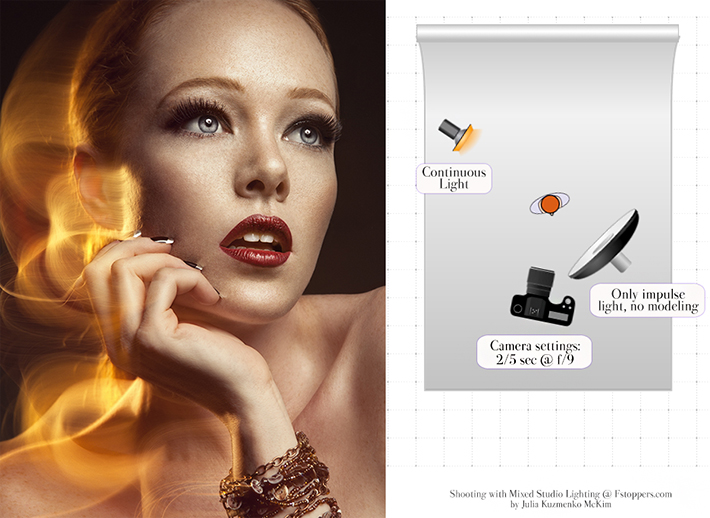
• For the purpose of this article let's agree that our ISO is set to 100 for all examples.
• Continuous and strobe light are normally of a different color temperature, and while in some scenarios this may work to your advantage, in others you may want to match your light sources' output color by using color filters or gels. I will talk more about this in a separate article.
• When we shoot with strobe light in studio our shutter-speed usually is a little below maximum synch speed, typically somewhere between 1/125 and 1/250 (and up to 1/800 - 1/1600 for some medium format cameras) depending on the equipment. We increase our shutter speed to those numbers to avoid any influence of the ambient light, such as light from the windows in the studio or modeling light of the strobes. It's important because ambient light, when it interferes with your intended controlled lighting, can reduce the sharpness of details in your image and alter its color temperature, thus add some undesired colors into the photos.

Shooting With Strobe Light
Given there's no ambient light in the studio and we're shooting at the same aperture and constant strobe output power, we can shoot at slower shutter speeds, and the picture will not change because it is exposed during the tiny bit of time that your strobe fires, which is way faster than the maximum synch speed of DSLR cameras (check out our post on flash duration comparison between Broncolor, Profoto and Einstein).
So, when we shoot with strobes we normally control exposure by adjusting our aperture and the strobe output power.
Shooting With Continuous Light
When shooting with continuous artificial light, on the other hand, the final picture that is formed on the camera sensor will mainly depend on the exposure value (EV ) - the combination of shutter speed and aperture. So, when we shoot with continuous light we normally control exposure by adjusting our aperture and shutter speed, as well as the light source power.
I know this may be boring and a little confusing, but bear with me, I'm getting to my point.
Now I'd like to walk you through the following exercise created by the amazing Fashion & Beauty photographer Oleg Tityaev from my hometown Moscow, Russia. Oleg is highly skilled in lighting, photography and retouching, and moreover, he is a great teacher. You can check out his work at www.tityaev.ru.
Let's see Oleg's demonstration on how exposure values actually affect images taken with strobe and continuous light in this example. We'll set our aperture to f/11 and start with shutter speed 1/200 and then make it a stop longer in each of the following shots. The output power of the both strobes is the same, although the flash is turned off in the strobe on the left side, so the right side of the image is lit by strobe light, and the left side is lit by continuous light only. Don't mind the difference in color temperatures for this exercise.

We matched our strobe and continuous light exposure at f/11 and 1/25. Note that in order to get sharp picture on the left side (lit by continuous light) at 1/25 as in the examples above, the camera should be mounted on a tripod. But for the actual lighting effect we're after we should shoot with a hand-held camera.
Now if we intentionally shake our camera during the exposure, the side lit by strobe light will still look the same (remember, it is exposed during the time that your strobe fires and not affected by your shutter speed), but the side lit by continuous light will get blurry (see illustration below).
With these settings you can already achieve interesting effects, but if you'd like to go even further and create blur, which looks more like "light haze", you should slower your shutter speed 3 f-stops down, and lower the power of your continuous light source 3 stops down as well. Keep the aperture setting the same.
I want to once again stress on how important it is to have no ambient light present in the studio when practicing this lighting technique.
 

Oleg's full article on shooting with mixed lighting in Russian: www.photoindustria.ru.
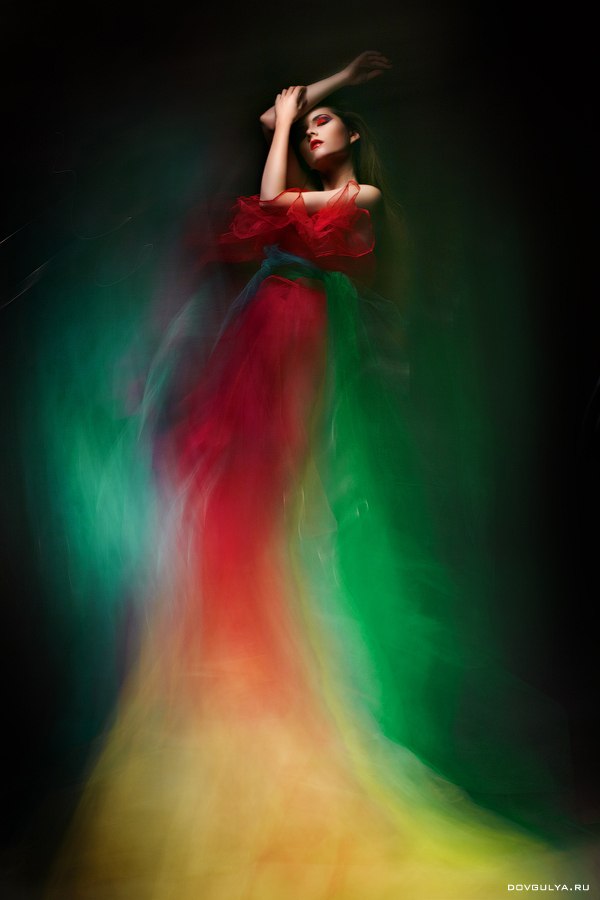
Now that we've figured out the exposure settings side of the technique, let's look at an example, which my dear friend, Fashion, Beauty & Commercial photographer Aleksey Dovgulya, kindly shared with us.
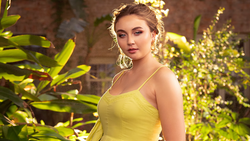
Once an advertising agency asked Aleksey to create a modern interpretation of the Rolls-Royce's Spirit of Ecstasy statue. The team selected a model who would fit their envisioned idea, purchased 7 meters of satin fabric and invited a fashion designer to create something impressive out of the piece of fabric.
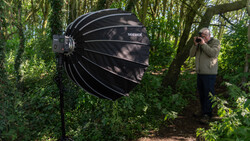
Aleksey chose to set up hard frontal light to create prominent highlights and shadows and imitate the metal shine of the statue. He used a beauty dish with grids in front of the model as the main light and the only strobe light in the setup. A couple of monolights with regular metal reflectors on both sides of the model with flash turned off and only modeling lamps turned on.
It is very important to place and point your light sources so that that main strobe light "freezes" the details that you want sharp and pronounced in the picture. And the modeling light should only spill on the areas that you want blurred. As I mentioned before, photographers often match the color temperature of the continuous and strobe light by using color filters, but in Aleksey's scenario the warmer colors created by the modeling lamps actually perfectly fit the idea and the mood of the image.

Aleksey suggests that when practicing this technique you should first set your camera settings at, for example, 1/160 at f/8, ISO 100. And after the lights' power and direction are adjusted, change the shutter speed to 0,5 - 1 second (1" at f/8, ISO 100) and shake and move your camera during the exposure.
"To create an impression of flames at the bottom of the model's dress I zoomed out and moved my camera up during the exposure," says Aleksey. He also recommends trying out different shutter speeds and various camera movements: "The photos will look different every time, and you will figure out what effects you like the most as you shoot," he says.
And one more example from me:

Key Takeaways:
1. Make sure there's no ambient light in the studio. Only your continuous light sources should be on when practicing this technique.
2. Place the continuous light source so that it doesn't spill any light onto the model's face or other areas of the image you'd like the strobe light to "freeze" and preserve sharp details.
3. Turn off the modeling light on your strobe. Some lighting equipment allows the modeling lamp to automatically go off right after the flash is fired, check if your strobes can do that.
4. Set your camera and the lights to "regular" settings first (for example 1/160 at f/11) , then start prolonging the shutter speed and adjusting continuous light as needed.
5. Use reflective objects, accessories and shimmering fabrics to add interesting highlights and "light trails" in your photos. Avoid using dark clothing and fabrics as they will absorb the light and weaken the effect.
6. If you use color gels on your continuous lights watch them closely to make sure they don't melt - continuous light sources tend to heat up quite quickly.
7. Use black or dark gray backdrop or if you're using a brighter backdrop make sure no light spills on it as you shoot.
8. Try longer shutter speeds from 1/2 up to 5 seconds and various camera movements.
9. Add a fog machine.
Good luck!
Want to learn more about Studio Beauty Photography check out: Studio Beauty Lighting & Retouching – Where Does Great Photography Start?
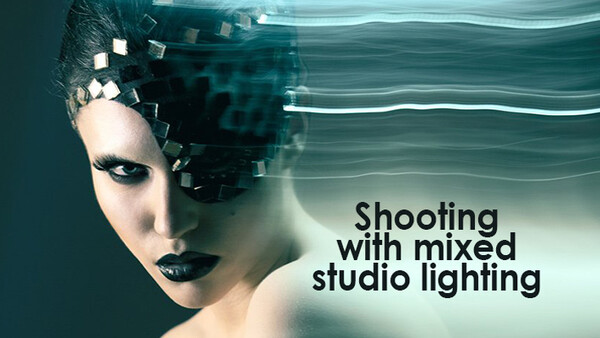
Featured image courtesy of Oleg Tityaev.

Join the Fstoppers community for free
-
Post comments and join in the discussions
-
Browse the site ad-free
-
Share your work and get featured in the community
-
Compete in the photo contests for fun and prizes
49 Comments
With a longer shutter speed isn't the subject blurred as well? I feel like a dummy for asking that but oh well. lol! I mix ambient and strobe light outside all the time but have never tried this.
the only part of the sudject that gets blurred is the part that is being hit by the ambient light. then the light from the strobe freezes the subject.
The subject won't be blurred as the flash is such a short pulse of light it freezes the motion
Yep, what the guys said :)
Only ambient or continuous light will blur parts of the photo. But if it's pitch black in your studio and you fire your flash pointing at the parts you want to "freeze" you'll get them clear and sharp.
Thanks!
here is an example from my library. hot light from camera left allows the subject to blur. if the subject stays still in one spot for long enough, then the subject gets burned into the frame. then when subject moves it causes blur. At the end of the exposure, the subject turns his head to the camera right side of the frame where there are no hot lights shinning, therefore no blur, and then the beauty dish with strobe fires along with rim light strobe with full CTO gel
http://500px.com/photo/26521145
Awesome variation of the hot + flash lighting!
Love your image, Jason!
thanks a lot Julia!! that means a lot coming from such a great artist!
What a great picture, Jason! To make the "blurried" effect sharpen like that you took more time choosing your expression, stoping it, moving it again, etc? because the effect is not constant.. Did i make myself clear? this article was sooo cool!
camera stays constantly still. The subject stays still for a second, moves slowly to the next spot and then stays still for a second, etc. The positions that are held still allow the light to burn in longer on the single position, makes sense?
It makes perfect sense! thanks a lot for answering it!!!!
Gorgeous. Thank you.
Thanks Yulia. Another great post. I know my question depends on the direction of camera movement and where you want the light trails to be but do you personally prefer front or rear flash curtain? Thanks
-Mo
if the position of your subject needs to be more precise, then front curtain so you can freeze the subject and then play with movement the remainder of the exposure. if the position does not need to be as precise, and your subject is the one doing the moving and you want the blur to look more fluid like the actual motion of the subject, then rear...
this is not my post, but gives an example. more or less, it depends on the look you are after...
http://insights.betterphoto.com/2012/11/flash-photography-front-vs-rear…
Thank you! You answered Moe's question better that I could :)
i doubt that... but thanks! :)
Thanks)
You're killing it with your posts, Julia...
Thanks Zach :)
This is definitely my favorite article of all time on fstoppers.
Wonderful Post!
Julia is a photo beast! Now I need to try this too.
Haha, thanks Isaac! I like that!
lol now following you on fb, got to stay up to date for more tips! Hope I can get to your level, I'm still a young gun in photography
Your work is already quite amazing, Isaac! Keep up the great work :)
Thanks! :)
Just rename the site "Julia's place" :D
Brilliant article, best one I've read on here I think. Cheers!
Another great post Julia! Thank you
The technique is oldschool and we've all seen it use to show movement in a subject.
The use of this technique in this post BLOWS. MY. MIND.
Seriously creative!
Super... Super... Super awesome post... Will use this technique for some of my wedding clients! Thanks for sharing!
Wonderful post. One technical question- What light do you recommend for the continuous light? A modeling light off of a strobe? An LED? HMI? There are a lot of options out there. Curious what these photographers have found work best in their studios.
Hi Rab, since it's just a creative technique that one can use every now and then, I believe the most rational way about it is to use what you already have. Most strobes have modeling light, so to me it's the best option. No need for extra spending.
Many thanks for replying. That's pretty much what I figured. I shoot regularly for a dance company and we'll be digging into this technique in the coming months for some new looks. Thanks again.
That's really cool! Don't forget to share the results with us :)
Amazing article. When I first saw your image on Facebook, I tried this for myself, thinking that it was the model that needed to move. Got some interesting (though not very good) shots. Never thought for one second that it was the camera that needed to move. Gonna be trying this technique out a lot. Thanks.
I am marveled, these are post you drool to see. Once again thanks Julia!!
Julia this is an amazing article! thank you
Very creative set, this type of lighting is incredibly hard to master. More Photography Tips
Tried it first time saturday I actually got interesting results only thing since the modeling light has to be off on the main strobe it was a bit challenging to achieve focus nevertheless I got interesting results
Tried it Saturday it was interesting I got nice results , my only thing since the modeling light have to remain off , achieving focus was a bit challenging. Nevertheless I got results that impressed me.. thanks for article..
amazing...would truly help in my personal work.
Great article! I followed your guide and got this result.
http://500px.com/photo/45696700
Thats Awesome, Thank you Julia! Can I ask is the flash synced to first curtain or dragged to 2nd curtain.ie is the flash first or at the end of the exposure? or is that even relevant?
thank you for the inspirational article here is my first attempt at mixed lighting :)
https://fstoppers.com/photo/40273
Thank you very much
Julia, I tried this today, with 2 continuous light and 1 strobe on a beauty dish. Shot with a 5d mk II in a black background, ISO 100, f11, 2 sec. But almost all pictures came with a kind of grain. Do you know what could happened? Any tip?
a shame that i only found it today! what a great article, Julia. Thanks a lot!!!
thanks a lot for this, amazing technique, great retouching !