
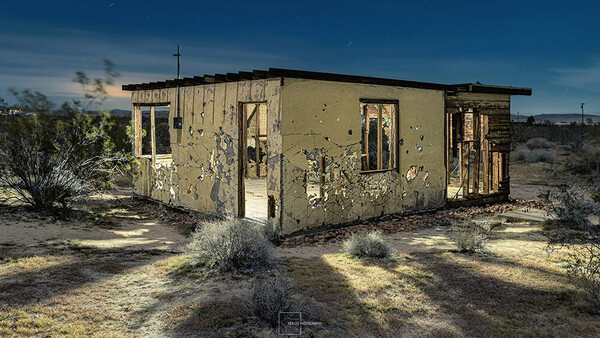
I set out to photograph and light paint a mysterious, dilapidated homestead cabin in the Mojave Desert under moonlight. With nothing more than a flashlight and a single long exposure, I turned it into a glowing, cinematic scene. Here's exactly how I did it, and how you can too.
I'll also discuss some of the issues one might run into while attempting to photograph this abandoned cabin. I did the entire photo in a single exposure, however.
But first, let's find out what "light painting" is.
What on Earth Is 'Light Painting' in Night Photography?
“Light painting” is often used loosely to describe adding any kind of light to a scene. But technically, it's using a handheld light source to "paint" during a long exposure. Your flashlight is the brush, and the scene is your canvas. You're the director. You decide what gets lit and what disappears into shadow. This is a long tradition among night photographers, who have been doing this for decades.
Why do I love handheld light painting? Because it's fast, flexible, creative, and ridiculously fun. No need for light stands, no heavy gear. Nope. It's just you and your light shaping the scene.
The amazing secret here is the ability to turn invisible! Keep moving, and you won't show up in your long exposure photo. Incredible, eh? If you stand still for about ten percent of the total exposure, you begin "registering" in the photo. So yes, just keep moving! And block that light from shining in the camera (or onto you).
I use a ProtoMachines LED2, which is unfortunately discontinued. We are hoping that ProtoMachines releases new products. You may also use other LED flashlights, such as the Wurkkos FC11C, which has a pleasing warm white light (but no other color options).
The Challenges of Light Painting a Cabin with Many Holes
Most of the time when you light paint an old cabin, you can hide behind walls and then begin lighting everything. Here, though, this was challenging. After all, I don't want to shine the light directly through the many holes and into the camera lens and create flares, hot spots, or otherwise ruin the image. I had to be very mindful.
Fortunately, my tripod has glow-in-the-dark tape. I typically use this so I don't lose track of where I left my tripod and camera. However, it also has another added bonus: at night, if the tape is glowing, I can see where it is and try to avoid shining my light directly into the lens. I charge the tape for a few seconds with my light, and it glows enough that I can see the tripod from over 30–40 feet away.
After that, it's a question of moving around while trying to hide the light behind something: part of the wall, my body, perhaps a piece of cardboard, or whatever works!
Lighting the Opposite of How One Might Typically Light
Most of the time, someone might light the outside of the cabin when creating a photo like this. After all, that is the primary part of the subject. However, I did the opposite: I only lit the inside. Why? Because there were lots of holes. I tried to take advantage of that. I felt that the light spilling out from the interior might be more interesting than simply lighting up the outside.
Therefore, the basic idea was to stand inside and essentially light the ground from the interior. That changed the approach. I also felt like I was doing something more creative as I tried to imagine how the shadows would look if I shifted the angles. This was very fun, and I spent a little bit of time seeing how it might look if I angled the light higher to light up the creosote bushes, or if I angled it down. I also tried to keep the light still at certain angles to create better-defined shadows.
Despite how small the cabin was, there were several rooms. Therefore, I repeated this approach, illuminating the wood frames and angling some of those geometric shapes out onto the ground. Fun!
Four Steps for Light Painting the Cabin
As mentioned, light painting is sort of like being a film producer. You decide what is illuminated and what remains in shadow. Therefore, light painting is not a random activity. It's not simply spraying light on a subject to light it up and nothing more. There is composition, shadows, detail, and more to consider. I was more methodical about this and took the following steps to make sure it came out the way I envisioned it.
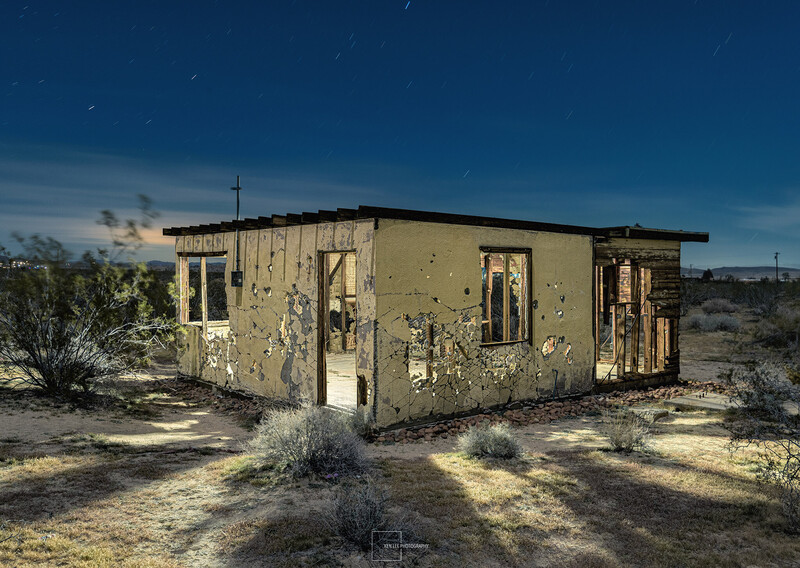
Step One: Creating the Main Shadows
I walked inside and stood more or less in the center of the main room. From here, I felt like I could keep the angle of the shadows more or less consistent. Although I initially experimented with the height and angle to a certain degree on my test shots, once I decided on them, I kept them consistent. Also, keeping the light at a similar angle and relatively still enabled me to create more definition in the shadows.
Step Two: Illuminating the walls
To illuminate the interior, including the walls, I aimed the light straight up at what was left of the ceiling. There wasn't much, but thankfully, there was enough to bounce the light off it, thereby illuminating the walls.
Why did I choose this angle? Because it would look slightly more natural, as if there were still a ceiling light.
Step Three: Illuminating the Back Room
I then walked to the back room, which was mostly wooden beams, and did the same thing as I had before, illuminating what was left of the ceiling.
Step Four: Light Pouring Forth From the Door
For the final touch, I walked back to the main room, crouched down low, making sure that the beam wasn't shining through the holes in the wall, and skimmed the light out the door. I love the texture that this creates on the ground. I did this only for a short time since there had already been some light coming out from the door.
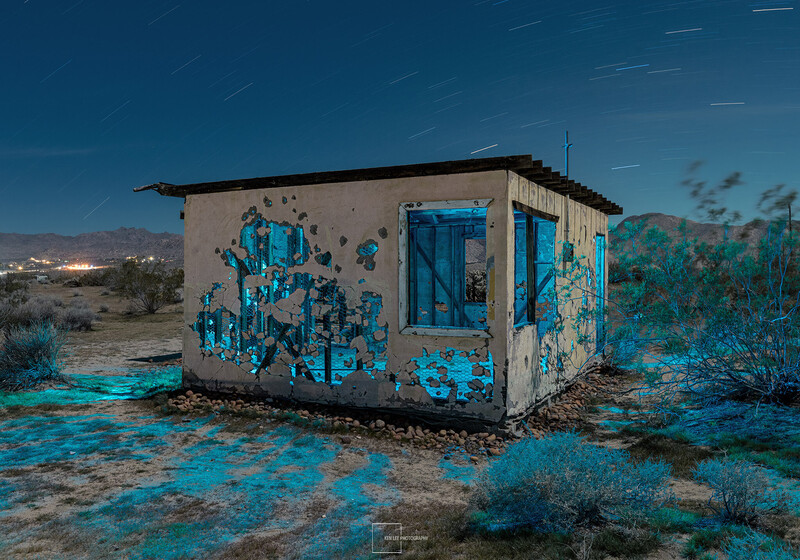
Experimentation Is Key
Trying different angles and approaches is key to creating something that you like. Although it's great to go in with a specific vision and keep your light painting consistent, it's also good to be flexible and allow for experimentation.
I photographed the house from many different angles, sometimes with different color lights, as seen in the photo above.
Can't Get Enough of Night Photography in the Southwest?
If you wish to learn more about night photography, light painting, star trails, Milky Way photography, or related items and wish to photograph in Southwest ghost towns, deserts, and mountains, I do teach night photography workshops with Tim Little several times a year.


Join the Fstoppers community for free
-
Post comments and join in the discussions
-
Browse the site ad-free
-
Share your work and get featured in the community
-
Compete in the photo contests for fun and prizes
No comments yet