
There are several different methods for tethering during a photo session and there are multiple methods for organizing one’s archives. But my gradual progression to a Capture One driven universe has immensely streamlined my photography process and boosted my business.
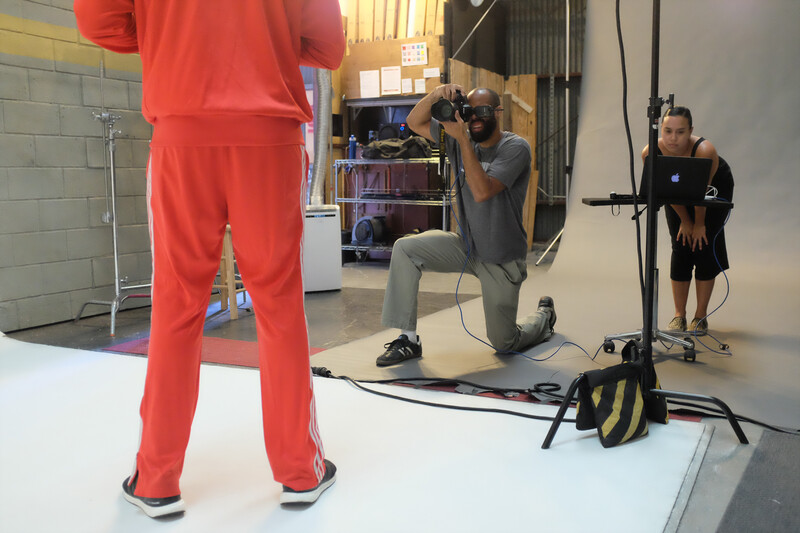
I spoke to you previously about why I shoot tethered and why my laptop has become as essential an on set tool as my camera and lights. Well, maybe the camera is still the most important tool. It is a photographic set after all. Today, I’d like to talk about my slow transition to a Capture One universe and how that specific product has allowed me to propel my procedures and save me hours of time I had previously lost due to an effective yet patchwork process.
First, a quick description of my workflow prior to Capture One. I’ll make this quick since I went into far more depth in my previous article.
Initially, like lots of people, I would capture to an SD card. Import into Lightroom. Edit in Photoshop. Save back into Lightroom. And export from Lightroom using each export preset one at a time.
Upon getting a chance to work on larger productions, I quickly began to learn that tethering wasn’t so much an option as it was a necessity. Because I already had Lightroom on my PC, my first attempts to tether were using Lightroom on a PC based laptop. Whether it was because of Lightroom or a lackluster laptop, that process just never really took hold. The images didn’t load fast enough, it didn’t feel quite stable enough, and there wasn’t enough added benefit to invigorate my process. That all changed the moment I began using Capture One.
I’d always known about Capture One. I was fortunate enough to have had the opportunity to assist for some of the best photographers in the business. And, without fail, they were using Capture One software on their tether stations. Being both cheap and quite less technologically adept than a wet rock, my initial inclination to try and duplicate that process through Lightroom was motivated by the fact that I’d already been using Lightroom as my catalog for years. Why not keep it in the family? Still, the larger and larger shoots I began to come in contact with, the more and more I saw digitechs working with Capture One. I knew there had to be something special about the program that inspired such loyalty.
Willing to try and overcome my technical deficiencies, but still, well, cheap, I decided to jump into the tethering process head first. Or, maybe it was more like tippy toe first. I went down to the local Apple store, waded past all the cool kids in line for the latest iPhone, and headed straight for the MacBook Pro with the smallest price tag. All those digitechs on set seemed to be using Mac systems, and knowing I was striving to run a professional set one day, I figured it was a good time to learn the system for myself.
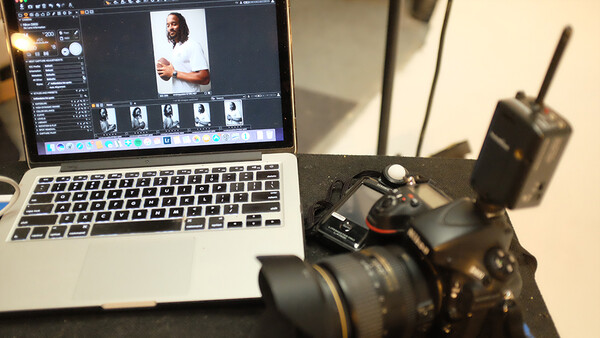
I took it home, downloaded the Capture One software, connected my camera via a brand new bright orange Tether Tools cable, and took a couple shots. I sat back in my chair, looked at the rudimentary shot of my dog lying on the couch now displayed big and bold on my screen and slowly said “Holy Moly.” Actually, I didn’t say “Moly” but rather another four letter word starting with an S, but as this is a family site, I thought it more prudent to edit my discourse.
As I already said, I am not someone who got into photography out of a love for technology. My ability to appraise a technology’s benefits are more in line with the procedure of a common eye exam when the ophthalmologist holds two lenses of varying strengths in front of my eye and asks simply “A or B.” But looking at these first images passed through the Capture One raw converter was a revelation. It’s not like Lightroom does a bad job of processing raw images. But something about those identical raw files being processed through Capture One just, well, they just looked better. I’m sure there are people in the world who can do a better job of explaining why that is down to the particular algorithm. There are likely also those who prefer Lightroom’s treatment. But to my eyes, Holy Sweet Mary those files looked good.
Perhaps even more important than that, they appeared on screen instantaneously even when attached to my entry-level laptop. Much faster than I’d experienced trying to tether to Lightroom. it may have only been a matter of seconds, but when I’m on set firing off dozens of images in rapid fire succession, this fractional addition in speed really adds up.
But the real selling point to me for Capture One was the color adjustments. Yes, you can work in the Develop module in Lightroom to create color adjustment presets. Yes, you can export each of those images individually to manipulate curves in Photoshop. But the ability to fine tune color adjustments through Capture One is simply ten times more powerful. The interface is also remarkably intuitive and even the least technologically adept person can be color toning in minutes.
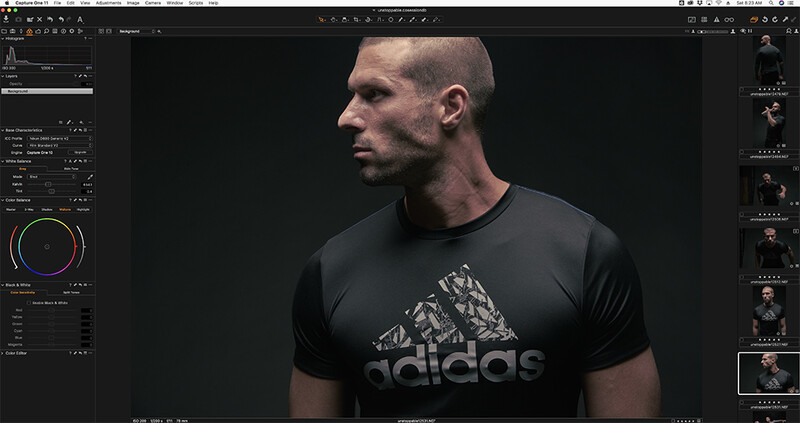
As someone who makes subtle color adjustments a major part of their creative process, I’ve spent hours creating a variety of color toning presets in my system. Capture One allows me to apply those presets to all incoming files before they pop up on screen. As a result, the clients hovering around the tether station are seeing exactly my vision for the final result right there in real time, rather than me having to give them my word that I will make it look cool in post. If they aren’t so keen on my vision, I can make additional tweaks right then and there and apply it to all the images going forward. So now the client and I are on the same page and when I walk off of the set I have an entire session already color corrected and already meeting with the client’s approval. All I have to do is kick out files for the client to proof and make their selects and then I can get to retouching.
Of course, old habits die hard. For several years, I maintained a dual system. I would shoot tethered to my Capture One loaded MacBook Pro. I would then spit those images out with the adjustments as TIFFs so that I could move them over to my PC and into my Lightroom catalog. Then do final edits in Photoshop. Then re-import into Lightroom. Then export from Lightroom to my eight standard preset file sizes that I find most useful.
If you’re thinking to yourself that this process seems cumbersome, you are right. If you’re thinking, there’s a better way to do that, well, I’m getting to that.
As has been my pattern of behavior since I was a little boy being taken to the local YMCA for my first swimming lesson, I began my Capture One journey by simply dipping my toes into the water. Once I realized how good the water felt at the base of my feet, I dove in head first.
The key to being able to finally leave the safety of the diving board was in a more thorough exploration of the catalog workflow in Capture One. For those of you who don’t know, there are two ways to work in the program: catalog or session. The session is intended as a project-based approach. You tether to a session. You shoot into the session’s Capture folder, move your best shots to the Selects folder and the rejects to the Trash. Then, you export the finals into the Output folder using your export presets, which Capture One calls “recipes,” and you’re all done.
This is my preferred way of working when initially acquiring the shots that will comprise an assignment. It creates a self contained session with the raw images, a sidecar file (list of instructions that contain any adjustments you’ve made) as well as the final outputs. I can then just locate the parent folder for the session on my hard drive, send that where it needs to go, either to a client or a backup drive, and “boom,” I’m set.
The catalog approach is similar to the Lightroom catalog. Its main purpose is to allow you to keep an accurate record of your entire image archive so that you know where all your files reside and are able to access them when they are required. Since my own Lightroom catalog just recently topped a quarter million files, this is that part where I was most hesitant to rock the boat.
So what changed? Well, three things really. One, as my PC began to slow, I chose to replace it with an iMac. Because my on-set workflow had become so ingrained with tethering to my MacBook, it seemed logical to keep the desktop and laptop in the same family.
Two, once I got my Mac as a desktop, I loaded Capture One to that system as well. Capture One does work on a PC, but since my process was already segregated, I had been using it exclusively on my laptop, then finishing the second half of the project the same as I always had on my PC with Lightroom and Photoshop. Illogical? Yes, I admit, change can be a process. But when I acquired my iMac, I could now simply unplug the external drive containing my session from the MacBook running Capture One and plug it into the iMac running Capture One, open the session file and voila! I can pick up exactly where I left off.
And three, I discovered an incredibly thorough series of free tutorials posted by Capture One to YouTube that gave me a better understanding of working with a Capture One catalog. Previously concerned that working with a Capture One catalog might be limited as compared to working with Lightroom, I quickly realized that not only did it provide equal capabilities, but in many ways exceeded those capabilities relative to my workflow. Those same raw conversion techniques and color adjustments would now be available to my entire archive. Additionally, by keeping it all in the Capture One family, I could simply import the entire Capture One session, including all the adjustments and subfolders, into my Capture One catalog without having to export any additional files.
Oh, and speaking of exporting files, this is probably the moment to highlight the biggest time saver I’ve found to be the result of the new process. As I mentioned, previously, I was doing final adjustments in Photoshop and exporting files from Lightroom. Personally, I have eight standard file types I use to export the final selects for every session. These range from huge TIFF files for clients all the way down to minimally sized low res JPEGs for the Copyright Office and everything in-between. True, I could just wait to make all those exports when they are needed, but I like to keep them on hand so that they are easily available without any additional work should I need them in the future. I also back up these files in triplicate in separate locations, so that if anything were to happen to the drive containing the original raw files, worst case scenario I have the completed files safe and secure at a separate physical location.
I do have all of these set up as presets in Lightroom. The only thing I’ve never been able to figure out, perhaps someone here knows the proper way, is how to export all of those eight presets simultaneously. By that I mean I previously had to export the TIFFs. The come back an hour later and export the JPEGs. Then come back to export the web versions. And so on, and so on. This works, but it’s time-consuming and requires me to keep walking back and forth to the computer. Or, at a minimum, I have to physically present to start each export individually. In Capture One, I’ve built identical export presets, but I can select all eight of them at the same time, hit “process,” and all of those different file types will be spit out into separate subfolders all in one go. It still takes a while to complete, but I only have to hit the button once, then I just come back when the entire process is complete. It’s like the George Foreman grill of exporting. I know it doesn’t sound like much, but that little function saves me hours by not having to manually monitor the export process. And, because the images have never left the Capture One universe (aside from non-destructive round trips in and out of Photoshop), I am always working closest to the source material which allows me a better exported file as well as easier flexibility should a client have a last second change of heart and want me to go back to the drawing board.
Capture One is also something of an industry standard with regards to commercial photography. Because of that, most of my larger clients are already using it as part of their own workflow. With this standardization comes increased portability. For example, I am often asked to come and shoot on location in other states or even other countries. In these scenarios, I am usually not tethering to my own MacBook, but rather tethering into a digitech’s workstation hired for the shoot. At the end of the shoot, the files often go directly to the clients without ever making it back to my office desktop for perusal and further editing. It is literally a hard drive handoff. But rather than wait for the client to make their selects or wait on sending images back and forth either online or through a messenger, I can instead plug an external drive directly into the digitech’s workstation at the end of the day, have them copy the session folder onto my drive, and hop my flight back home. Once I get back in front of my desktop (or laptop in the next hotel room), all I need to do is plug it into my system running Capture One and the session will open up exactly the way it appeared on set. So now, if I need to go back and make adjustments or provide additional files, I have everything right at my fingertips ready to go while the client has a duplicate session with adjustments available for their in-house team.
The benefits of keeping my workflow inside the Capture One universe are far too numerous for me to adequately summarize in a single article. And having used Lightroom myself for over a decade, you won’t find me using many unkind words towards its own abilities. But simplifying my process by slowly migrating to a process contained within Capture One has allowed me to improve image quality, communicate more efficiently with my clients and creative team, save time (and thus money) in post-production and processing files, as well as reduce my delivery time while simultaneously making it easier to address last second alterations.
For someone not technologically inclined, my evolution to this way of working may have been exceedingly gradual. But now that I have surrendered to simplicity, I am able to move at the speed of light.


Join the Fstoppers community for free
-
Post comments and join in the discussions
-
Browse the site ad-free
-
Share your work and get featured in the community
-
Compete in the photo contests for fun and prizes
31 Comments
I am intrigued by your post. A longtime user of bridge and photoshop....well you have me thinking...Well, ok, ugg, maybe get a trial version and check it out. Good honest post. Thanks
I know a few old School people that do the bridge / Camera RAW combo. I always explain to them that C1 is basically your tether software (Eos utility, Soforbild), bridge, and then Craw processor all in one. There is a learning curve, but it is the best.
Every pro photographer owes it to themselves and their clients to at least try Capture One. For starters, the speed will save you time and frustration. And more importantly, the files just look better right from the start. Capture One puts a lot of effort into their camera profiles. Their hard work means less work for you. And when work is required, the layers for various adjustments is fantastic. Yes, layer-based adjustments on a raw file. I am extremely happy with it for my entire workflow: tethering (when needed), raw processing and file management.
Faw Raw Viewer is a great Adobe Bridge alternative. It uses the Finder and sidecar files just like Bridge to manage your photos. You're not locked into anything. There's no raw converter but you can hook up three or four which you like (my list includes Iridient Developer, Photo Ninja and Photoshop). Haven't been able to get Capture One to handle single photos so it's not on the list. Iridient Digital is better for Canon but Capture One is very good to Sony raws (which are generally a tougher nut to crack).
I came into Capture One Pro sideways, Christopher. There was - still is - no way Adobe could EVER convince me to go with their cloud based software, or their subscription based payment system either, for that matter. OK they could do things I couldn't - so what, if I didn't want to anyway?
And then I found myself chatting to others, who used other systems. Till one day one of them suggested we all try different PP software and report back to the group, sharing out experiences.
That was the turning point for me. I don't think I've used Lightroom ever since, except on one occasion, with one shot, one evening, when I was running a cross-comparison test with about half a dozen different programs.
It was an epiphany moment. Looking at the comparisons as photos, Capture One Pro was a clear winner. Up close, the elimination of digital noise still left traces in COP, but while that was no longer true in Lightroom I didn't like the LR result - it switched from one extreme to the other, and instead of digi noise, it had gone strangely milky. The best of the bunch under close examination/greater enlargement was one of the minor league players - ACDSee, I think, without checking back. I don't have technical expertise in these computerised PP software programs, I can only comment on what I see. But for me, that was pretty well the point at which my interest in LR stopped.
For convenience, I am still using PS to dispatch shots to the printer - it's all set up for my printer, and for the papers I print on. And I do use it for resizing images, cropping and a couple of other minor functions.
But like you. I now find most - not all - of the colour adjustments are made in COP. PS still has a useful means to zero in on colour changes, though - you can select a particular colour (from a table or from an "eye dropper" placed on a suitable point in the image), and change things like huge, deeper/lighter etc I do still find that useful - we shoot in RGB and print in CMYB, and there's no way that can mimic the trillions of colours in real life, without occasionally needing adjustment.
I never got into Lightroom despite giving it a try. I made the jump from EOS DPP/Utility to CaptureOne a few years ago and haven't looked back. The hardest part for me was persuading my largest Client to not be so Adobe centric in their workflow. Lightroom has always been too slow tethering and despite my Adobe CC subscription, I've no need for Lightroom. I hope that Capture One expands to the point that it eliminates the need for Photoshop. My next step is to utilize the Capture One app and hand the client an iPad and they can watch images as they come up and not have to huddle in front of the MBP or external display on set.
C1 is especially attractive for Sony users because of the low cost of the Sony-only version. (has all functions, but only works with Sony Raw files)
In the past 3 years, I've spent just $142 on C1 software.
Beats the hell out of making monthly payments to Adobe.
I bought Photoshop CS5.1 in 2012 for $223. Haven't seen any reason to upgrade. (mostly because my skills are so elementary!)
Try this https://affinity.serif.com/en-us/photo/
$50 and is very similar. They have some great tutorials on vimeo that explain all the functions and if you ever wonder how to do something you did in PS on affinity, a quick google will almost always yield results. Pretty sure theres a trial you can use
Affinity Photo is a Photoshop replacement for many people. And their iPad version is AMAZING!
I would recommend PaintShop Pro (Corel).
I tried the trial version of Capture One and found it amazingly easy and intuitive to use. I would make the leap to Capture One if only they had the equivalent of LR Mobile functionality which is a big part of my work flow. Great article.
curious what part of the mobile ? as in actual editing ?
you can use capture pilot on the ipad not only when tethering so clients can view as you shoot rate as you shoot etc..
the capture one youtube channel just hit with some good videos on that :)
as actual editing nope does not have reckon the reason to many would be lack of control and proper screen etc...
Hey Chad, I love the fact I can import a 500 image shoot, sync it with Lightroom mobile and go through the culling and rating process anywhere. I can rate, delete and also toy with some minor functionality like white balance and color coding. It's so convenient to be able to view and cull on the fly from anywhere with an internet connection on any device.
yeah that is a solid thing for some from a ipad :) I do think some will say I tether to my computer so its all with me anyway kinda thing not arguing :) hahahahahah just saying what I hear know
I had the 2nd ipad when it came out recently bought a large pro and the pencil my wife is a full time graphic designer my daughter at 13 now got my wifes art ability and my seeing light ability and is doing amazing work on the pro one of the best purchases of tech recently
they are so strong and the pro really does have great color
I do think potential of devices like that are awesome hope we see more leverage them moving forward
how sweet would be it be to have the ability to tether real time with a ipad on the road no wires :) not here yet but that would be a dream for me hahahha :)
But thanks for the YouTube tip. Checking that out..
some of us have been preaching it since it came out :) good to see more seeing the light :)
and the color control is like no other for sure :)
after switching to capture one last summer, I'm amazed at how much better it was than Lightroom. Like you said, files just look much better when processed with capture one. and the local adjustments/layers in capture one are worlds ahead of lightroom.
1. with LR tethering, you can also put presets "live", so when you see your expo first time in LR, they will be already colorgraded. yes, it's slower, but the ability exists.
2. you can export a session, or a folder, or selected photos any time, like a new mini catalog, from LR, on your laptop, copy it to desktop, then "import from another catalog", and voila, you just pasted it to your general catalog on desktop, even with the raw files (or without them, just the catalog files with the actual adjustments). it's a simple action, one package.
3. and yes, you can execute several exports simultaneously, okay, not with one click, but right after each one started manually, and LR will do the whole process, you don't have to check, when will the first finish to start the next one. even if you do one big export, it's recommended to do the export hafling the photos, and then start the export together in one time, because it will be quicker, LR will use the cpu cores more effectively! I don't know, with the newest upgrade will it behave the same way (because Adobe just corrected the export optimalization), but it was like this before.
I don't say, LR is better, the raw conversation is famously better in C1, and the two application are different in some ways, but the things, you missed from LR are there! ;-)
LR is more simple to handle, lives with PS together, but fewer options and different colors from the raw file, and yes, it's so sloooow! :-) but maybe easier to understand and to handle it. (okay, it depends on the learning curve of both app)
I was wondering. When shooting tethered in studio, do you use a session or catalogue to start, and how do you separate each look, by session, folder, group?
Session, for sure. Then separate into different capture folder with dynamic naming to match the different looks.
For more details, have a look at this blog post I've written about that exact workflow: https://blog.phaseone.com/managing-multiple-headshots/
I shoot into session mode and do 99% of the work in session mode. Once that is complete, I import the session into my larger catalog for archival purposes. While shooting, I separate each look by setting up capture folders for each. So the red shirt shots are captured into the red shirt folder, the blue shirts in the blue shirt folder and so on. Then, when you output, you can output them into separate folders or even have the system rename the files to include the subfolder blue shirt naming in the file name. So it would spit out as Shot1_blueshirt_front or whatever you choose. Or, you can skip all that and do it however else you want. But it's really really easy to automate based on your preferences.
besides that link hit up their youtube channel they just did some more vids and this was one of the things they went over a bit :) so can sometimes make more sense seeing it :)
I use sessions and really do not use catalogs much at all
Thanks for the detailed explanation on how to manage Sessions to avoid catalogues (which I've hated since Aperture went MIA and Adobe decided to make Lightroom subscription only).
A great alternative is Fast Raw Viewer for fast triage and then the raw converter of your choice for development. There's literally no load time no matter how many images and all the info is kept in a sidecar.
Is it possible to use X-Rite ColorChecker Passport with C1? Or are there alternative ways to achieve accurate colors in C1? I mean, color toning for pleasing colors is one thing, trying to repro a specific color is something else.
It wasn't your laptop as much as it was LR. Just sayin.
Sorry but there is no way that is an impartial unsponsored article. Shameless advertising.
Capture One is a great RAW Converter, maybe the best overall. But unfortunately, they do not support medium format cameras (besides their own brand). Such protectionist behaviour will keep them from being a real threat or new standard compared to the Adobe world.