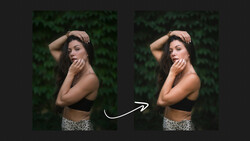
I'm personally obsessed with the cinematic look in my stills work. I think it's timeless, elegant, and endlessly interesting. If you'd like to add that same style to your own portraiture, this tutorial will show you how to do it using just Lightroom.
In this great video from Nathaniel Dodson, you'll learn how to edit a portrait to give it the feeling of a movie still. While this starts with an unusual (for still photography) crop, the real meat of the look is in the color grading. Notice how Dodson cools the image off and pays a lot of attention to the color (especially in the shadows). He also flattens the image and desaturates it slightly before making more pointed adjustments. As an additional tip, while holding the alt/option key when split toning gives you a preview of a 100-percent saturation of the hue you're selecting, I like to click on the small box just above the right edge of the sliders, which brings up a two-dimensional representation, allowing you to effect changes to the hue and saturation simultaneously, which makes it easy to quickly hone in on exactly what you want. Either method works perfectly well.

As always, we would love to see your work, so grab a portrait you've shot and try this edit in Lightroom, then share it in the comments and the Fstoppers Community!


1 Comment
Great article; much appreciated. I went to Lightroom and played with the first frame that happened to be open. It went from reject to something I am proud of. Thank you!