
You frame a landscape with a striking rock in the foreground and mountains on the horizon, you focus on the mountains because that is your subject, and when you get home the foreground rock is soft. Or you focus on the rock, and the mountains go mushy. The scene your eye saw as sharp from front to back will not cooperate. The fix is more than a century old and it is one of the most useful, and most misunderstood, ideas in landscape photography: the hyperfocal distance.
What Hyperfocal Distance Actually Is
Hyperfocal distance is the closest distance you can focus your lens at while still keeping everything from half that distance all the way out to infinity acceptably sharp. Focus there, and you squeeze the maximum possible depth of field out of your lens.
A concrete example makes it click. Shoot a 24mm lens at f/11 on a full frame camera and the hyperfocal distance is roughly two meters. If you focus on something two meters away, everything from about one meter in front of you out to the horizon will be acceptably sharp. Focus closer than that and the horizon softens. Focus on the horizon instead, which is what beginners instinctively do, and your foreground goes soft. The hyperfocal distance is the single focus point that balances the whole scene.
The key word in all of this is "acceptably." Hyperfocal focusing does not make the foreground and the horizon equally tack-sharp at the pixel level. It keeps everything within an agreed tolerance for sharpness, a standard that itself depends on how big you intend to print, how close the viewer stands, and your sensor. This matters more than it used to, and we will come back to it, because the traditional numbers were set for modest prints and can look optimistic when you examine a modern high-resolution file at 100 percent.
The reason this works comes down to how depth of field distributes itself. Depth of field usually extends farther behind the focus point than in front of it, but the ratio is not fixed at any tidy number, despite what you may have heard: it changes with a variety of variables we won't get into here. The popular "one third in front, two thirds behind" rule is only true at one specific distance, and it falls apart at the hyperfocal distance itself, where the rear depth of field stretches all the way to infinity rather than ending at any 2:1 ratio. That is exactly the point. Hyperfocal focusing works because it pins the far limit of acceptable sharpness at infinity while pulling the near limit as close to the camera as that aperture allows. Focus on the horizon instead and you throw away all the depth of field that would have extended behind it, getting nothing for it.
Why It Matters for Landscapes
Landscape photography, more than almost any other genre, wants front-to-back sharpness. A great landscape often depends on a strong foreground anchoring the frame, a middle ground, and a distant background, all rendered crisp enough to hold up. Hyperfocal focusing is the technique that makes that possible without guessing.
The most common beginner mistake the technique solves is focusing on the wrong thing. Defaulting to the horizon, or letting autofocus grab whatever is most contrasty, wastes the depth of field you paid for by stopping down. Hyperfocal focusing tells you exactly where to put your focus point to get the deepest usable sharpness from the aperture you are using, which is why landscape photographers have relied on it for generations.
How to Find It Without Doing Math
You do not need to calculate anything in your head. There are two reliable routes, from most precise to most approximate.
The most accurate is an app. PhotoPills is one of the best known, and DOFMaster and Hyperfocal Pro do the same job, most of them free or only a few dollars. You enter your camera, focal length, and aperture, and it gives you a calculated hyperfocal distance based on your format, focal length, aperture, and an assumed standard for acceptable sharpness, often with an augmented-reality view that shows you roughly where in the scene to focus. One thing to get right: enter the lens's actual focal length, not its full-frame-equivalent field of view, or the math comes out wrong. For deliberate, tripod-based landscape work, an app paired with a sharpness check on the rear screen is about as precise as it gets.
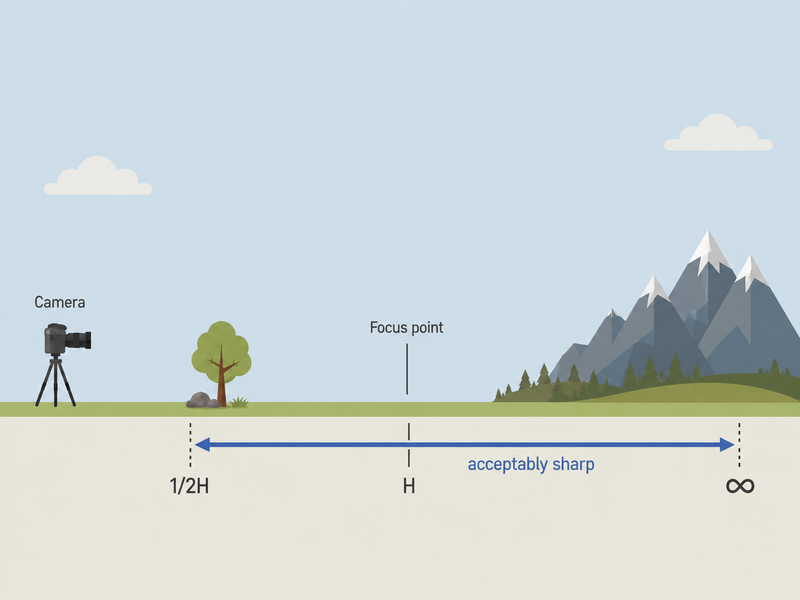
If you do not have an app open, there is a field rule that gets you most of the way. Find the closest object you want sharp, estimate how far away it is, double that distance, and focus there. With a wide lens stopped down to f/11, that lands you close to the true hyperfocal distance. The caveat is that this only works if your aperture and focal length actually provide enough depth of field to reach infinity from that focus point; if the horizon still looks soft, you need a smaller aperture, a farther focus point, a wider focal length, or focus stacking. It is not exact, but it is far better than focusing on the horizon, and it tends to err on the safe side.
The One Rule That Saves Your Shots: Focus Just Beyond, Never Short
Here is the single most important practical point, and it is the one beginners get wrong. When you are estimating the hyperfocal distance rather than measuring it exactly, always err on the side of focusing slightly farther than your estimate, never closer.
The reason is asymmetric risk. If you focus a little beyond the hyperfocal distance, you lose a small amount of sharpness in your nearest foreground, which is usually not critical. But if you focus even slightly short of it, the far limit of sharpness pulls back from infinity and the horizon goes soft, which is immediately obvious and ruinous. How small an error matters depends on your gear: with longer lenses, wider apertures, or a high-resolution sensor, even a modest focus error short of the mark can move infinity out of acceptable sharpness. So when in doubt, focus a touch farther into the scene than you think you need. You sacrifice a little foreground to protect the horizon, which is almost always the right trade.
Adjust for Your Sensor Size
One thing that trips people up: hyperfocal distance is not the same across camera formats. Because the acceptable circle of confusion differs with sensor size, the same physical lens at the same aperture produces a different hyperfocal distance on different cameras. The example numbers above are for full frame. As a rough adjustment, if you mount the very same lens on an APS-C body, multiply the full frame distance by about 1.5, and on a Micro Four Thirds body by about 2, because the smaller sensor needs more enlargement and so demands a stricter sharpness standard.
But here is the catch most beginners miss: landscape shooters rarely use the same physical lens across formats. They shoot for the same framing, so to match a 24mm full frame view on APS-C they reach for a 16mm lens instead. Because focal length has an outsized, squared effect in the hyperfocal math, that shorter lens actually drops the hyperfocal distance and gives you more depth of field, not less. So the format alone does not tell you the answer; the focal length you actually use does. The practical rule is simple: enter your lens's true focal length, not the full-frame equivalent, into a calculator and let it handle your format, and the confusion disappears.
Where Hyperfocal Runs Into Diffraction
There is a tension worth understanding. Stopping down to a smaller aperture like f/11 or f/16 increases depth of field, which helps hyperfocal focusing cover more of the scene. But stop down too far, into f/16 and beyond on many lenses, and diffraction starts softening the entire image, undoing the sharpness you were chasing. So hyperfocal focusing is not a license to close the aperture all the way. For most landscapes, an aperture in the range of f/8 to f/11 is the sweet spot where you get deep depth of field without paying a diffraction penalty, and you use hyperfocal focusing to place that depth of field where it does the most good.
When even hyperfocal focusing at a sensible aperture cannot get everything sharp, usually because the foreground is extremely close to the lens, the answer is not to keep stopping down. It is focus stacking: shooting several frames focused at different distances and blending them in software. Hyperfocal focusing handles the large majority of landscapes in a single frame; focus stacking is the tool for the extreme near-to-far cases where one frame physically cannot do it.
The High-Resolution Catch
Here is the modern wrinkle that catches a lot of careful shooters off guard. The hyperfocal numbers in traditional tables and most apps rest on a circle-of-confusion standard set decades ago for modest prints viewed at arm's length. Set your lens to exactly that calculated distance, then pixel-peep the raw file at 100 percent on a 45-megapixel sensor, and the horizon will often look slightly soft. The classic standard simply is not strict enough for today's high-resolution bodies and the way people scrutinize files.
The fix is easy once you know to apply it. In an app that lets you adjust the circle of confusion, set a stricter value, roughly half the default, which pushes the calculated hyperfocal distance farther out and tightens up infinity. Or just lean on the "double the closest object" field rule, which naturally biases you toward focusing farther into the scene and tends to protect the horizon on demanding sensors. Either way, the principle is the same one from earlier: when in doubt, focus a little farther, not closer.
A Note on Distance Scales
Older manual-focus lenses had a distance scale and depth-of-field markings printed right on the barrel, which made hyperfocal focusing simple: you lined up the infinity mark against the aperture marking and you were done. Most modern mirrorless lenses focus electronically, by wire, and have dropped those physical scales in favor of autofocus speed and compactness. A few specialist lenses, like certain Voigtländer and Zeiss Loxia primes, still include them, which is part of why those lenses retain a following among landscape and street shooters who use hyperfocal focusing constantly.

If your lens lacks a scale, modern bodies give you better tools than the old markings anyway. The most useful is focus peaking: turn it on, stop down to your shooting aperture, and the camera highlights the in-focus areas right in the viewfinder, so you can literally watch the zone of sharpness march from foreground to horizon as you adjust focus. There is one trap worth knowing: at small apertures like f/11 or f/16, the increased edge contrast can fool the peaking algorithm into painting the whole horizon bright and sharp-looking even when the background is falling just outside a strict high-resolution sharpness standard. That false positive is exactly why you should confirm with magnified live view on the horizon itself, which is the only way to be sure you have not fallen short. Magnified live view lets you check a distant detail is genuinely crisp, your camera's distance display gives you a number to match against an app, and any of these fills the gap the missing scale left. Note that magnification and peaking verify sharpness rather than report a distance, so pair them with an app or the distance readout when you need an actual figure.
Putting It Into Practice
The fastest way to internalize this is to practice somewhere low-stakes before you are standing on a hillside chasing the light. Set up a tripod in your yard or a local park, ideally with a wide angle lens since that is where hyperfocal focusing earns its keep, find a scene with a clear foreground and a distant background, dial in f/11, focus to a guessed hyperfocal distance, and then check the file at 100 percent on your screen. A remote shutter release or the two-second self-timer keeps you from nudging the camera between the focus you set and the frame you take. Do that a dozen times and you will develop an intuitive sense of where to focus without reaching for the calculator every time.
Once it becomes second nature, hyperfocal focusing changes landscape work from hoping a scene comes out sharp to knowing it will. You stop focusing on the wrong thing and start treating depth of field as the precise, controllable tool it actually is.
For a deeper, field-to-finish education in landscape technique and the post-processing that complements it, Elia Locardi's Photographing the World: Landscape Photography and Post-Processing is a thorough starting point, and Photographing the World 4: Advanced Landscapes goes further once the fundamentals are solid. If your landscape work extends into night skies, focusing gets even more demanding. For the stars themselves, most photographers focus directly on a bright star or infinity using magnified live view, since stars reveal the slightest focus error. Hyperfocal focusing and focus stacking come into play when you also need a foreground sharp alongside the sky, and Photographing the World 2: Cityscape, Astrophotography, and Advanced Post-Processing covers that ground.

Join the Fstoppers community for free
-
Post comments and join in the discussions
-
Browse the site ad-free
-
Share your work and get featured in the community
-
Compete in the photo contests for fun and prizes
10 Comments
All Great Information to learn and practice. Now for the miracle no one talks about and that is what happens at night to the light even when using a f/1.2 or 1.4 or 1.8 and in most cases we with just a f/4 lens. We want and use to gather as much light as we can get to get a faster Shutter Speed but we learn that even 1.2 does not have a blur fore and far but all is in focus from right in front of the camera lens to the horizon like magic and no one points it out but Milky Way capturers.
BUT WHY?
Some known info of mine for I use both A7SM3 and A7RM5 and a number of ultra wide and and fast glass (it is called with wide opening). Both cameras will capture the same image with the same lenses but the A7RM5 will do it at a faster SS, it is the MP amount and the height of each, the best way to see is to use PhotoPills App Spot Stars section where you select your camera then a lens MM, f/# and you can also select Accurate or Default each will have a different SS also. I could put data here but it is better to see your numbers.
I have used the A7S models for years but in the last few have been capturing the MW ARCH and that requires a panorama rig doing a 200+ degree a rig with a degree selector for each image to stop at point. All in All you have images to be put together side by side.
The key point of the subject here is the fact that no matter the f/# of the lens but in this case if using a wide open lens of a low f/# you will have clarity from near to far IF you focused on the whole but again many want the bokeh and focus on a subject close and not on the far as clarity. As far as MW capture you focus on the Farthest and it is the stars to get pinpoint sharp stars BUT when an image is captured even sea shells on a beach closet to the lens are in focus. The camera model and its sensor type and MP number will affect the SS used.
Just for info in my case you want a faster SS and even using a 2.8 or even 1.4 lenses there is a need for the ultra wide like today the 10mm f/2.8 but a Sony 201312mm f/4 is the lightest E 10-18mm (15-27mm in 35mm) f/4 OSS with treads for filters if needed that in Full Frame mode is 12mm so small and so light atop of a pano rig. Why a 12mm, The arch in July and August are so high it is right above your head and you want more stars above the arch pin point.
The last image is just playtime while waiting for clear skies but lights on the horizon are pin point sharp as well as the tree debris near.
This is great and explains a lot - especially the softness in the middle-foreground. Thanks, really useful.
If you are using a tripod, why not just focus stack?
Actually, you can focus stack using hyperfocal distance. Take one shot in close, and another at hyperfocal distance and then a two-image stack is all that's needed for full DOF.
I want offer something a little bit different. I don't like the focus stack to look where everything is completely sharp. I'll tell you why the human eye doesn't see it like that. You stand in front of a landscape and tell me that the mountains in the background, a pin sharp they are not. I prefer the hyperbole method at say with my medium format which is about a 14 because of the shallow depth of field and yep there's a little bit of soft haze with the mountains in the background unless I'm using a Zoom lens to highlight the mountains then I'm okay with the soft fall off in the background because that's how the human I see it... This image that I've attached here is a good example that mountain on the right hand side it will be a little bit soft if it was pin sharp it would look odd and it just doesn't work in my opinion and it gives it that HDR look which I don't like... It also saves having to stack images in Lightroom or Photoshop when you get home as well
The article was simply explaining the use of hyperfocal distance, not promoting its use.
Weather any individual chooses to apply it, or not is a personal choice
Well I'll put it this way mate. It actually works as a professional landscape photographer who sells a lot of prints and uses a medium format camera for a lot of my landscape work. This actually works so it's not really a choice so much. It's a scientific equation that gets you to take better photos you can choose to ignore that or you could choose to embrace it. Choice is yours but from someone that does a lot of landscape photography it 100% works 100% of the time.
You seem to be confused. I didn't write the article, nor did I comment as to its value one way or another.
The article simply explained its purpose, not whether or not it was useful,
Very practical advice, and most of what I use!
When I realized the old DoF scales on lenses were designed for about an 8"X10" print held in the viewers' hands, using film and paper prints, and date to the 1930's, I understood why my large format pictures seemed much better. It's also very easy to find the hyperfocal distance with a view camera without a scale. (Focus near, focus far or infinity, split the difference between the film holder and the lens aperture).
I think there is room for modern cameras to automate all of it, if a photographer wants perfectly sharp images with deep depth of field with all possible factors taken into the equation: everything mentioned plus final image viewing distance, final physical print/image size, and how good the viewers's vision is. There is an physical limit of resolution determined by the number and size of pixels in a digital sensor that a "circle of confusion" produced by a lens covers.
There are many DoF apps today, but George Douvos came up with a few DOF calculating apps a few years ago (OptimumCSP, TrueDoF-Pro, FocusStacker) that used a concept of "Blur Spot Diameter", which he defined in some essays now on the Wayback Machine as somewhat different than a "Circle of Confusion" or "Airy Disk". "Blur Spot Diameter" is a blurred circle of light that covers about twice the physical diameter, usually measured in microns, of the pixels of a given sensor. That's the minimum area that delivers a signal to a pixel. From this diameter, using physics, his apps calculate the resolution of the final image including diffraction, and today all that could be done automatically in a modern camera. The system could even switch from single image capture to high speed focus stacking, or pick an aperture and shutter speed depending on what inputs the photographer gave. Heck, the system could even use focus tracking, IBIS and OIS data to determine an ideal shutter speed for moving subjects! It might even be possible in a cell phone.
Maybe that's what some cameras do now, as computational photography?
Great article! Now if only I could tell the difference between 30 and 50 ft away by just looking? I missed that course in college!