

If you're new to photography, you might feel overwhelmed by the variety of settings and controls on your camera. But don't worry, there are only a few you actually need to worry about.
Your camera has somewhere between 47 and 200 menu options depending on the brand, and most of them exist to solve problems you do not yet have. That is not an exaggeration. Spend ten minutes in a Sony menu system and you will encounter settings for pixel shift multi-shooting, breathing compensation, and something called "shutter AWB lock" that even experienced photographers have to look up. Canon's menu system is friendlier, but it still buries critical controls behind tabs you might never open, and Nikon's is somewhere in between. The result is a paradox that has been plaguing new photographers since the first digital SLR shipped with a settings manual thicker than a novel: the camera that is supposed to help you take better photos is actively making it harder by presenting you with more decisions than you can reasonably evaluate.
Here is the good news. Of those dozens or hundreds of settings, exactly five determine the vast majority of how your photos will look. Everything else is refinement, niche problem solving, or marketing filler that exists to justify the spec sheet. If you learn these five settings and understand when to change each one, you will produce better images than photographers who own cameras twice as expensive but leave everything on auto. That is not a motivational platitude. It is a mathematical reality about how cameras capture light.
1. Aperture: The Single Most Important Creative Decision You Make
Aperture is the size of the opening inside your lens that lets light reach the sensor. It is measured in f-stops, and the numbering is counterintuitive: a smaller number like f/1.8 means a larger opening, and a larger number like f/16 means a smaller one. If that feels backwards, you are in good company. It confuses everyone at first, and the explanation involves fractions that nobody wants to hear during their first week with a camera. For now, just remember: small number equals big hole, big number equals small hole.
What makes aperture the most important creative setting on your camera is not its effect on exposure (though it does brighten or darken your image). It is the effect on depth of field, which is the range of distance in your photo that appears sharp. At f/1.8, your subject's eyes might be perfectly focused while their ears are already starting to soften. The background behind them becomes a smooth, creamy blur that isolates them from their environment. At f/11, everything from three feet away to the horizon line can be in focus simultaneously. That is an enormous creative difference, and it is entirely under your control.

Portrait photographers tend to live at wide apertures like f/1.4 through f/2.8 because the shallow depth of field separates the subject from distracting backgrounds. Landscape photographers tend to work at f/8 through f/11 because they want everything sharp from the foreground wildflowers to the distant mountain range. Street photographers often choose something in the middle, like f/5.6 or f/8, because they need enough depth of field to catch moving subjects without worrying about precise focus. The point is not that any single aperture is "correct." The point is that this is a decision, not a default, and making it intentionally is what separates a photograph from a snapshot.
If you are shooting in auto mode right now, switch to aperture priority mode (marked "A" on Nikon and Sony, or "Av" on Canon). You pick the aperture, and the camera figures out the corresponding shutter speed on its own. For a beginner, no other single mode change will improve your results as dramatically, and you will be in good company: most working professionals default to this mode for the bulk of their shooting.
2. Shutter Speed: The Reason Your Images Are Not Sharp
Shutter speed determines how long light hits the sensor each time you press the button. At 1/1000th of a second, motion freezes in place. At 1/30th of a second, anything that moves (your subject, your hands, a passing car) registers as a streak or a smear. If there is one setting responsible for more frustration among new photographers than any other, this is it. The complaint is always the same: "Everything looked fine on the back of the camera, but now it is blurry."
The answer is almost always that your shutter speed was too slow. There is a rough guideline called the reciprocal rule that works like this: your shutter speed should be at least 1 over your focal length. If you are shooting with a 50mm lens, you want a shutter speed of at least 1/50th of a second. If you are shooting with a 200mm telephoto, you want at least 1/200th. This is a minimum for handholding, not a guarantee of sharpness, and if your subject is moving, you will need something faster regardless. A child running at a birthday party needs 1/500th at minimum. A dog sprinting across a field needs 1/1,000th. A hummingbird needs 1/2,000th or faster.

Modern cameras with in-body image stabilization (IBIS) can cheat this rule by several stops for static subjects, but stabilization does not freeze a moving subject. It only steadies the camera. If the thing you are photographing is in motion, no amount of stabilization will save you from a shutter speed that is too slow.
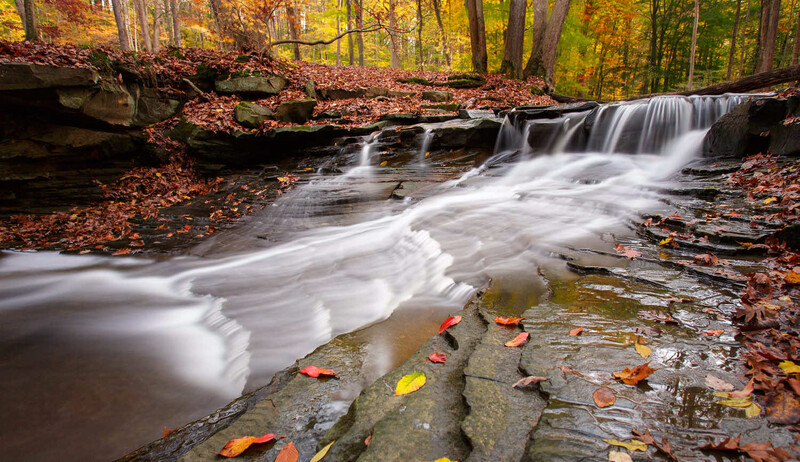
Shutter speed also opens up creative territory once the technical basics click. Half a second of exposure turns falling water into smooth glass. Fifteen seconds on a tripod stretches headlights into glowing rivers across an intersection. None of these results are accidents; they are choices you make once you understand what the shutter physically does to time. Early on, though, the job description is narrower: pick a speed fast enough to eliminate unintentional blur, and leave the creative experiments for later.
3. ISO: The Setting Everyone Overthinks
A practical way to think about ISO is that it controls your sensor's sensitivity to light. A low ISO like 100 produces the cleanest image with the least noise (grain). A high ISO like 6400 brightens the image significantly but introduces visible noise, especially in shadows and dark areas. This is the third leg of the exposure triangle, and it exists primarily to solve a problem: there is not enough light for the aperture and shutter speed you want.
Here is where beginners go wrong. They read online that high ISO is "bad" and then refuse to raise it above 400, even in dim conditions. The result is that they compensate by using a shutter speed that is too slow, and they get motion blur. This is the wrong tradeoff every single time. A sharp photo with some noise is usable. A blurry photo with no noise is garbage. Noise can be reduced in post-processing with increasingly powerful tools like DxO PureRAW, Adobe Lightroom's AI denoise, or the Nik Collection's Dfine module. Blur cannot be fixed at all. Not by any software, not by any AI tool, not by any amount of sharpening. Blur is permanent. Noise is negotiable.

The practical approach is to set your aperture for the depth of field you want, set your shutter speed fast enough to eliminate blur, and then let ISO float to whatever value is necessary to produce a correct exposure. On most modern cameras, ISO 3200 is completely usable for any purpose short of billboard-sized prints. ISO 6400 is fine for social media, web use, and standard print sizes. Even ISO 12800 is workable on full frame cameras made in the last five years. The cameras are far better at handling high ISO than most beginners realize, because the internet advice they are reading was often written during an era when ISO 1600 genuinely looked terrible. That era ended years ago. Adjust accordingly.
If you are currently shooting in auto ISO with a cap of 400 or 800, raise that cap to at least 3200. You will immediately start getting sharper photos in indoor and low-light situations, and the noise difference will be invisible at normal viewing sizes.
4. White Balance: Why Your Photos Look Orange
White balance tells your camera what color "white" should be under the current lighting conditions. Different light sources have different color temperatures: daylight is blueish, tungsten bulbs are orange, fluorescent lights are greenish, and shade is cooler than direct sun. Your eyes adjust to these differences automatically. Your camera does not, unless you tell it what kind of light it is looking at.
Most beginners leave white balance on auto, and most of the time this works reasonably well. The problem is the 30% of situations where auto white balance fails, and when it fails, the result is immediately and obviously wrong. Indoor photos under warm bulbs come out with a heavy orange cast. Photos taken in shade look cold and blue. Mixed lighting situations (like a room with both window light and overhead fluorescents) produce colors that look vaguely sick. You have seen these photos on social media. You have probably taken some yourself.
The fix is straightforward. Learn where the white balance control lives on your camera and get comfortable changing it. Every camera ships with white balance presets: daylight, shade, cloudy, tungsten, fluorescent, flash, and usually a few more. Choosing the one that matches your actual lighting will clean up your color immediately. You do not need to memorize Kelvin numbers or invest in a gray card right now (though both become useful down the road). All you need is the awareness that white balance is there, that auto gets it wrong more often than you might expect, and that correcting it is a five-second fix.
If you are shooting in raw (and you should be once you start editing your photos), white balance can be corrected fully in post-processing without any quality loss the vast majority of the time. This is one of the genuine advantages of raw files over JPEGs: the color temperature data is not baked in. But learning to set white balance correctly in-camera has two benefits even for raw shooters. First, it makes your LCD preview and histogram more accurate, which helps you evaluate exposure in the field. Second, it reduces the amount of editing you need to do later, which matters when you are processing hundreds of images from a single shoot.
5. Focus Mode and Focus Point: Where Sharpness Actually Lands
This is not a single setting but a pair of decisions that determine whether the thing you want sharp is actually sharp. The first decision is focus mode: single-shot AF (called AF-S on Nikon, One-Shot on Canon) locks focus when you half-press the shutter and holds it. Continuous AF (AF-C on Nikon, AI Servo on Canon) constantly adjusts focus as your subject moves. The second decision is which focus point or focus area the camera uses to determine where to focus.
Beginners almost universally leave both of these on their default settings, which typically means the camera chooses from a wide area of focus points and locks on whatever is closest or most prominent. This works when your subject is the obvious thing in the frame and nothing else is competing for attention. It fails the moment your subject is off-center, partially obscured, or standing near something the camera finds more interesting (like a fence, a tree branch, or a high-contrast background element). The camera focuses on the wrong thing, and your subject is soft. It happens constantly, and most beginners blame their lens.
The fix depends on what you are photographing. For stationary subjects like portraits, landscapes, and still life, use single-shot AF and either select a specific focus point manually or use your camera's eye-detection autofocus if it has one. Eye AF has become remarkably good on recent cameras from every manufacturer, and for portraits, it is the single most useful autofocus feature invented in the last decade. For moving subjects like sports, wildlife, pets, and children, switch to continuous AF and let the camera track the subject. Modern tracking systems can follow a subject across the frame, and they work well enough that fighting the system by trying to manually recompose is usually slower and less accurate.
The broader lesson here is that autofocus is not a single monolithic thing. It is a system with modes and options that need to match your situation. A portrait session and a soccer game require completely different autofocus configurations, and leaving your camera on the same settings for both guarantees that you will miss shots at one of them. Learning when to change your focus mode and where to place your focus point is the skill that will produce the most immediate improvement in your keeper rate, which is the percentage of photos from a shoot that are actually worth keeping. Once you are comfortable with these basics, back-button focus is the next step worth exploring.
Everything Else Is Optional (for Now)
That covers it. Five controls. The rest of what lives in your camera's menu system, from picture profiles to programmable buttons to the dozen or so drive mode options, falls into one of two categories: a fine-tuning layer on top of these core decisions, or a niche tool built for a shooting scenario you have not run into yet. All of it will matter at some point. (When you are ready, here are the next five default settings worth changing.) But if you spend your first three months mastering these five controls, understanding when to change each one, and recognizing the visual consequences of getting them wrong, you will have a stronger technical foundation than the majority of hobbyist photographers who have been shooting for years but never moved past auto mode.
The camera is a tool, and like any tool, it works best when you make deliberate decisions about how to use it rather than hoping the default settings will figure things out. Auto mode is not shameful, and there are situations where it makes perfect sense. But understanding the five settings that drive 95% of your image quality is what turns you from someone who owns a camera into someone who knows how to use one. The distance between those two identities is narrower than most people assume. It is exactly five settings wide.
For photographers looking for a structured path through these fundamentals and beyond, Fstoppers' Photography 101 walks through all of these settings with hands-on assignments, practical shooting exercises, and post-processing instruction that builds on the technical foundation covered here.


Join the Fstoppers community for free
-
Post comments and join in the discussions
-
Browse the site ad-free
-
Share your work and get featured in the community
-
Compete in the photo contests for fun and prizes
2 Comments
Your first camera you just bought and either from a local store or on line the first thing you find is several folded papers in many languages and the one for you is about the size of half a poster! This is what is found in all older and newer boxes Really!! If you are lucky the maker has a help site that can be viewed on the big computer monitor, Sony has one for all models from the beginnings of the first A7/R/S to now as well as a place to get firmware updates and also for lenses and their updates also, the place you will head every time you hear something new about your camera and it's work, it is also a fast place for you the beginner and the experienced photographer that may not know or remember all things. I do not care the maker or model this is where you first learn and test for this info will be in your head for ever even the camera you first bought back in 2014 like me.
The very next thing is a book and its PDF for your computer, pad and phone. The books are the most needed because it is way better than being on your computer/pad/phone (very small screen) for hours. the books will cover everything a function is and has an for todays camera of still and video use you will be getting a book 0f 600 pages plus and with images or results. Like kid reading your comics under the covers for the first time your new camera will be like a car machinic trying to find things out about the new fast car. There are many YouTube videos about the camera and recommended settings and uses BUT not handy before your first capture and i also say this for the seasoned photographer, the problem for the seasoned photographer is they have be doing the same thing for years and have never seen or tried something new and also there may be something new to help what is already known!
As far as the info here all items are a must to know! 98% of all captures are done in aperture mode it is just to easy. You also pay for it so use auto mode also it is full of very old things it uses and you can learn setting results. A key few even know is that the image on the back LCD and the EVF are the results of Jpeg settings, read and know the settings you can make to see what you captured and may not be what you are seeing. White balance in auto is great but understand and play with it during say sunny and cloudy times if you are doing Jpegs BUT not to worry for in post if you do RAW or even Jpegs and using the many SW editors they have selections for all under the camera and then you can use the color picker to get a good start before editing, this is never shown in YouTube edits. Follow the info in the article.
ISO noise do not worry about so much because editors have away to get rid of even the highest ISO's but say you are doing a night capture and a lot of lights are bright and blown out just going lower or lowest you will get more detail and because most all newer cameras have ISO Invariance meaning you can just increase exposure in your editor to brighten it up and keep the detail, many are not aware of. Below image was a resent panorama where I set the ISO at 64 because I wanted detail in the buildings but to get a panorama edit I had to increase exposure so the editor could see all 9 images details to merge all images and just using Lrc to PS and back no special pano program, yes Pegasus was mostly hidden in the glow of the increased exposure but worked it! Not a pro just play time for a hobbyist!
"Choose your Shutter Speed with PURPOSE and your Aperture with FEELING. Then adjust the BRIGHTNESS with ISO." Joe Edelman
Answer the Why of your photo.
Everything else mechanical