
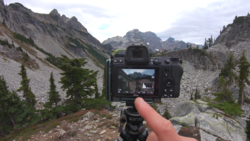
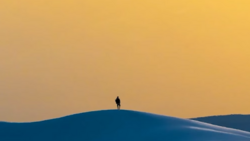
Landscape photography looks serene from the outside. A lone figure on a hillside, tripod silhouetted against a sunrise, communing with nature. What the Instagram post does not show is the two-hour predawn drive, the boots soaked through before the first frame, the sky that refused to cooperate, and the 200 exposures that produced three usable images. Landscape photography is not a passive activity. It is an ongoing negotiation with an environment that does not care about your shot list.
Every landscape photographer, from the weekend hiker with a camera to the professional who lives out of a van for weeks at a time, has a catalog of field disasters that taught them more than any tutorial ever did. Here are nine of the most universal, along with what to do when each one inevitably happens to you.
1. The Composition That Looked Epic in Person Is Flat and Boring on Screen
You were standing on the ridge. The depth was staggering. Layers of mountains receded into haze. The scale was overwhelming. You composed carefully, exposed correctly, and shot twenty frames. You got home, opened the files, and the image looks like a postcard from a gas station. Flat, compressed, lifeless. Everything that made the scene feel immense is gone.
What to do: The human eye perceives depth through binocular vision, parallax, atmospheric cues, peripheral awareness, and physical sensation (wind, temperature, the effort of the hike). A camera has none of those. It records a flat rectangle of light. To translate three-dimensional grandeur into a two-dimensional image, you need compositional tools that create the illusion of depth: a strong foreground element close to the lens that anchors the viewer's eye, leading lines that draw attention from front to back, layers separated by atmospheric haze or tonal contrast, and a focal length that exaggerates the relationship between near and far.
Wide angle lenses (14mm to 35mm on full frame) are the classic tool for this because they stretch the foreground and compress the background, creating a sense of scale that a midrange zoom cannot. But the lens alone is not enough. You have to get low, get close to the foreground, and compose so the viewer's eye travels through the frame rather than bouncing off a flat wall of scenery. If you want a structured approach to building these compositions in the field, Photographing the World: Landscape Photography and Post-Processing walks through location scouting, lens selection, and the editing techniques that restore the depth the camera stripped away.
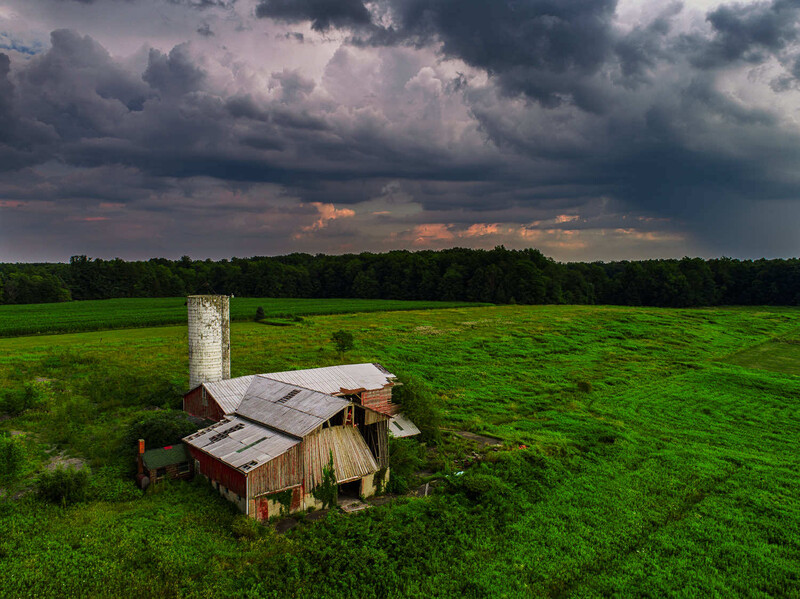
2. You Arrive for Sunrise and the Sky Is a Featureless Gray Slab
You checked the weather. It said partly cloudy, which in landscape photography terms means "potentially spectacular." You set the alarm for 4 AM, drove an hour in the dark, hiked to the overlook, set up the tripod, and waited. The horizon brightened. The gray stayed gray. No color. No clouds. No drama. Just a flat, overcast ceiling that looks the same at 6 AM as it will at noon.
What to do: First, do not pack up immediately. Overcast skies sometimes break at the horizon right at sunrise, producing a narrow band of intense color below the cloud deck that lasts two to three minutes. Wait at least 20 minutes past the theoretical sunrise time before calling it.
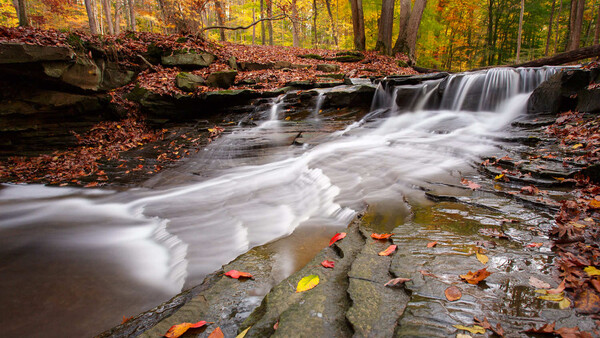
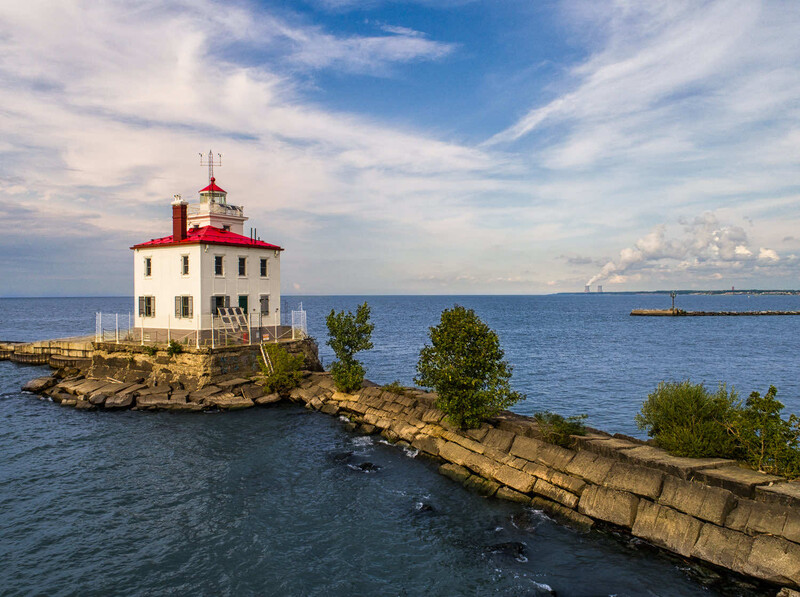
If the sky genuinely offers nothing, pivot. Overcast light is soft, even, and shadow-free, which is ideal for intimate landscapes: forest floors, waterfalls, streams, moss-covered rocks, wildflower close-ups. A circular polarizer becomes especially useful under overcast skies, cutting glare off wet leaves and rocks while deepening greens and saturating colors that flat light tends to mute. Stop looking up. Start looking down and around. Some of the strongest landscape images are shot under flat skies because the photographer stopped chasing the epic and started seeing what the light was actually good for. Remove the sky from the frame entirely and shoot the details the clouds are illuminating perfectly.
3. Your Foreground Is Perfect and the Sky Is Perfect but They Require Exposures Four Stops Apart
The classic landscape dilemma: the ground is dark, the sky is bright, and your sensor cannot hold both. If you expose for the sky, the foreground is a black hole. If you expose for the foreground, the sky is a white sheet.
What to do: You have four options, ranked by reliability. First, if you have a graduated ND filter, use it. A 2- or 3-stop soft-edge grad placed at the horizon darkens the sky while leaving the foreground untouched. This is the fastest field solution.
Second, bracket your exposures (one for the sky, one for the foreground) and blend them manually in Photoshop using luminosity masks, or merge them in Lightroom's HDR tool. This works well for static scenes but fails if anything is moving (waves, grass, clouds) between frames.
Third, if your camera has strong dynamic range (13+ stops at base ISO), expose for the highlights (protect the sky), shoot raw, and lift the shadows in post. Modern sensors, especially at base ISO, can recover three to four stops of shadow detail cleanly. This single-frame approach avoids alignment issues and works even with moving elements.
Fourth, come back at a different time. The four-stop gap at midday might be a one-stop gap at blue hour when the sky dims and the foreground holds more ambient light. Timing solves problems that filters and software cannot. For a deeper dive into exposure blending, HDR merging, and the post-processing workflow that ties these techniques together, Photographing the World 4: Advanced Landscapes covers the full process.
4. You Are Standing at the Famous Composition and 14 Other Photographers Are Already There
You drove to the iconic overlook, the well-known arch, the famous bend in the river. And when you arrive, there is a line of tripods, a crowd of photographers jockeying for position, and absolutely no room for yours. The composition is taken. All of them.
What to do: Walk away from the crowd. Literally. Move 50 feet in any direction and look for a composition nobody else is shooting. The famous angle exists because one photographer found it first and posted it. It does not mean it is the only good angle at that location. Some of the strongest images from iconic locations are shot from secondary positions that nobody fights over because everyone is fixated on replicating the image they saw online.
If the location truly only works from one angle (a narrow overlook, a single viewpoint), go at a different time. The crowd is there for sunrise because that is what the Instagram algorithm rewards. Come at blue hour, midday, or during weather that keeps the fair-weather shooters home. Rain, fog, and snow clear the crowds and produce more interesting images.
5. You Nail the Composition but the Fog, Light Ray, or Reflection Disappears Before You Finish Adjusting Settings
The scene was perfect for eight seconds. Fog drifted through the valley. A shaft of light broke through the trees. The lake was glass. And while you were adjusting your aperture, checking your focus, leveling your horizon, and removing your lens cap, the moment evaporated. The fog lifted. The light shifted. The wind rippled the water. It is gone.
What to do: When conditions are volatile, shoot first and refine later. Take a frame at whatever settings you have the moment something extraordinary happens. It might be slightly off on exposure or composition, but a slightly imperfect image of a spectacular moment is infinitely better than a technically perfect image of the moment after.
Then, if the conditions persist, refine. Adjust the composition. Dial in the exposure. Add the filter. But the safety shot is already on the card. This is not sloppy technique. It is triage. Transient light does not wait for you to be ready, so the single most important habit in landscape photography is reducing the time between seeing something and pressing the shutter.
6. You Finally Get the Composition Perfect and a Plane Contrail Cuts Across the Sky
You have been working the composition for 20 minutes. The foreground is anchored. The sky has beautiful cloud structure. The light is building toward peak color. You press the shutter and notice, at the top of the frame, a white line bisecting the sky from left to right. A jet contrail, bright and sharp and impossible to ignore, has drawn a stripe across your carefully composed image.
What to do: Keep shooting. Contrails dissipate. Depending on humidity and altitude, the trail will spread and fade within five to fifteen minutes, and the sky behind it will be clean again. If the light is peaking now and you cannot wait, shoot through it and plan to remove it in post. A contrail in an otherwise clean sky is one of the easiest Photoshop removals: the Clone Stamp or Content-Aware Fill handles it in under a minute because the surrounding sky is uniform.
If contrails are a persistent problem at your location (you are near an airport or a major flight corridor), check a flight tracking app before your session. Early morning and late evening tend to have fewer flights, and low-angle light makes contrails less visible because they are illuminated from below rather than directly.
7. Your Boots Are Soaked, Your Hands Are Frozen, You Cannot Feel the Dials, and the Light Is Finally Perfect
This is the landscape photographer's bargain with nature: the most dramatic light tends to arrive under the most uncomfortable conditions. Pre-dawn winter shoots, coastal storms, mountain weather, post-rain fog. The images that stop people mid-scroll are rarely made in pleasant weather. And the physical reality of making them involves cold, wet, exhausted discomfort that tests whether you actually want the shot badly enough.
What to do: Safety first, always. Hypothermia, frostbite, and exposure are real risks, not abstract concerns. Dress in layers with moisture-wicking base layers and windproof shells. Bring glove liners that let you operate dials and touchscreens without removing full gloves. Waterproof your boots before the season, not the morning of. Carry hand warmers. Bring a headlamp with a red-light mode so you can see your gear and the trail without destroying your night vision or contaminating other photographers' exposures. Tell someone where you are going and when you expect to return, especially if you are shooting alone in remote locations before sunrise. And if it's time to prioritize your safety and go home, do so.
Once the safety basics are covered, simplify your camera operation for cold conditions. Pre-set your exposure and composition before your hands get numb. Use back-button focus so you are not hunting for the shutter button with frozen fingers. And know your personal limit. No photograph is worth a medical emergency. If you are shivering uncontrollably or losing feeling in your extremities, pack up. The location will be there next week. You need to be there too.
8. The Post-Processing Takes Three Hours and the Result Still Does Not Look Like What You Saw
You have pulled the highlights, lifted the shadows, adjusted the white balance, bumped the vibrance, dodged the foreground, burned the sky, applied a graduated filter, masked the subject, added clarity, sharpened for output, and the image on your calibrated monitor looks... fine. Competent. But nothing like the scene that made you pull over the car and scramble for your camera bag.
What to do: Accept that it never will, and that is not a failure. Your eyes perceived that scene with 20 stops of dynamic range, binocular depth, peripheral context, emotional state, physical sensation, and the accumulated meaning of the journey that brought you there. A photograph cannot contain any of those things. What it can do is evoke a feeling in someone who was not there, and that is a different goal than replication.
In practical terms, most over-processed landscape images suffer from the same problem: the photographer tried to make everything visible. Shadows lifted until midnight looks like noon. Highlights pulled until the sun has no punch. Saturation boosted until the colors scream. The fix is restraint. Let the shadows stay dark where darkness belongs. Let the highlights bloom where the light was naturally intense. Use the sliders to reveal detail selectively, not globally, and stop editing when the image feels right, not when every pixel has been optimized. If you want a structured editing workflow that teaches this kind of restraint, Mastering Adobe Lightroom covers the full process from raw import through final export, with an emphasis on natural-looking results.
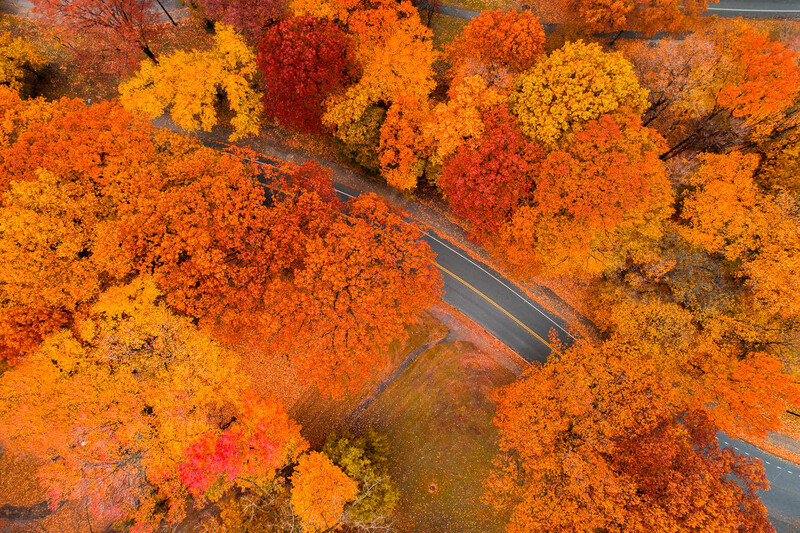
9. You Find the Perfect Rock, the Perfect Tree, the Perfect Leading Line, and the Light Never Comes
Everything is in place. The composition is the best you have ever found. You are positioned, focused, filtered, and ready. The forecast said clear skies with clouds. The clouds are there. The sun is below the horizon. Any second now, the sky should ignite. And then it does not. The light stays flat. The color never arrives. The sun rises behind the clouds and the scene goes from predawn blue to gray daylight without passing through any of the spectacular stages in between.
What to do: Shoot it anyway. The flat light version of a strong composition still has value as a reference image for next time. You now know exactly where to stand, what focal length works, and what the foreground looks like. When the light does cooperate (and it will, on a future visit), you will not waste a single second of it on logistics you have already solved.
Then go back. Landscape photography is a game of repetition. The photographers whose work you admire most did not find those compositions and conditions on the first visit. They went back. They went back in different seasons, different weather, different light. The composition is patient. It will wait for the light that completes it. Your job is to be there when the two finally meet.
Landscape photography is a discipline built on variables you cannot control. The light, the weather, the crowds, the physical conditions: none of them answer to your schedule. The photographers who produce consistently strong work are not the ones who avoid these problems. They are the ones who have been defeated by them so many times that the adaptation is instinctive.
If you want to accelerate that process with structured field technique and post-processing instruction, Photographing the World: Landscape Photography and Post-Processing covers location scouting, composition, exposure, and editing across some of the most challenging landscapes on the planet. And if you are still building the foundational camera skills that make field adaptation possible, Photography 101 starts at the beginning and works through everything from exposure to Photoshop. Pack your camera backpack, set the alarm, and go. The conditions will never be perfect. Your response to imperfect conditions is what makes the image.


Join the Fstoppers community for free
-
Post comments and join in the discussions
-
Browse the site ad-free
-
Share your work and get featured in the community
-
Compete in the photo contests for fun and prizes
12 Comments
8. The Post-Processing Takes Three Hours and the Result Still Does Not Look Like What You Saw
What! I do all my editing in no more than 15 minutes. It probably shows, but all done in 15 minutes. I wouldn't want to spend longer.
I shot film most of my life. Any “edit” for me is a quick adjustment. I just shoot it right to begin with, I seldom shoot multiple frames.
100% agree. I use large format film and hand process. Every piece of film costs $5.00 now. That teaches one to be selective and be careful in every step in the process. 4 Stop spread? No problem. N- or N-- development and everything is good.
I was always careful and deliberate with film, I still shoot the same way out of habit. I learned the use of a tripod in 1967, and I still shoot that way. My era of 4x5 helped a lot.
If I were to design a photographic curriculum each student would have two semesters where students would use film only and would have to learn to calculate exposures using a hand held meter and process their own film. Manual function cameras only. Fundamentals are 100% needed to sustain a career in photography.
Really well done article.
When it's overcast, put on a 6, 10 or 15 stop filter and do long exposure. It can turn pretty flat scenes dramatic sometimes.
Sometimes, a lot of time, the image has to "simmer" for a period of time before you can get all the "flavors" out of it. I have numerous images that I couldn't figure out in the immediacy of their original conception. Coming back to them weeks, months and even years later allows me to see what is in the image and then extract the image, most times it's much better than what I thought in the moment. someone that says they will spend only a few minutes on an image will likely come back with only a "surface" interpretation. And interpretation is the word for me since most of the time the "final" image is quite different than what I saw in the moment. Vision takes time to develop.
I also do this. Editing an image weeks/months after the fact one can essentially approach the image with a fresh perspective.
Terrific article! Thank you!