When it comes to portrait photography, the softbox is one of the most fundamental and versatile tools you can have in your kit. If you are new to working with artificial lighting, check out this fantastic video tutorial that will show you how to properly place a softbox to get the best results.
Coming to you from Daniel Norton Photographer, this helpful video tutorial will show you how to properly place a softbox for a portrait. One of the most important rules a photographer should learn is how the relative (not absolute) size of the source affects the softness of the light. In other words, a small source can create soft light if it is close and thus relatively large to your subject, and a large source can produce hard light if it is placed far away. This is the same reason the sun produces hard light; despite its massive size, being 93 million miles away, it is relatively small compared to earthbound sources. Check out the video above for the full rundown from Norton.
If you would like to continue learning about how to light a portrait, be sure to check out "Illuminating The Face: Lighting for Headshots and Portraits With Peter Hurley!"


Join the Fstoppers community for free
-
Post comments and join in the discussions
-
Browse the site ad-free
-
Share your work and get featured in the community
-
Compete in the photo contests for fun and prizes
1 Comment
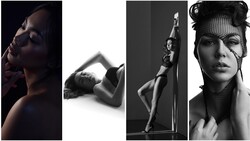
Perhaps a better title would be How to Distance Your Soft Box which the video does a good job of explaining. However, I virtually never aim a soft box (and I use them all of the time) with the center of the beam of light at the center of my subject. It seems like people forget that even though a soft box's light is diffuse, it is still acts like a beam with a center and an edge. Knowing how to light using the edge of the beam gives you more control over the effect, perhaps greater than the effect of distance. Thinking of the light from a box as 3-dimensional instead of simply a line.
A typical set up for me shooting a model would be to set the light to the side (45 degrees or greater) and aim a soft box so that the center of the passes by the center of the model (either face or torso depending on my crop) with the edge of the beam hitting the model directly. The greater volume of light passes by the model and hits a reflector to control the shadow. Another effect is that by exposing (1/2-1 stop less) for the edge of the beam, it allows the center mass of light to fall off over the rest of the figure to condense the dynamic range of the lighting effect so less post manipulation is needed. Widening the fall off range allows you to use a smaller box or set at a greater distance.
These photos were shot using only a Plume Wafer 100 (small box) and V-flat for shadow control for a client who needed light coverage over the whole gown.
https://fstoppers.com/photo/35176
Again, the video does a good job at one aspect of soft box lighting but there is always more to learn.