
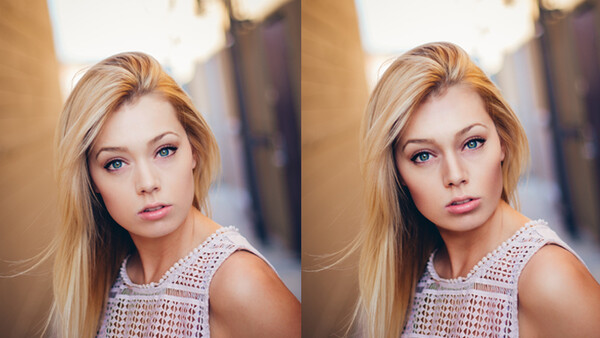
It's amazing how adding just a little bit of shadows can drastically improve the depth of your photographs. Contouring faces is a little trick that can take a few minutes to do, but ultimately increases the overall image quality. I'm going to show you how to use the adjustment brush tool in Lightroom to act similar to the dodging tool in Photoshop, and then the key areas to brush for properly contouring a face.
I often think people underestimate the true power of Lightroom. It's true that Photoshop is an amazing tool that allows you to do much more than Lightroom, but Lightroom can be equally effective if used right. All the contouring in the image above was done using the adjustment brush tool. By adjusting a couple of settings, the brush acts very similar to the dodge tool in Photoshop.
I don't like to adjust the exposure because I don't want the brush to darken everything. I adjust the shadows because I want it to make the shadows that already exist more pronounced. I'll go over why the saturation is up in a moment.
The flow affects how much the brush is actually brushing. The flow is set to 53 so that I can control how much the brush affects the shadows. The density does exactly what it sounds like, it affects the density or the opacity of the brush tool.
The above image shows where I've brushed in red. Brushing certain areas will add dimension to the image, and make it appear sharper. The three main areas to brush are the cheekbones, nose, and forehead. Brushing the cheeks makes the face appear slimmer, brushing the nose makes it less pronounced, and brushing the forehead makes it less of an attention grabber. I also brushed underneath her chin to add some separation. You can see I also added a little brushing to the shoulder to add dimension.
When you start darkening the shadows with the brush tool, sometimes it can make the person's face look dirty. This is where adding saturation comes in. By adding saturation you bring back some of the color that was lost when that area was darkened.
Above shows what it looks like before adding saturation and after saturation is added. There is not a huge difference, but it helps retain a natural look.
Below you can see what the the image looked like before any contouring and then the final image after contouring the face.


Join the Fstoppers community for free
-
Post comments and join in the discussions
-
Browse the site ad-free
-
Share your work and get featured in the community
-
Compete in the photo contests for fun and prizes
57 Comments
ok guys this might have been covered somewhere else on this website but I gotta ask, i would like to add the before/after image slider to my own website that is used in this article. does anyone know how to do it?
http://demosthenes.info/blog/819/A-Before-And-After-Image-Comparison-Sl…
Great article Kenny! Thanks for sharing!
Great article! Contouring is an extremely important part of my retouching process.
I stick to photoshop when I do my image contouring, but for no reason other than that's just how I learned, and it works for me. I use lightroom maybe once a year.
I like the way you explore photography :)
Kenny, great read. I think it's really cool that you responded to some people comments about "overdoing it" and re-editing it. That's really awesome
I noticed you didn't touch the highlights. Any particular reason? Do you ever?
Don't bother re-editing the image, just retitle this post to "how to make your subject look like a zombie" Perfect!
Seriously, though, we all see it's a caricature of the technique, right?