I have been teaching retouching and photography for a couple of years, and I found that even my advanced students often didn't know some basic tools or techniques. Those gaps in knowledge are to be expected among self-taught photographers and retouchers, of course. However, I have just returned from my trip to Italy where the amazing Italian Photoshop guru and Wacom evangelist Marianna Santoni organized a series of educational events, in which I taught Beauty photography and retouching. We had over 200 attendees overall, and I have to tell you that the level of Photoshop skills of our Italian fellow-photographers left me open-mouthed. The fact that most common gray areas in the Photoshop education were not new to our attendees made me think that we have to up our game, guys!
Let's patch it up and fill in those gaps! And we should start at the beginning of the digital imaging process: getting the best details out of your raw files.
I seem to always have at least two solid ways to tackle any retouching task. And exporting the best image data from raw is no different - I always use one of my two techniques depending on the task at hand. From my teaching experience I've learned that usually photographers know about either one of them, neither of them, but almost never both. I believe, though, that it will save you a lot of time and energy to utilize these both techniques in your retouching workflow.
I'm Sure You Shoot In Raw
At this point in time, there's no need to even go into the raw vs. JPEG discussion, right? We all know that if you are serious about your photography and retouching, you will only shoot in raw because of the amount of recorded data and flexibility this format offers.
I am a huge believer in getting things right in camera, but there are always circumstances that get in the way. And, no matter how experienced we are with our lighting, the dynamic range in the images we shot sometimes isn't as wide as we would like. That's usually not a problem if your photo files are in raw format and your exposure is correct, or close to being correct, to begin with.
So, before we take our photo into Photoshop for detailed editing, our goal is to export the image with all parts well-exposed. We don't want any shadows so dark that we can't see any details in them, or any highlights blown out. Unless, of course, that's the look you're trying to achieve.
Houston, We've Got a Problem
But what if when we adjust the exposure to dial down the highlights our shadows fall into complete darkness? Or when we pull out the details from the shadows our Highlights Clipping Warning starts screaming with red pixels all over the place?
You can sure compromise, find the exposure with the least damage to both highlights and shadows, and then correct the rest in Photoshop. But that way you are sacrificing the quality of you image, and start by leaving a lot of color and detail information behind. The information that you could actually pull out from your raw file, because it's there.
That's when these techniques come into place.
So, just like I said, I use two main techniques for getting the details that I need from my raw files. Sometimes, I export a few exposure variations to correct my own lighting mistakes, but sometimes I do it to expand the dynamic range of a photo, just because I can. It never hurts to get as much pixel information out of my raw file as possible.
Method Number One
My number one method will work in most situations, including the complex dynamic range corrections when you need to extract many parts of the image with different exposure and other settings.
Simply focus on one part of the image at a time, for example the hair, or the face, or the outfit - adjust exposure, highlights, shadows, etc. and export a PSD naming it accordingly, for example "Details in hair" or "Bright face" or anything that helps you identify your exports when you combine them in Photoshop.
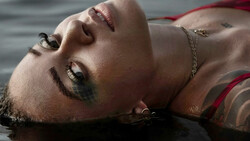
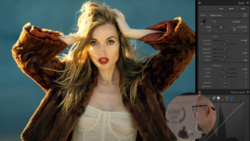
For example, in this photo I have some dark areas in the hair, where details are not visible even though there are no Shadow Clipping warnings.

I'd like to see more details in the hair (especially in the shadows) and in the further side of the hat. So, I export my original as a base PSD and name it "base". If the original requires some global exposure and color corrections, I would perform them before exporting my "base" PSD.
Then I adjust exposure, highlights, colors, etc. and brighten just the hair and the hat. Then export another PSD, adding "hair" or "bright" to the name of the file. I am only looking at the hair and the hat while adjusting exposure for this export - it doesn't matter if other parts of the image get overexposed or lose contrast.

Then I focus on the face and skin and make another exposure variation, in which I only care to prepare the skin for further retouching. I make sure there are no overexposed highlights on the skin and the shadows are not too dark. I don't need too much contrast in the skin texture at this point, so it is easier to retouch it later in Photoshop. After my skin exposure variation is ready, I export another PSD and add "face" or "skin" to the file name.

After all well-exposed parts are exported, I go to Photoshop > File > Scripts > Load File Into Stack and find my exported PSDs in the dialog window.

This function makes it super easy and quick to put all my exports into one PSD file as layers.

I then place the Base layer at the bottom of the stack and the brightest layer at the top of the stack in the Layers panel. Cover all top layers (not the Base) with Layer masks and invert them (CTRL or COMMAND + I).
Needless to say, you don't need to keep the exported PSD files on your hard drive, just keep the master-file, in which those exports are combined.
UPDATE (suggested by Tomas Ramoska)
Like my Australian teachers used to say: "There are always dozens of ways to get from point A to point B in photography and digital image editing". I personally have been using the method I've described above for a few years now, but Tomas has just made a suggestion in the comments, I tested it and it looks like a very good alternative to my method.
Instead of exporting PSD files you can create a Virtual Copy of each exposure variation (right click on the file with the exposure adjustments applied and select Create Virtual Copy). Then adjust your exposure for another part of the image and create another Virtual Copy.
Once all your exposure variations are created, select all Virtual Copies and right click and select Edit In > Open As Layers in Photoshop...
The master-file that is created this way is identical in size to the master-file that is created via my method described above. The only thing that will be missing if you do it this way is the names of your PSDs, which help you to organize your layers in the master-file quicker, especially when you have many exports. But that's something we can definitely work around.
Then I carefully paint with a white brush (soft or hard - depending on how hard the edges of what I am uncovering are) and reveal the best parts of each layer.

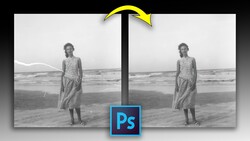
The difference with the original may be not so striking in my example, but the principle is there and this technique will work especially great when you accidentally overexpose or underexpose some parts of your image. Normally, if the image is ruined we just leave it alone, but I have a few favorite photos in my own portfolio that were actually rescued thanks to this technique.
I also use this method when I need drastic color changes for parts of the image, for example, lipstick or nail polish color or the outfit color.
Method Number Two: Lightroom Adjustment Brushes
This is an alternative to my main method and I use it when I need just a few local exposure or color corrections before I export my image and get down to retouching it in Photoshop.
As simple as it sounds, I correct all such parts with the Adjustment brushes in Lightroom and export just one PSD.

If you haven't used the Lightroom Adjustment Brushes before, the following two sources will help you get familiar with them.
This video tutorial by my colleague, Fstoppers writer Trevor Dayley:
And the Adobe TV video tutorial: Adjustment Brush: The Basics

Hope you find this helpful and if you wish to learn more about retouching and Photoshop from working professionals, make sure to visit our new project Retouching Academy. We're a team of passionate artists, and, even though, our project is very young we are constantly adding new articles that are helping photographers and retouchers all over the world to become better at their craft.
Start from our Free Educational Materials page and connect with us on Facebook - Retouching Academy - to stay tuned for our news and offline events in 2014!

Join the Fstoppers community for free
-
Post comments and join in the discussions
-
Browse the site ad-free
-
Share your work and get featured in the community
-
Compete in the photo contests for fun and prizes
86 Comments
Excellent per usual, Julia
Thank you Zach!
Thanks for sharing!
Wouldn't importing your base RAW file as a smart object from ACR to Photoshop, and then using New Smart Object Via Copy to make a new adjusment, work the same as exporting each adjustment on a separate PSD file?
You can also open as Smart Object from Lightroom, too. Then, in Photoshop, you just duplicate Smart Objects and adjust each layer independently.
I am not too familiar with Lightroom as I only use Photoshop. Can you bring each Smart object layer back into Lightroom to make separate adjustments and back to photoshop? You can do that with ACR and Photoshop.
Jesse and Joe, I am not a Lightroom expert either, but I am still convinced that those initial adjustment will give you the best results if done in Lightroom. I am not saying that my way is better than everyone else's, I am just sharing the methods I have been utilizing for years. I learned them from respected professionals, besides all the additional knowledge regarding RAW format that I possess.
Julia, I do not question your methods. I actually thought you were using ACR in your first method until now when I noticed the Lightroom interface in your example images. My mistake. Thank you for sharing your knowledge. I always look forward to learning something new from professionals such as yourself.
Jesse, I do that in ACR sometimes too, but as far as I know (and I can be mistaking, I am not a techy) ACR's algorithm is still different and it is still more like working on layers.
But hey, you can still do it, I think I stick with my guns because that's how I learned it and that's how I've been doing it for so long. I'm sure in most well-exposed photographs you will easily widen dynamic range without LR.
I open the file as a smart object in photoshop. I duplicate the base layer smart object and rasterise one of them. then double click on the smart object to bring up Adobe Camera Raw and create a light version. Duplicate the smart object then rasterize the light layer. I then create my shadow layer using the smart object. I recently discovered the joys of opening RAW files as a smart layer in photoshot, it saves having so many duplicates of files in my Lightroom library, just magic!
Another awesome article, Julia. Thank you.
If you've watched Joey L's creativeLive sessions you'll see he teaches the same method to achieve a better dynamic range in the image.
Thank you Nick! I haven't seen it, but I love Joey L's photography, and would love to see what he does for sure. Thank you for letting me know :)
I become one step closer to becoming a bro one Julia post at a time. This post a tremendous help! just what I was looking to do!
I don't have Lightroom, but do this with ACR and photoshop CS6 in a slightly more long winded way.
Adjust raw in ACR, open as smart object in PS - name layer Base (example name from this tutorial here) .
Duplicate the RAW in bridge, readjust for hair, open as smart object, rename layer Hair.
Duplicate the RAW in bridge, readjust for skin, open as a smart object, rename layer to Skin.
Bring all layers together in same project = three objects adjustable in ACR, no loss of data. I could use New Smart Object Via Copy after the initial edit in ACR and the first layer, but do it this way instead (if Ps crashes before save or something I would ony have to do the adjustments again) YMMV.
I used to convert different adjustments to TIFF and blend them in photoshop with masks, changed to this way as it means no chance of lost data and more flexibility.
Yeah, there are always different ways! Thank you for sharing!
You delete duplicated RAW files after you're done with retouch, correct?
Also, I have a question - I hear here and there people retouching and saving their master-files in TIFF. From my education I know that TIFF is a format that's good for the final version of your edited image that goes to print. The file format you'd send to your clients for print, to a magazine, or whatever. PSD is the native Photoshop format which provides no data loss, and everything you need to save in a multilayered master-file.
So why some photographers work in TIFFs? I really want to know, I'm not being sarcastic or anything.
I believe it is because of the compatibility of using TIFFs across many platforms/programs. If they need to they can use a multitude of products to work on an image. Or, if in the future, Adobe is no longer around, or if they decide to switch from using Adobe editing software to one by a different company, they know all of the previous files/edits will be compatible.
Good one! Thanks Tagnal!
((((seriously doubt Adobe ever going anywhere in our lifetime))))
Hey Julia,
"You delete duplicated RAW files after you're done with retouch, correct?"
Absolutely, once the retouch/landscape/whatever is done you can delete the duplicate RAWs. I used to save each adjustment of the RAW as TIFFs for the layers as that was how I originally tackled this blending technique. With regards to saving the master-files Tagnal below has it right in my opinion. Personally I just save the PSD and burn off TIFFs or whatever as needed.
I would imagine some photographers work with TIFFs because they might be using a RAW converter other than ACR. For example if I convert the RAW in Capture NX2 (which can give better results than ACR for Nikon RAW files) then I'm going to have to save it in TIFF before I can do anymore editing in ACR/Photoshop (which I would do because i prefer the Adobe software, even though the result from that initial NX2 conversion can often be a bit more accurate, although I really hate how NX2 deals with blown highlights compared to ACR so I'd only do this for certain images) There maybe a load of other reasons I'm not aware of.
Cheers!
Thanks so much for sharing your thoughts! I work with Adobe software only, so I don't know much about the alternatives. I do appreciate you sharing your knowledge with us though! Thank you!
+ TIFFS are lossless too and keeping the layers for later editing comes as an option. (Great article by the way...)
Very good article.
I'm more confident using Lightroom local adjustment brushes than the layer method, but I think I can give it a try. Using virtual copies as suggested before is a great method and naming them correctly in LR is the key
Andrea, I hear you! I love the Adjustment brushes (fast and easy), but sometimes you just have to take it to Photoshop to mask out and layer up. Try it, I'm sure you'll love it in some occasions.
I'll surely give it a go :)
Your keyboard makes really good articles!
I think the point is there are 20 ways to skin a cat, these are 2 of her favorites. Good article, I've used both methods and they work great.
Thank you Cody! That's exactly what I meant!
I think what a lot of people are getting all confused about is why you export as PSD? and not TIFF, why not just open the RAW as a smart object, make multiple raw conversions then mask those? Is there an added benefit to using PSD as your output?
I just use Lightroom haha. Great tutorial Julia.
Virtual copy's in Lightroom can also get named each VC can have it's own Copy Name
Awesome! I can't wait to get home and edit some photos. :)
Great post... This is essentially doing HDR in post, no?
It's a great article, thanks for that. But is that the top notch pro level? I'd like to think that big commercial shootings shot on medium format, don't use Lightroom or the photoshop RAW converter. But they semm to do the work with Capture One and right there. It's quite more complex than other RAW Converters and it seems that this would be a workflow we should try to learn.
Great great articles this is helpful !
I have a question, i have been locking for a while to how to do this kind "script" maybe or curves ?
http://www.flickr.com/photos/nicolaslefebure/
You knows that true Dark color and gold skin ?Anyone knows ?
Please i'm stucked .. :'(
Cheers from Belgium.
@juliakuzmenkomckim:disqus... I have never thought of doing that before. Such a simple quick method too. Thanks!
I also found @tomasramoska:disqus virtual copies idea a lot quicker but I'm use to working this way. It may reduce drive space too as a now PSD isn't created for each layer.
(Not that it really makes a whole lot of difference as not going to save them anyway!)
So thanks too Tomas.
Really great stuff on Fstoppers as always. I don't have to bother with the arrogant egoistic photography blogs any more, you know the ones I mean!
Hey @juliakuzmenkomckim:disqus, I just thought of another way to do this all within Photoshop CC.
-Copy the base layer to create two new ones for Blacks and Whites (dark/light, Shadow/highlight, burn/dodge... ).
-Apply the Camera Raw FIlter* to each layer and apply the light/dark adjustments as you already do.
-Mask them and brush in as before.
This keeps it all within one application and one file too!
I'm still fairly new to the Camera Raw Filter as a layer in Photoshop CC so not sure if it has the same ability and dynamic range as Adobe Camera Raw or if it is just making a good effort!
*Camera Raw Filter - Only available in Photoshop CC
Thanks for the article Julia!