
Capture One has been known amongst high-end retouchers and commercial photographers for quite some time, the main reasons probably being its powerful tethering and color editing tools. Wedding photographers seem to think Capture One is not tailored to suit their needs. At least, that is what I thought. After a full year using only Capture One to process my raw files, I wanted to share with you why I stopped using Lightroom.
I first started using Capture One about a year ago when I started shooting tethered in studio. The Lightroom tethering tool is so basic; it kept crashing all the time and it has no advanced functionality whatsoever — I started looking for another solution. I ended up trying a couple of programs, but Capture One seemed to do what I wanted and needed the best. So, I started using it. A couple of weeks later, I got used to it and liked my processed raw files better than those I could get out of Lightroom. I thus decided to give it a try for engagement sessions and weddings. Spending more and more time with it, I found a couple of things I did not have in Lightroom that made my wedding editing much easier and also faster.
Shortcuts and Panels Customization
I must confess that I am a geek. So, the first thing I do when I open a new piece of software is either learn or customize the shortcuts. With Capture One, being able to customize not only the shortcuts but also the panels made my life so much easier. I could finally get the interface I wanted. I did not have to work the way the software wanted me to work. Being able to customize the interface meant that I could finally set my raw processing software to strengthen and speed up my workflow. For example, let's say that I do not need the exposure tool because my pictures are all exposed to perfection in camera. Well, I can just remove it from my interface. Or if I want to set exposure before the white balance, I can move the white balance tool below the exposure tool. I know in Lightroom you can also remove some of the tools, but you cannot remove all of them. You can also not change the order they are placed in the Develop module. This is probably something that most Lightroom users fail to understand when switching to Capture One. They keep looking for modules and they want to work they way Lightroom wanted them to work, while they actually could just set the interface however they would like to work.
As for shortcuts, for most international users, having to deal with default shortcuts is often a pain. For example, on my QWERTZ keyboard, I must hit a combination of keys to get a bracket that is often used for brush size changes. That was a problem using Lightroom. It is not anymore when using Capture One. I can finally set up my shortcuts the way I want them to be and thus, it is also much easier to remember them.
Focus Mask
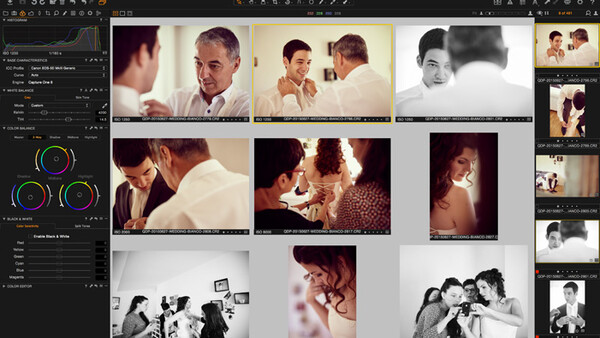
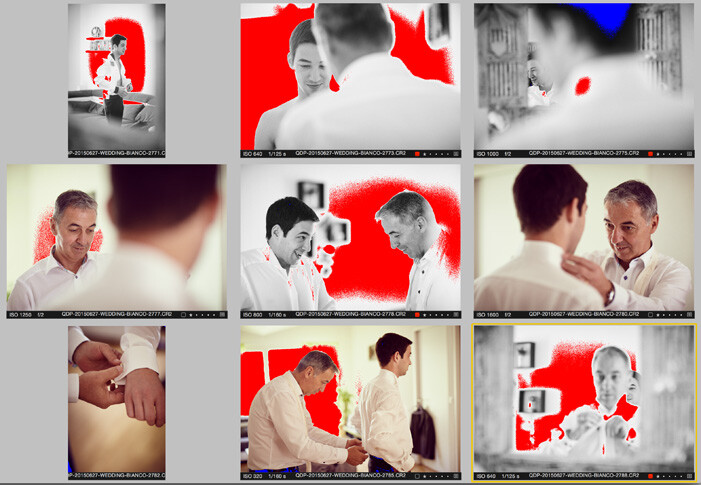
If you are a pixel-peeper, you probably do not wish to deliver a soft picture to your clients. In Capture One, you can display a focus mask on your pictures so that you can quickly check if the focus is correct or not. You can even display the focus mask on the images in grid mode, making your culling way faster and easier. No need to display the full-size picture to know if it is sharp or out of focus. To me, that is a time saver!

Exposure Alerts
I know what you are thinking: Lightroom also has this functionality. Exposure alerts exist in (almost) every single image-editing program. Even your camera can show you when your highlights are blown. However, what Lightroom fails to offer is the possibility of showing exposure alerts in the grid mode. You must go into the develop module to be able to activate the alerts, which makes it less powerful for mass-editing.
While I surely do look at my wedding pictures one-by-one to be sure they can be printed, the more I can edit them at a small size (i.e. grid mode), the faster I can work. Being able to see if I have any clipped information on my pictures and adjust the exposure, highlights, and shadows without having to quit the grid mode is a time saver.
Unlike Lightroom, highlights and shadows values for exposure alerts can be set in the preferences. You can set them however you like, depending on whether the end result is going to be printed or not, for example.
Better Looking Default Settings
This is probably personal taste. However, I never was able to get a file to look great in Lightroom without having to tweak a couple of things in the develop module. With Capture One, it is an entirely different story. I feel like the default look is way better and crisper. I feel like I need to do less to the images to get a result that is good enough for delivery.
Also, while this remains very personal, I have heard quite a few photographers complain about how their images looked faded when bringing them into Lightroom. It seems like the embedded JPEG looks better than the raw file with the default Lightroom adjustments.
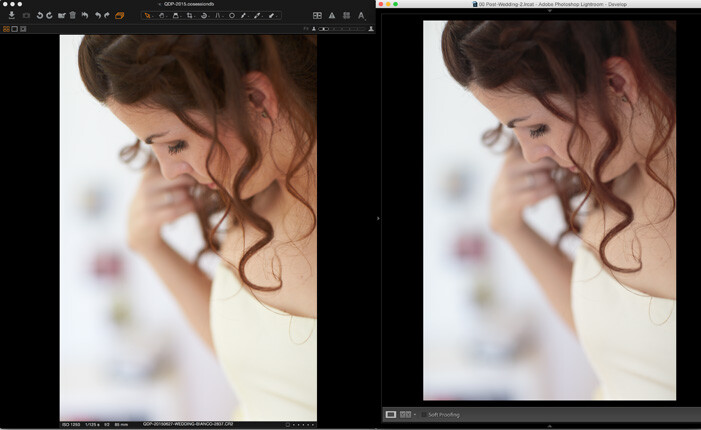
There are solutions to this problem, one being to change the camera calibration profile in Lightroom and the other being to apply a personal preset to the imported images. However, still, the less I do to my images, the easier it will be to make them all look similar in term of colors and toning. So, if my raw editing software gives me better results out of the box, I think that's a great thing.
White Balance Based on Skin Tones
I have written a full article regarding that matter; so, I will not go too much into the details here. In Lightroom, I used to do my white balance on the bride's dress. As it is usually white, I knew my white balance would be correct. However, what is a proper white balance?
When shooting fashion, you surely want your clothing to look perfect and like the stylist created it. However, wedding photography is not about clothing; it is about the bride and groom. So, I want them to look perfect, meaning I want their skin to look the best possible in every single picture. I do not want them to look white in the morning before makeup, orange under the bright sunlight, and red in the evening after a couple of drinks.
With Capture One, I can set my white balance for one picture with my bride and groom in it, then create a preset that will let me set the white balance according to their skin tone and not to a neutral piece of paper or fabric. This way, I can keep my skin tones the same in all my pictures.
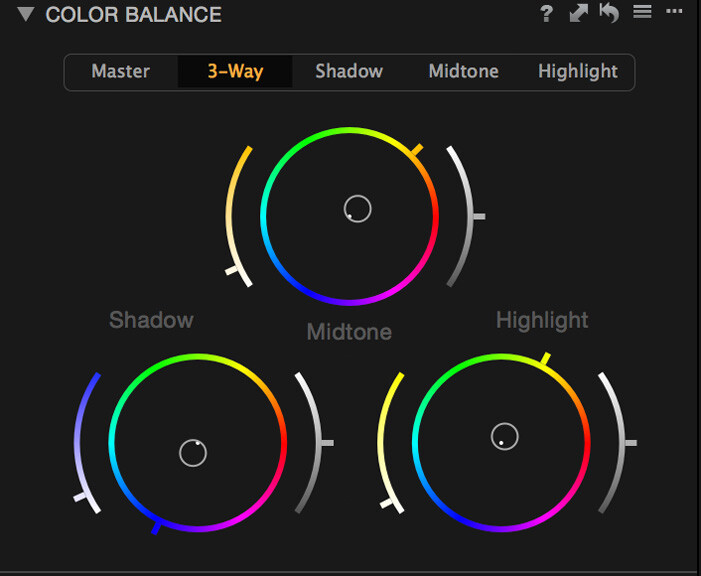
Color Balance
Being a very visual person, using a color wheel to make color correction and toning is way easier. With Capture One, I can use the color balance tool to correct either my whole image or the shadows, midtones, and highlights independently with a color wheel.
When I worked with Lightroom, I used to hate my clients when they put pink or purple lights against the wall at their reception. Their guests would look awfully pink. I almost came to the point where I edited 90% of my reception pictures in black and white to stop losing time color correcting that.
With Capture One, while still annoying to correct, I find it easier to do. I can use my color balance and give an overall tone to my image. Let's say my clients put purple lights all over the reception venue. I can apply in the master channel the opposite color up to the point that the image looks somewhat decent. I do not have to play around with curves, levels or, worse, desaturate part of my image. I can balance it correctly and get away with much better results in less time.
Multiple Exports
One thing we all hate is losing time. Having only my laptop to work on most of the time, exporting pictures is pretty much a loss of time for me. I cannot do anything else without slowing the process down. Also, I usually export my images three times: full resolution, 8"x12", and small web files.
With Lightroom, I had to keep an eye on each of my export processes to see when it would end and launch the next one. So, I could not launch it in the morning, go out to shoot, and come back at night with everything done.
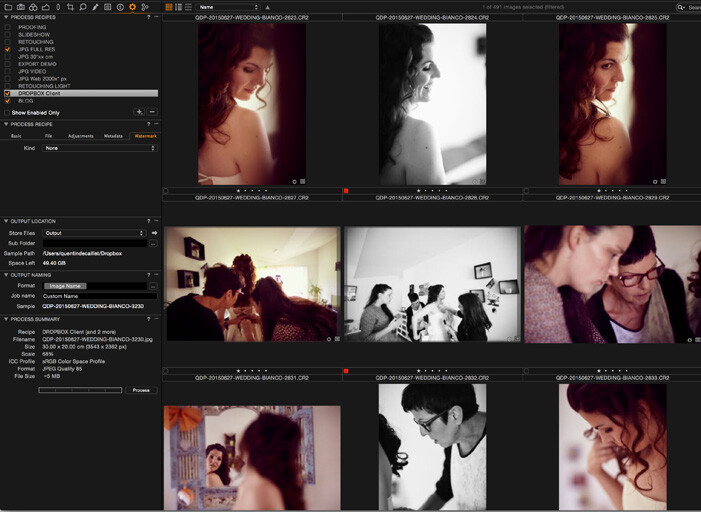
Capture One has something called "process recipes." It is much like export presets. However, you can select multiple recipes and Capture One will process your images with each of them without you having to do anything in-between.
So now, I can have a recipe for each file size I need, activate all of them, launch the process, and just let it do its thing. I can launch it before going to bed, wake up in the morning, and everything is done.
Want to Learn More About Capture One Pro for Wedding Editing?
If the seven points mentioned above are not enough to persuade you to give Capture One a try, be sure to tune in on the 26th of November for Capture One's webinar "Capture One Pro for the Wedding Photographer". I will be live with David Grover and we will show you how Capture One can be used to edit weddings to the highest quality as quickly as possible. Be sure to register to receive the link to watch the webinar and be reminded when the webinar goes live.
So, you now have one month to start playing around with Capture One and get your questions ready. You can even watch Phase One's previous webinars on their YouTube channel if you want to get going with the interface and different functionalities. More videos will be available in the coming months in English, German, Japanese, and French.
Finally, if this article or the upcoming webinar convince you to make the switch to Capture One, be sure to use the code AMBQUENTIN to get 10% off your license.


Join the Fstoppers community for free
-
Post comments and join in the discussions
-
Browse the site ad-free
-
Share your work and get featured in the community
-
Compete in the photo contests for fun and prizes
57 Comments
I made the jump last year and no looking back! It wasn't an easy transition but worth the effort!
Quentin, thanks for writing this article. I'm considering switching from LR5, and your take on Capture One was very informative. I see new software in my future.
Have Fun,
Jeff
Another + for C1:
In Capture One Pro you can choose if you work with Catalogs or with Sessions. LR only works with catalogs - if you move your folders on your hard drive, you rearrange the structure.... LR looses links to your photos (unless you do the operation within LR, again another constraint)
C1 sessions liberate you entirely (Sessions!) - You can move your folders and place them wherever you wish. And then you can still open your work in C1 without having an annoying task to reconnect everything again like it would be in LR.
One more thing: LR is Adobe. LR6 is the last BOXED version. Personally, I hate monthly fee for an application. BTW, imagine every app you have is accessible only by monthly fee, you would end up paying 1K of monthly fees for apps! Insane. No way. I hope Capture one will never adopt Adobe strategy. With C1 you have your choice for this too, monthly or "boxed".
For a certain period of time i get used with CO... You can get better sharp image, more options and vesatility with colors, skin tones... But i think the workflow on LR is mutch better than CO!
And if im not wrong you have focus mask and exposure/black alerts on LR also
Vitor, there is no focus mask in LR. But i do think the software is really good. Just for me C1 is more close to my workflow and what i need to do in program before i'll go to Photoshop. For me all my work 70% done in PS. But be able to correct colors inside C1 is a really big deal.
The raw conversion in Capture One is crisper because they have the sharpness turned up slightly. I did conversion on these raw images with sharpness off in Capture One, Lightroom and mystery 3rd. I am curious which is your guys preference: https://www.dropbox.com/s/v8slrspp39nzjcz/Raw_Conversions.zip?dl=0
Love C1 not the brownish tinge though on skin. This is a known issue for some.