Time-lapse Photographer Rufus Blackwell put together an interesting video for DJI, featuring their Osmo stabilizer/camera system, but using it in a way that might not be the most obvious: for hyperlapses. Check out the video, then read on to see what improvements DJI has made in their latest firmware update to the Osmo.
I asked Blackwell about his process for creating hyperlapses with the DJI Osmo, and in response, he shared insight that was a combination of technical specificity and also some creative ways to get the smoothest image possible.
Almost every image I shoot has what is called a 180 degree shutter. That is that the exposure time should be half the interval time. So if you are shooting an image every 4 seconds the exposure should be 2 seconds. So to get this effect I decided to shoot in video mode.
So if you now want it to look like you shot an image every 4 seconds, you have to take 2 seconds of video and blend the frames to form a single exposure. So your time warping process involves you frame blending 2 second chunks to make up each frame of the time-lapse sequence. If done correctly you end up with perfectly motion blurred images.
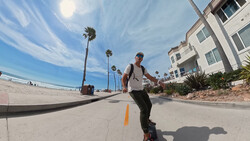
Blackwell went on to say that by mounting the Osmo to his bicycle, he was able to get fast-moving, smooth images, and when on a boat ride, the Osmo was able to keep a steady image even amongst all of the rocking. Pretty neat stuff!
To learn more about the work of Rufus Blackwell, check out his website.
Here's the long list of updates that are now available through installing the latest firmware from DJI, taking the Osmo to firmware v1.5.2.0.
Major Updates:
1. Consumption reduced, increasing Osmo battery life to 90 minutes for a total recording time of 70 minutes (80 minutes with Wi-Fi off).
2. Fan turns off automatically when recording video. To keep fan off during video recording, tap Mute Fan in the Audio Control menu. When activated, the fan will only restart to prevent critical overheating.
3. Video downlink optimized for enhanced live streaming.
4. Added Digital Zoom Control when recording video at 720p, 1080p and 2.7K. Put two fingers on the screen and pinch to zoom in, open your fingers to zoom out, or switch on Digital Zoom Control for fine control.
5. Control of Osmo tilt and pan axis simultaneously added by setting the joystick control direction to Free.
6. Added Portrait option to optimize portrait photography.
7. Optimized D-Log and D-Cinelike colors.
8. Downloading of videos and photos to mobile devices now three times faster.
9. Continuous photo capture by holding down shutter button added.
10. Added a key combination to turn on/off Osmo Wi-Fi. Pull down the power switch while simultaneously pressing and holding the trigger then release the trigger. Wi-Fi is off when the system status LED blinks twice. Repeat to turn on Wi-Fi. The Osmo will operate for longer when taking timelapse photos without Wi-Fi.
11. Note appears in DJI GO when trying to connect to an Osmo that is already connected to another mobile device.
12. DJI GO now displays the current photo instead of a live preview when shooting timelapses.
13. Audio control optimized to avoid audio distortion when recording in noisy environments.
14. Audio data loss when using some Micro SD cards under class-10 or UHS-1 fixed.
15. Double capture of the same shot when shooting panorama fixed.
16. Gimbal drifting reduced.
17. Joystick control optimized.
18. Horizontal calibration data saves automatically after powering off.
19. Single video recordings in high temperatures are capped at 30 minutes to ensure video quality.


26 Comments
Well this is awesome! Makes me want to buy an Osmo. Would love to hear how time consuming the post production process is.
Was not too bad actually. The Osmo really does lock off the shots. Because it is 4K some of the renders were quite long, but most of the hard work was done in camera.
The post production technique is more interesting than the Osmo, more about that! Is there a software that can automate that frame blending he described of every 2 out of 4 seconds?
I use Autodesk Smoke. It is not cheap, but it gives extremely precise control of things like the motion blur. I use that from beginning to end for a job like this, no need anything else.
what does he mean by 'blending'?
Combining a number of frames to create one frame that is a mix of them all.
Wow, rufus. Thats really great stuff. Just to be clear, you're taking 2 second videos non stop during the time lapse. So you have to constantly hit the record and stop button every two seconds while framing the shot?
Hi Andrew. No just shooting normal video and in post alternatively keeping and deleting two second segments. The software does that automatically, its not as complicated as it sounds once you know how to do it.
Wow, thanks for the reply. Whats the software? Is it a plug in or can you do it manually in your editing program?
I use Autodesk Smoke. It's quite expensive.
Hi Rufus. Awesome work btw. This really inspired me. Is it possible to do this with just Premiere and After Effects?
Plus it seems just made for Mac OS!!!
I wanted to give it a try, but it seems that i will stick myself with Adobe apps
Your work is really awesome man, keep it up
Rufus,
Amazing stuff.
Rufus,
Keep up the good work.
Amazing! Is there a way to shoot 4K video and remove the 2 frames in post using After Effects or Final Cut?
HI, did you use X3 or X5 on your Osmo?
The x3 Shot with Dlog setting
Well, since Rufus has not shed any more light on his method, here's my best guess...although probably not as thorough as his process:
Using Autodesk Smoke 2016, create a new project
Set resolution, frame rate, bit depth as needed (my settings where basically 1920x1080, 24 fps, 10 bit)
Finish creation of the project and Start the project.
Above the timeline activate Ripple and Snap.
Import a 24-second piece of footage (going to keep this short but these steps can be applied to any length of footage).
Open the footage as a sequence.
Click the View mode popup menu and choose Player (Option+1).
Right click the footage and from the popup menu select Add Effect. From the Video Effects panel select the Timewarp button. An FX ribbon will display. An Interpolation button should be displayed on the Timewarp ribbon. If Rendering is displayed click the button and select Interpolation. Mix should be displayed to the right of Interpolation, if not click the button to set it to Mix. Make sure Sample is set to Start.
Be sure the positioner is at the beginning of the clip. Since this example is for 24 fps, a 2-second interval would be 48 frames. Click on Amount and type 48 and click Enter. (Of course if your footage is at 30 fps you would use 60, or if 25 you would use 50).
Scrub through the timeline and you should see the effects of the Mix. The scrub may not be smooth at this stage.
When mixing frames, you are combining multiple frames together to create one blended frame using an additive mix. Each resulting frame is a blend of an equal number of frames from both sides of the given frame. Since we set the sample to Start, frame 48 would be the resulting frame for the first 2 seconds, frame 96 would be for the next 2 second and so on.
From the Timeline Layout combo box in the lower right corner, choose Fit Selection.
Set the positioner to 2 seconds (It’s very important that the positioner be exactly on the 00:00:02+00 mark). Insert Slice (Control+V) at that position. Move the positioner to 00:00:04+00 seconds, Insert Slice. Continue to Insert Slice at each 2-second position until the entire clip is sliced into 2-second segments.
To collect only the last frame of each 2-second segment, we’ll move the positioner to the end of each of the slices and backup 1 frame and do an Insert Slice at that point and Extract the other 47 (24+23) frames in front of the last frame for that 2-second segment.
So, with the positioner at the 00:00:00+00 point, click your Down Arrow key and the positioner will jump to 00:00:02+00. Now click your Left Arrow key one time The positioner will move to the 00:00:01+23 point. Insert Slice at that position. The result should be only the last frame of the first 2-second segment which contains the Mix of all the other frames of that first 2 seconds. Extract (delete) the 47 frame slice.
Now click your Down Arrow key again to move the positioner to the end of the next 2-second slice (00:00:04+00 in this example). Move back one frame with the Left Arrow key, Insert Slice and Extract the other 47 frames from that 2-second segment. With Ripple turned on, the two final frames from the first two 2-second segments will move together. Continue on through all the slices using this forward and back Insert Slice and Extraction process.
When finished you should be left with 12 frames. From the Timeline Layout combo box in the lower right corner, choose Fit Selection to see the frames a little better. At 24 fps these 12 frames represent one-half of a second left from what started as 24 seconds in my example. Using the Rufus Blackwell method, he suggests to now even delete every other frame so that 24 seconds of footage will be pared down to a quarter of a second.
To “automate” this reduction process there are a few Keyboard Shortcuts which might come in handy.
One is the Clip Cut at (n) Frames. This is a quick way to cut a clip up into multiple clips with the same duration. With the clip selected, you hit the hotkey, and then enter a number in the calculator that pops up. The clip will then be split in to separate clips with the same frame duration. This works on clips in the source area so it may be somewhat limited in this effort.
There is no hotkey mapped to this shortcut so you will have to select Keyboard Shortcuts under the Autodesk Smoke menu or type Option+H and search for it or scroll through the shortcuts to #467 and then set a hotkey.
Continuing on with the Rufus Blackwell method, in his video the first street scene is composed of 168 frames, which working backwards, means he started with 336 sliced frames from his 30 fps footage which equates to about 5.6 minutes of captured footage. Although if you examine his video on You Tube it plays at 15 fps the actual length of the original footage might be less than that.
Of course after you have a segment of footage sliced down, a render is needed, which depending on your original footage format and the format of your finished footage will take some time as mentioned by Rufus on several other blogs where his video is featured. Once you have all your time warped segments rendered, stitch them together in a final video…after color grading/correction or any other adjustments.
Hope this helps. I’m sure Rufus’ method was a bit more complex, automated and more involved, but this will get you started in that direction.
This composite of several cropped screenshots of Smoke through some of the steps might make it a little clearer:
https://sharingsight.shutterfly.com/pictures/9
did it worked for u? I'm about the buy the osmo just for this, and get autodesk smoke
Slayton, thanks for the walk trough, any chance you could upload the sreenshots somewhere where i dont have to register to download?
Cheers
Thanks for sharing the step by step. I have never used the OSMO before, but have a TL project coming up, and I think I will rent one to see what kinda results I can come up with.
Can anyone comment on using the DJI Focus with the OSMO X5? Or just focusing in general with the X5 Osmo? I can't make any claims but having used the OSMO I'm wondering how intuitive it is to use the controls on the OSMO, the controls on the cell phone plus now the focus system. And yikes, $999!~ But really love the OSMO and enjoy using it so hoping for some feedback.
http://store.dji.com/product/focus-remote-controller?from=related_produ…
Rufus, what's that on 1:02-1:04? You move from left to right in the middle of road. Since this is hyperlapsed, you couldn't stay so long in middle of the road. What's the trick? Also 1:09- 1:13 is very interesting. Did you install Osmo on rails? Anyway, the route for rails looks too long. Come on mate, I registered here just because of you :)
Is the portrait mode still a thing? I can't seem to find it anywhere.
Rufus WOW now That was inspiring. Definitely not my strong point, but I really want to experiment. Can you give me any good basic starting point settings to try something like what you've done here/ Thanks for sharing! Daren