Color contrast is what turns a flat, gray landscape into something that feels deep and alive. Learning to build contrast between warm and cool colors is one of the fastest ways to rescue files that would otherwise feel dull.
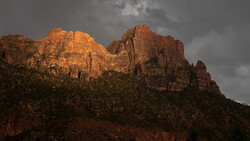
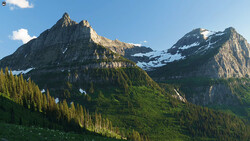
Coming to you from Christian Möhrle - The Phlog Photography, this detailed video walks through how to take a very dark, noisy raw file in Lightroom Classic and push it into a punchy, moody final image using targeted color work. Möhrle starts by running Lightroom’s Denoise tool on a high-ISO file so you can safely lift the shadows without turning the image into a grainy mess. He switches the profile from Adobe Color to Adobe Landscape to gain extra base saturation and brightness in the darker areas, then raises exposure, shadows, and blacks to pull out structure in the rocks and trees. At the same time, he pulls highlights down to keep the sky under control and uses the whites slider to add just enough punch while watching the histogram to avoid clipping. You see how a small tint adjustment can clean up a green color cast and how subtle texture, dehaze, lower clarity, and a boost in vibrance and saturation create a sharp but slightly dreamy base to build on.
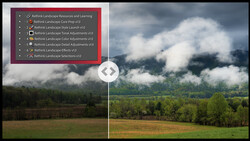
The real teaching value comes when Möhrle uses Lightroom’s masking tools to create intentional color contrast between the warm foreground leaves and the cold, overcast background. He selects the foreground rock and leaves with object masks, brightens them, warms the white balance, and pushes saturation so those autumn tones become the main hook of the frame. Then he targets the sky with a sky mask, adding contrast and clarity so the cloud structure shows up, before darkening most of it and carving out a soft bright spot using a radial gradient that suggests light breaking through above the mountains. Separate landscape masks for the central mountain, the water, and the forest let him fine-tune each zone so the viewer’s eye moves from the glowing foreground up toward the darker, more dramatic background. Watching this section shows how much of “atmosphere” in a landscape is really just careful local exposure and color control.
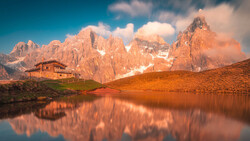
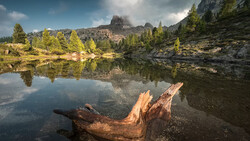
Möhrle does not stop with global warm vs cool color contrast. In the color mixer, he shifts orange, yellow, and green hues toward a deeper, richer red and green range, then balances saturation so the leaves feel intense without turning cartoonish while the blues support the cold mood of the sky and water. Luminance adjustments on orange, yellow, and green lift the brighter leaves and parts of the forest, helping them stand out against the darker surroundings in a way you can reuse on your own autumn images. A quick trip into the calibration tab, where he moves the blue primary hue and saturation, adds another layer of subtle color contrast that you might overlook if you only stick to the basic and HSL controls. At the end, he takes two nearly identical frames into Adobe Photoshop, aligns them, and uses a simple gradient on a layer mask to blend a frame with a sharp foreground and a frame with a sharp background, building a clean focus-stacked image without needing complicated selections. You get to see how the Lightroom edits carry over into Photoshop so the focus work is all you need to finalize the file. Check out the video above for the full rundown from Möhrle.
Join the Fstoppers community for free
-
Post comments and join in the discussions
-
Browse the site ad-free
-
Share your work and get featured in the community
-
Compete in the photo contests for fun and prizes
No comments yet