It’s already the fourth time Jessica Kobeissi got together with three other photographers to challenge themselves on a shoot. Each artist is given the opportunity to choose the outfit and location for one set, and then everyone has to come up with something in their own style. For this episode, the photographers were Joey L, Brandon Woelfel, Dani Diamond, and Jessica Kobeissi. Each having a very different photographic style, the video is quite entertaining.
The healing brush in Photoshop is a potent tool to clean things up. It can be used in numerous scenarios and works well most of the time. However, if there's one scenario where it doesn’t perform like we would like it to, it’s in the case of edges. For example, when you need to alter the edge of a face on a portrait or the border of a building when shooting architectural images, it tends to mess things up and create some sort of blurry areas instead of clean lines. In this tutorial, Joseph Parry shows us how to make the healing brush work the way we want it in those situations.
When it comes to background blur, or what we photographers like to call bokeh, it’s a well-known thing that smartphones aren’t the best. In the recent years, however, they have improved, thanks to the dual camera systems and pixel separation algorithms. They have improved so much that some may be tempted to say they are on par with some of the best professional cameras out there. Marques Brownlee decided to see for himself if that was the case and compared the current best smartphones on the market against the Hasselblad X1D.
Shooting with a gimbal is fantastic, it makes all of our footage incredibly smooth and vibration free. However, it’s not appropriate in every scenario and may even kill the mood of your video in some cases as Jakob Owens explained in a previous video. In a new one he posted on his YouTube channel, TheBuffNerds, he teaches now how to shoot handheld. So if you are tired of all the overly stabilized slow-mo footage found on the web nowadays and want to do something different, be sure to watch this tutorial.
Relying on your camera screen to nail exposure is a sure recipe for disaster. Depending on the lighting situation, the contrast of your display, how it’s back-lit, as well as other parameters, you’ll see the luminosity values differently. To make sure you get it perfect, there are tools available to you. In this 10-minute long video, Haapoja from TravelFeels will list most of them and explain which is best for what situation.
Shooting with an iPhone is an excellent alternative in places where a DSLR is overkill, but in its default configuration, it lacks quite a few features. The company Moment offers solutions to most of my issues, starting with their superb wide angle lens.
You have been dreaming of shooting underwater for a while, but waterproof housing is too expensive, none seem to fit your huge rig, or you can’t find one with which you can trigger your strobes. Then check out this trick.
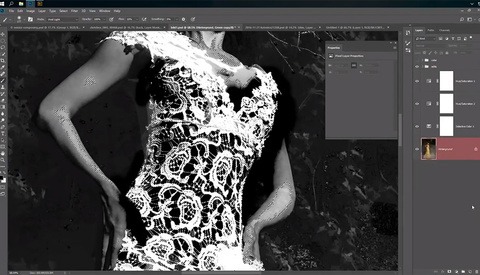
Creating selections and masks in Photoshop is a crucial part of any advanced editing workflow. Learn all there is to know about it with this video by Stefan Kohler.
When it comes to graphic tablets, one brand name always come up: Wacom. However, the Japanese manufacturer is not alone, and the competition is getting better. Parblo is probably among the best alternatives out there for the entry level market with products such as the A610S.
Spiffy Gear has made a name for itself by creating unique lighting products such as Spekular and the Light Blaster. They are now adding a third exciting solution to their range of products with Lumee.
Retouching skin is about detail and patience. It can be a real time consuming and can require a high level of precision to keep the natural aspect of an image. Each of us has a different style of editing and our tastes differ. However when giving retouching lessons many photographers ask me about skin texture and how to keep it looking as natural as possible.
This is not a simple answer as it is mostly a combination of elements. In this article I have combined the five things I see most photographers do wrong or too much when looking for a believable skin texture and look.
A couple of weeks ago, Serif released its powerful photo editing software called Affinity Photo. This Adobe Photoshop competitor has since been downloaded by numbers of users and has already seen a couple of improvement through an update. Its price and its speed are probably two of the most notable advantages the software offers over Photoshop. While the reviews are slowly making their way to different websites, many photographers and retouchers seem to be wondering if the software is worth its price.
Adobe just updated a couple of their CC applications, one of which being Photoshop. Amongst the new features, it was almost inevitable that a few bugs would show up. One that can be quite annoying is the liquify tool lighting or rendering problem. But there is a quick and easy workaround.
When learning about retouching, selections and masks should be on top of the list along with curves and brushes. But each of these tools have so many options, and it is hard to know the in and out of each of them. In this article, I will guide you through different ways to create precise and refined luminosity masks to help you improve your retouching skills.
Capturing emotion is not an easy task. It requires being in the center of the action and perfect timing to press the shutter. But that is not it. Creating moving images are more demanding than just placement and synchronization. Famous sport and music photographer Michael Zagaris joins Marc Silber on "Advancing Your Photography" and gives us his essential tips to come up with touching pictures.