Articles written by Quentin Decaillet
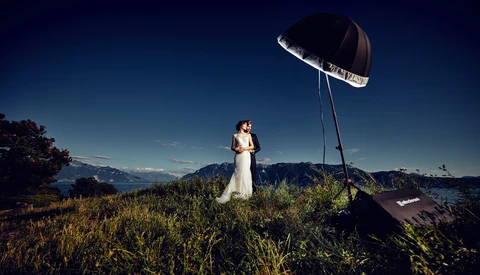
When working on location, softboxes are not always the best choice as they can be quite cumbersome to assemble. Umbrellas tend to be a lot faster to set up. Thanks to Elinchrom and its Snaplux range, you won't have to choose between the light quality of a softbox and the ease of use an umbrella.
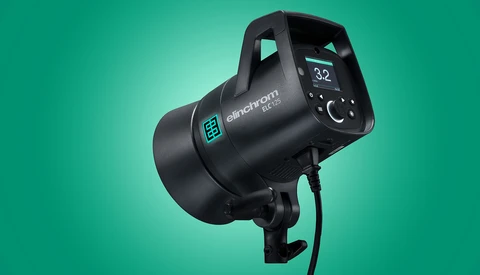
Elinchrom has always been known for its superb light modifiers. But the strobes designed by the Swiss flash manufacturer are just as good. Now marks a new direction for the brand with the introduction of the ELC 125 and ELC 500.
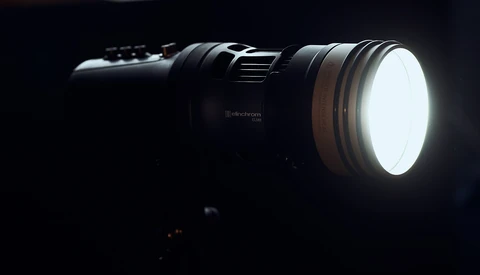
Elinchrom focus has mostly been on light shapers and strobes ever since they've existed. However, the ELM8 they released last year may be a hint they are serious about getting into continuous light. After four months of use, here's my opinion on the Elinchrom ELM8.
Elinchrom is well known for its superb range of softboxes. The Swiss flash manufacturer just announced today the introduction of grids for their Rotalux line.
It's no secret that producing still as well as motion gives any photographer an edge over his competition. As the years go by, creating animated content is getting increasingly more accessible. In this article, I review Flugo, an iOS app that turns any still portrait into an eye-catching motion shot.
Spiffy Gear has made a name for itself by creating unique lighting products such as Spekular and the Light Blaster. They are now adding a third exciting solution to their range of products with Lumee.
A few weeks ago, Capture One released a version specifically tailored for large studios and businesses. While some could have thought the Danish company was moving all its efforts towards this market, it's actually far from the truth! It was just a step to carry the needs of all professionals.
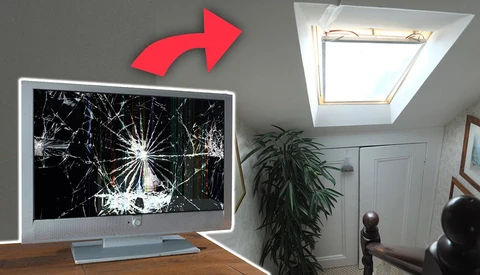
As photographers and videographers, let's be honest, we never have enough light equipment. But it can quickly become quite expensive! Thanks to DIY Perks, if you own an old TV that you don't use anymore, you won't have to break your bank account to add a new LED panel to your kit.
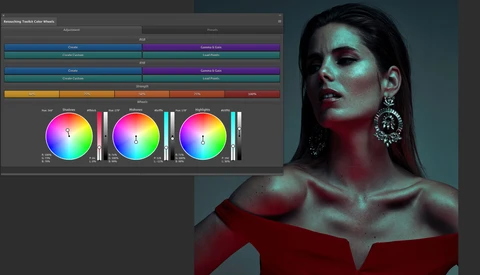
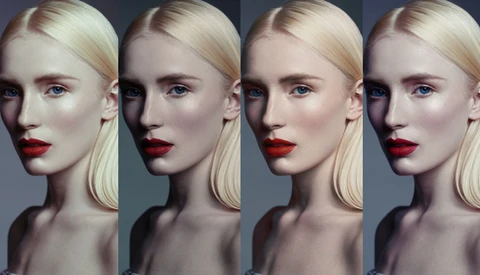
It still boggles my mind that Adobe hasn't added color wheels to Photoshop in 2019. It's a tool loved by colorists and video editors, yet photographers are forced to rely solely on curves and sliders instead. Fortunately, the guys at Retouching Toolkit fixed Photoshop once again.
Hearing photographers talking about creative burnout or feeling in a creative slump is not rare anymore. It seems like everyone is dealing with it on a regular basis. What if I told you there are easy techniques to get more productive and creative at the same time?
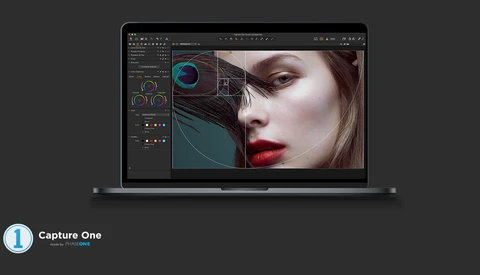
Capture One has evolved over the past few years to become the powerhouse it is now. With its newest release, it turns into even more efficient software, thanks to the addition of Capture One Studio.
In a perfect world, raw files would be as light as JPEGs. Even better yet, every camera manufacturer would use a similar and open format such as DNG. Unfortunately, as we all know, we don't live in a perfect world. However, one company named Dotphoton is about to change it all!
The Retouching Toolkit is, without a doubt, the best Photoshop extension I have tried yet. It helps streamline one's editing workflow, improves Photoshop's interface, and with the latest update, it's getting one step closer to becoming the only Photoshop plugin you could ever need.
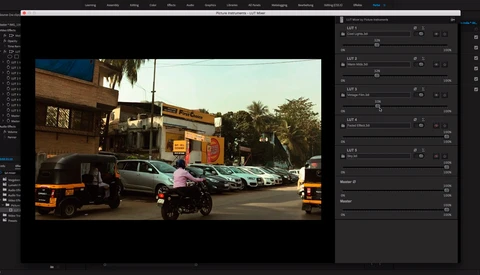
When using LUTs, one of the biggest problems is that many apps won't let you preview what they do before applying it. This makes the LUT choice and application slow and very unpractical. That was until Lutify came out with a solution!
Posing tables are one of those accessories you don't know you need until you get one, and then, you cannot live without it. The only problem: its cost. So, let's see how you can build a DIY version for under $60.
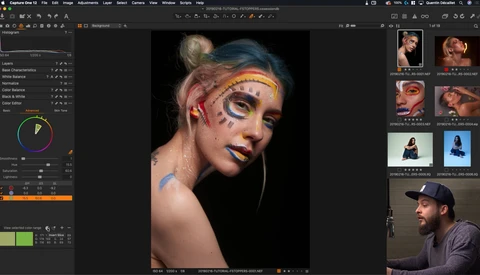
Capture One Pro 12 was released at the end of 2018, and since then, it has made my workflow drastically more efficient. Let me share some of my tips to help you supercharge your workflow with this latest version.
When switching from Lightroom to Capture One, I hear many users complain about not being able to bring their presets into their new photo editing software of choice. Well, thanks to Picture Instruments, it's now possible!
When Capture One Pro 12 was released, a couple of new features were introduced including more refined masking tools. In this video, Michael Woloszynowicz shows you exactly how to take advantage of masking in Capture One.
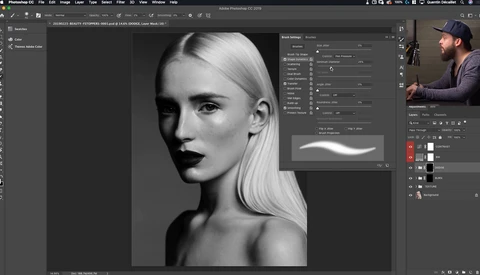
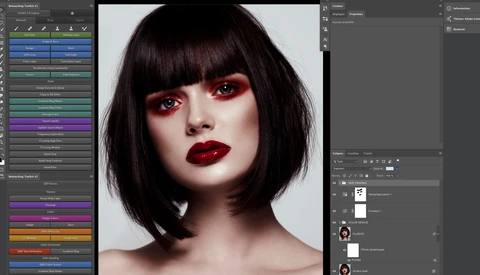
When it comes to making your editing workflow as efficient as possible, customization is key. Photoshop is great but doesn't allow for very advanced workspaces with custom scripts and actions. That's until you start using the Retouching Toolkit 3.0.
When it comes to graphic tablets, one brand name always come up: Wacom. However, the Japanese manufacturer is not alone, and the competition is getting better. Parblo is probably among the best alternatives out there for the entry level market with products such as the A610S.
Ring lights have been around for a while, but recently they haven’t been as trendy as they used to. Except in the YouTube beauty industry where many influencers rely on these, day in and day out, to create their content. I recently tried the Angler Circo LED Ring Light to see how good it was.
Following the Google Pixel 3 announcement, brands are already introducing new products for this amazing smartphone. One of them is Moment, who’s already offering support for its lenses.
The Blend if the feature of Photoshop is one of the fastest and easiest ways to create luminosity and hue-based masks. However, it can’t be refined manually, unless you follow this tutorial to create a layer mask out of it.
When the GFX50S were released, there were speculations whether or not Capture One would support it. Most rumors said it would, but then Phase One decided otherwise. At least until yesterday.
Tether Tools is well known for making tools that make photographer’s life more comfortable and better. You’ve probably seen their orange USB cables at least once in your life. Today, they’re introducing a new range of power solutions, ONsite Power.
After Cone Color and Image 2 LUT, Picture Instruments just released LUT Mixer, a tool to apply different LUTs simultaneously to the original image instead of adding them one on top of the other.
After Sony, Canon, Nikon, and Olympus, it’s now Fuji’s turn to get access to all advanced Elinchrom features such as HS, HSS, and TTL.
Profoto just released a teaser video announcing a new product is about to be released. It may well be an updated B2 or a baby version of the B1X.
Phase One introduced today the new XF IQ4 system, the first medium-format camera with 151 megapixels and Capture One Inside.
Colors are very important in a composition and should be considered at the moment of capture. When shooting in still life, for example, gels can bring a good shot to the next level as Dustin Dolby from Workphlo shows us in this video.
How often have you seen an image that you liked and wanted to copy the grading? It can quickly be done with Photoshop, but how about creating a LUT out of it so you can use it no matter what. That’s what Image2LUT is designed for.
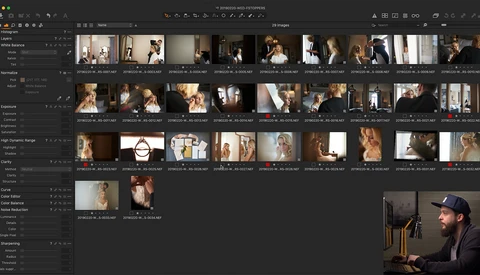
As raw processing software for wedding editing or batch editing in general, Capture One has nothing to envy from Lightroom. Quite the opposite, it’s perfectly tailored to help wedding photographers get a fast and efficient workflow.
Earlier this year, I reviewed the Elinchrom ELB 1200. It has become one of my most used lights along with the ELB 500 TTL. However, quite a few users missed the possibility of using the unit as a power pack in the studio instead of relying on batteries.
Canon, Nikon, Sony, Fujifilm, Olympus, or Panasonic, it doesn’t matter what system you use with Elinchrom anymore. All of these are finally or extremely close to being compatible with TTL, HSS, and Hi-Sync.
Elinchrom is joining forces with Red Bull to offer the best action photographers with reliable and robust flashes. It will translate into more behind-the-scenes content and inspirational content for all of us as well.
Being able to automate repetitive parts of a retouching workflow in Photoshop directly translates into a saving of both time and money. This saving could make the all the difference in meeting or missing a deadline or making it home early to see your family. How can you make it a reality? Actions are certainly one option however they are severely limited to straight repetition of the original steps. Scripting is actually the answer that you have been looking for. Think of scripts as intelligent actions on steroids.
As photographers, we tend to care more about our cameras and lenses than the gear we use to process our images, such as monitors. It’s a shame, because it’s crucial too. Let’s find out in this review if the ViewSonic VP2785-4K could make your workflow better and easier.
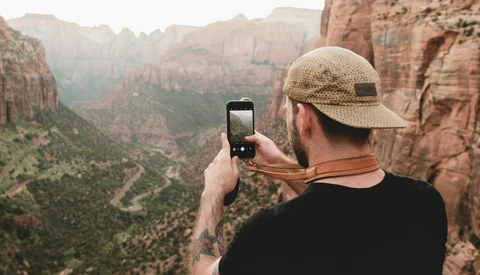
Moment is known for its fantastic smartphones lenses bringing DSLR like experience on your mobile device. They are releasing a new version of their app to offer you the best photographic experience possible on your phone, even if you don’t own any of their lenses.
Creating selections and masks in Photoshop is a crucial part of any advanced editing workflow. Learn all there is to know about it with this video by Stefan Kohler.
While drones are easy to get off the ground, it’s another story to shoot cinema quality looking footage. In this video, Matti Haapoja highlights a couple of maneuvers you must master to create the best aerial videos possible.