Articles written by Taylor Mathis
In past articles, I have shown you what I love about wooden and stone food photography backgrounds. These backgrounds make great sturdy surfaces that you can use anywhere. However, their sturdiness comes with weight and rigidity that can make hauling them around quite the chore. If you are looking for a lightweight background with a wide range styles; cloth is the way to go. Let me show you why.
Is there a perfect light for your food photography? In past posts, I have mainly talked about using large lighting modifiers to create a soft light over my subject. I tend to choose softer light, because I think it looks better on my food. Is this the only lighting option? No. Like fashion photography, there are many different types of lighting that you can use on a subject. To get a better understanding of what will fit your style, let's take a closer look at the characteristics of hard and soft light and how they affect your food shot.
A stone background provides a great look for many food shots. The only problem is the weight that comes with it. Spend a day hauling around large stone tiles and you will understand the price that comes with this great look. There is a solution though. Let me show you how you can still have the same great stone look that is easy on the back and the wallet.
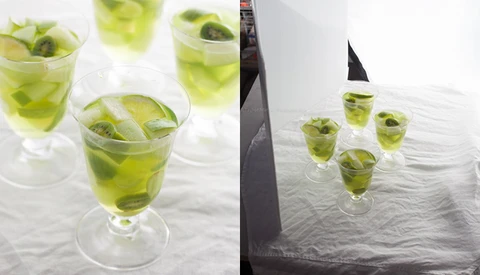
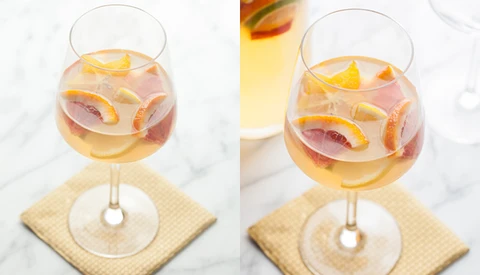
Saint Patrick's Day celebrations in the United Stated revolve around one thing: lots of green booze. In working with a recipe developer for a St. Patrick's Day beverage, we both wanted to steer clear of the common green beer and food coloring based cocktails. The result was a beautiful green sangria. Here is more on how I created this subtly St. Patrick's Day themed shot.
I know what you might be thinking. How can something used for construction and home improvement help me with my photography? Well, keep in mind that some of the best food photography supplies come from the hardware store. Folding sawhorses are light weight, incredibly portable, and can create a shooting space with a small footprint anywhere! Let me show you a versatile set-up you can recreate anywhere.
With rare and expensive props, you may run into a supply problem leaving you without the desired number for your shot. For this shoot, I wanted to show three bowls in the image, but only had two on hand. Here is how I created a composite to solve the problem.
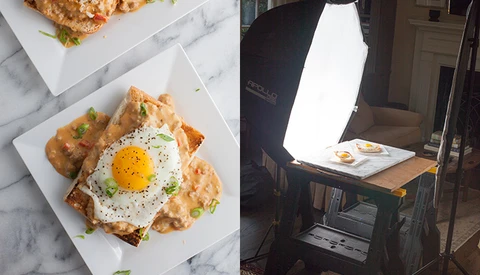
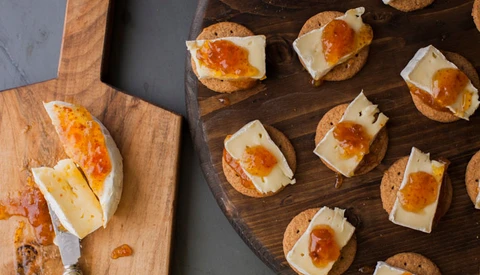
There are many great dishes that are boring to look at. Most dips and sauces are monochromatic and have very little texture to them. They taste delicious, but there is a challenge in making them jump off the page at a viewer. Here is how I took a boring looking blue cheese dressing, and made an image that you want to take a bite out of.
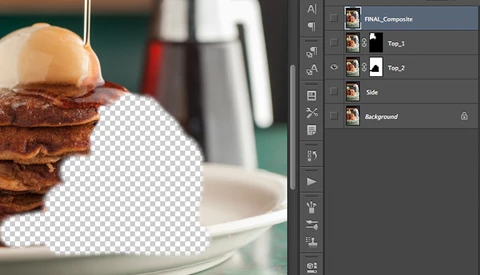
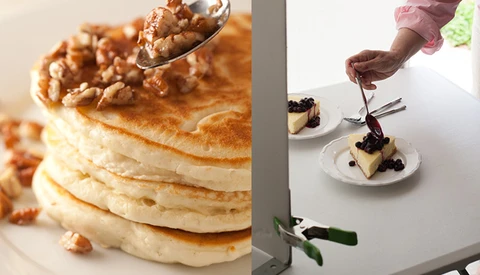
Does seeing a towering stack of pancakes with syrup running down the sides make your mouth water? What about a rich and thick caramel sauce flowing over the top and sides of a slice of cheesecake? The sauce or syrup pour shot is one that will make your viewers mouths' water. When creating these shots, I like to piece together several pours to make the perfect pour! Here is how I plan and execute a pour composite.
Did you know that what you wear may have a huge influence on the look or your images? In portrait, landscape, or sports photography, you will most likely be working far enough away from your subject that you won't notice the effects of your outfit on your subject. Let me show you what happened while shooting with a red shirt.
In a perfect world, you will have a stand-in and hero version of your food subject. You will be able to pre-light the stand-in and have everything perfect when the final hero version is ready. Then, all you have to do is add the hero and take the final shot. Unfortunately, most food assignments don't take place in a perfect world. There are times when you will have to use a non-edible stand-in for your pre-lighting.
Adding props is an important and sometimes difficult part of food photography. There are times when an image needs the negative space, while other times, a well-placed prop will take the photo from good to great. When selecting a prop, I have found that menu-based props are the easiest to use correctly. Let me show you how to style a shot with menu-based props.
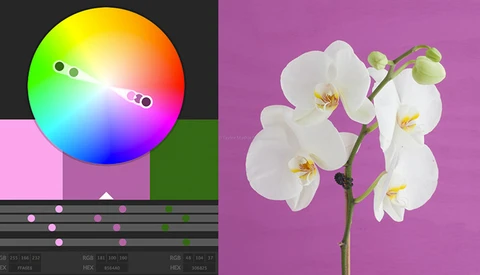
Do you use color theory as inspiration for your photography? If you are ever feeling stuck or are in a rut, I have found the color wheel is a great source of inspiration! There are many different ways to look through a color wheel, but my favorite is using Adobe Kuler. Let me show you how I used it for inspiration.
You probably know by now that natural light from a window will create beautiful images. This free and readily available light source is my first go-to when shooting food and portraits. It yields beautiful results, but has a downside. It can change on you throughout a shoot. In order to achieve the look you are after, it is best to understand your options and find the best natural light source for you!
There are certain stores that I can walk into leave with a full shopping cart and wonder, "Where did the last hour and a half go?" This is what happens when I make a trip to my local hardware store. If you are interested in photographing still life, food, or any other table top project, the hardware store is full of inspiration. Let me show an aisle that is filled with amazing ready to go backgrounds.
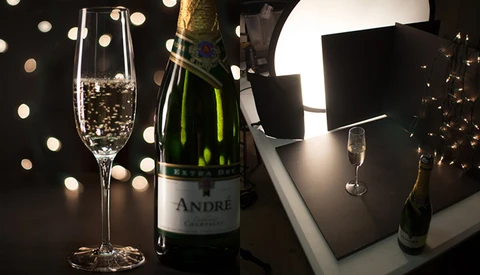
A champagne toast at midnight. There is no more iconic way to make the transition from one year to the next. To celebrate the beginning of 2014, I decided to shoot a glass of champagne. Let me show you how I created this shot with items I had laying around my garage.
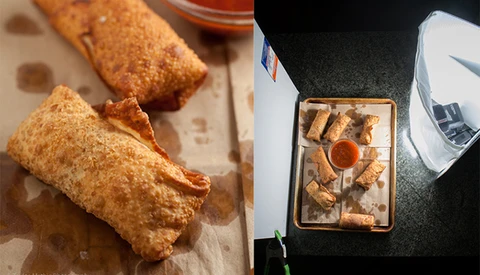
When working on a multi-page editorial spread or a cookbook, it is important to showcase a variety of different food shots. If there is an author or chef involved in the shoot, including them in a few action shots will blend nicely with a variety of still shots. Here is a look at a recent shoot I did where I was assigned to shoot both action and still shots of the same dish.
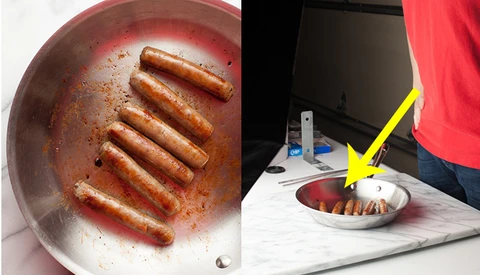
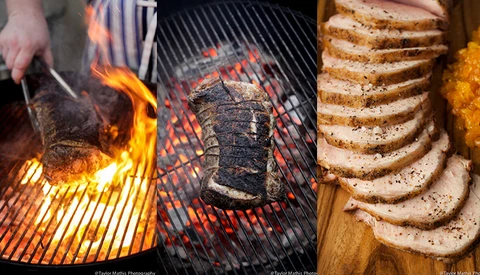
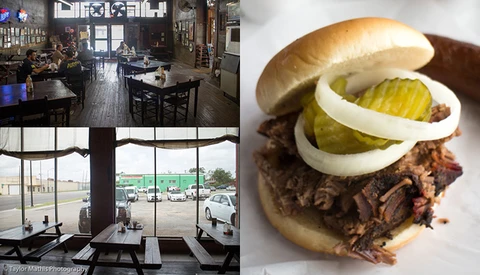
When traveling to a restaurant, you never know what type of lighting environment you will find yourself in. There could be a large window with beautiful soft, natural light, or it could be dark like a cave with only overhead fluorescent lights. If you want to add restaurants to your portfolio, reading the light in a room is a great habit to get into. Not sure what I mean by reading the light? Let me show you what I found on a stop for some Texas barbecue.
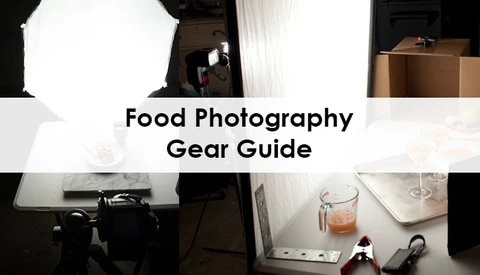
Are you looking to add food photography to your portfolio? Chances are you may already have a lot of gear that you need to get started! Here is a list of the cameras, lenses, lights, modifiers, and other items that I use to make beautiful images anywhere!
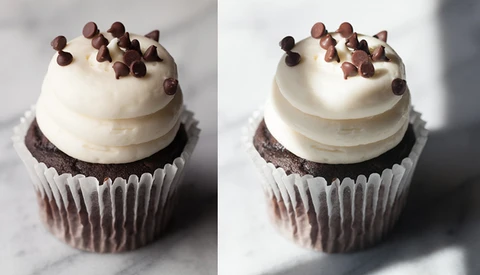
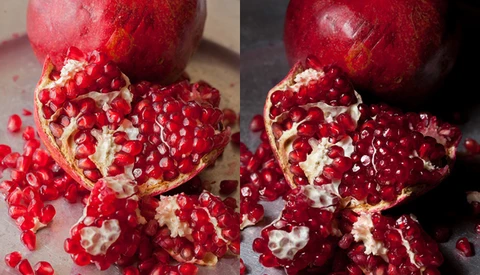
When shooting an ingredient shot, shadows can make or break an image. Sometimes you want less noticeable shadows while other times dark shadows can add a lot to an image. In the case of this pomegranate, I shot it both ways. Let me show you how playing with the shadows will have a dramatic effect on your final image.
When you are on a food photography shoot, you will hear the term the "Hero _____ " throughout the day. DO NOT EAT THE HERO. The hero is the picture perfect version of the food that will be in the final shot. Here is a look at what goes into finding the hero for your shot.
A tripod is the go to device for photographers who want to stabilize their shots. The three adjustable legs do a great job at keeping a camera supported and in one position. However, these three legs create a huge problem when shooting in a small kitchen or busy restaurant. Let me share with you a piece of equipment that will stabilize your camera with no legs at all!
In choosing how to style a dish, there are many decisions that you have to make. What color background will you shoot on? What props will you use? What camera angle will you shoot from? These are just a few of the questions that you will have to decide. Let me show you why styling with the final layout in mind is something you should always consider.
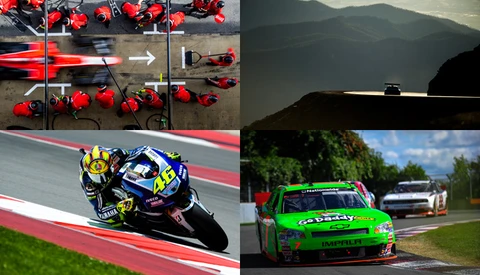
Photography is filled with niche markets that require a specialized skill set from the photographer. What kind of skills does it take to capture a vehicle (that is worth more than all the houses on your street combined) moving at over 200mph? I sat down with Jamey Price to find out more about the world of motorsport photography.
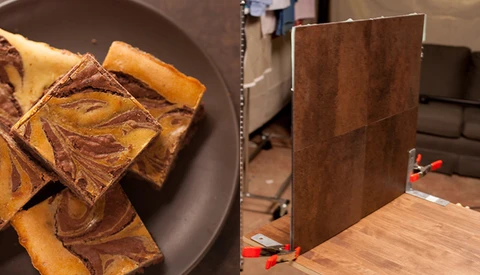
Every food shot will have some type of background that the subject sits on. A few months ago, I showed you how you can paint wooden boards to make a beautiful and versatile background system. If you don't have the storage space for a wooden board system, or are just getting started in food photography and want something a little simpler, I have a solution for you! Let me show you a background material that any level of photographer will find inexpensive, portable and versatile!
All restaurants aren't the same. They will serve different dishes, have different interiors, and charge different amounts for what they serve. When you are assigned to shoot a restaurant's signature dish, you will find that all restaurants will have one thing in common. There will be a table for guests to dine at, and for you to shoot at. Do you think of a table as just a table? Before you brush off the importance of selecting the right shooting surface, let me show you a few examples of how this decision will impact your image.
There is one lighting modifier that I never leave home without. Its compact size and light-weight build has earned it a permanent place in the outside pocket of my gear bag. I made this modifier about 4 years ago and have brought it to every food shoot since. If you are shooting food, it is a must have and it won't break the bank to make it. What is it you wonder? It is a collapsible Tabletop V Reflector. Let me show you how easy it is to make!
From national magazines to local papers, media outlets of all sizes like to cover restaurants. If you are a photographer who shoots editorial assignments, there is a good chance that you have been assigned to cover a dish at a restaurant. Over the last couple of years, I have photographed hundreds of dishes at restaurants ranging from white table cloth fine dining establishments to hole in the wall hidden treasures. Here are some tips that might help you with shooting a dish for an editorial client.
Have you ever eaten at a fine dining restaurant? You know the type of place with white table cloths, 3 different forks, and you have to have a reservation to get a table? In fine dining restaurants, the dishes look a little different; the plates are works of art! The colors, textures, and placement on the plate are all done with very specific intentions. This type of beautiful plating is becoming more widespread than you might think. No longer is it reserved for the restaurants where you know your check will have three digits in it. If you are hired to shoot at these locations, make sure to capture the beauty of the plate! Here are some tips to help you out.
For beautiful salivating food photography, you don't need a lot of lighting equipment. To create a shot that will make your viewer's stomach start to rumble you only need one diffused light source. Using only one light source creates a natural look with one set of shadows. By changing the direction and intensity of these shadows, you can create countless lighting scenarios that will leave your viewers hungry. Let me show you how one light can provide many options.
Do you use a sweep in your portrait or large product photography? Sure a roll of paper several yards in length is necessary for photographing people and large products, but what about food and small products? Walking into a bakery or the back of a kitchen with two C stands and a large roll of paper is not going to work in the often small kitchen shooting environments.
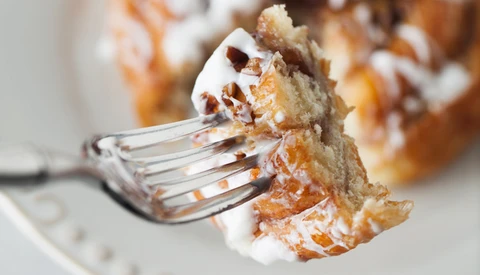
Have you ever looked at a picture of a dish and been embarrassed? It could be that a sliver of drool escapes from your salivating mouth. Or you could be a crowded place and looking at a food shot causes an embarrassingly loud rumble from your stomach. Looking around and pretending that it wasn't you won't save you. The food photographer and stylist have done their jobs. They have made you hungry. So how did that do it?
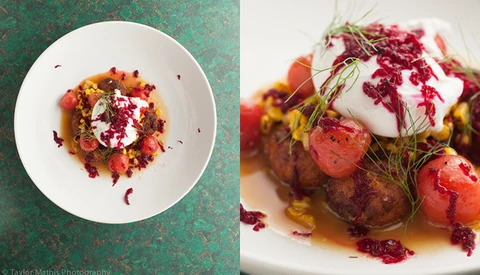
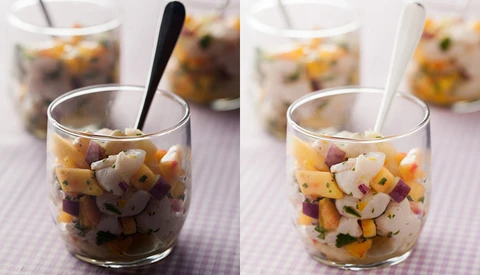
Have you had trouble lighting reflective surfaces? If you were given a food like ceviche to style, would you know where to begin? In this post, I am going to show you how I styled and shot a scallop and peach ceviche recipe. Here is a little background on the shot. The recipe developer meant for this dish to be served at an outdoor entertaining event, and wanted to highlight the light refreshing nature of the dish. With this in mind, I chose lighting and props that would help communicate this. Here is how I created the shot.
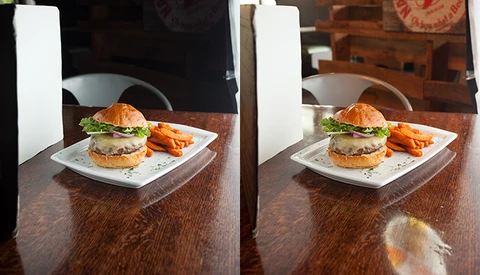
Restaurant's interiors can be just as beautiful and recognizable as the dishes that they create. When shooting a dish, you may want to include some of a restaurant's interior elements in the shot. These can be chairs, walls, light fixtures, or anything else that shows off the restaurant's character. To do this, you will need to be able to balance the light you are creating with a flash and the ambient light in the restaurant. Here is a look at how I did this on a recent assignment involving a burger and beer.
Have you ever wished you had an extra hand that you could set a prop in and know that it wouldn't move? Fortunately photographers and videographers have dozens of clamps, clips, stands, and arms that allow them to place any piece of lighting gear, lighting modifier, or prop anywhere they would like to. You could have a model or member of your crew hold a utensil in place, but there is a high chance that they will experience fatigue and drop the food. Here is a solution that uses grip gear to ensure your food will stay in place for as long as you would like.
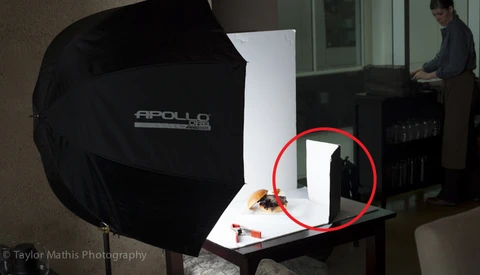
When taking pictures of food in a kitchen you will almost always have to create your own lighting environment. Restaurant kitchens are usually lit by overhead fluorescent lighting that won't help you make a beautiful picture of a dish. In these situations, you will have to make your own light. There is a problem, though. What happens when the shooting space is so small that you can't fit a softbox or light stand into the kitchen? If you ever find yourself with only a counter top sized area to shoot on, this lighting set-up will create the shot you need!
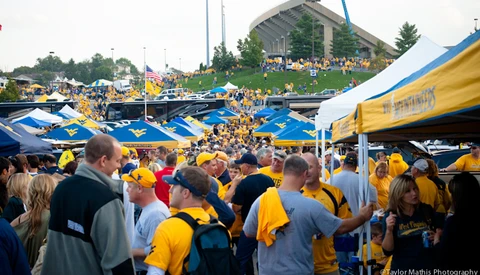
In the fall of 2010, I decided to shoot my dream assignment. I knew that no one was going to pay me to go out and tackle this subject matter, and I had not seen any photographer do what I wanted to do, so I did it. At the time, I had no idea what the assignment would turn in to or how it would change me as a photographer and a person. Here is what I learned from photographing 35 College Football Tailgates.
What do you do when you find yourself in a restaurant without a decent window to shoot by? You will have to create your own light. If you are new to food photography and never had to use artificial light to light a dish, you may find yourself unsure of where to start. You don't need multiple flashes and a bunch of modifiers to create a beautiful shot. All you need is a flash, a light stand, a large diffusion source, and a piece of white foam board. Here is how I use these tools to create a beautiful backlit shot.
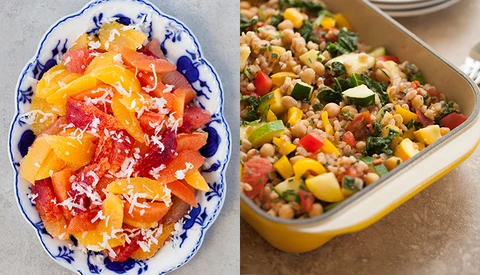
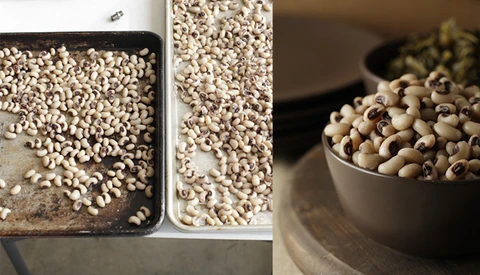
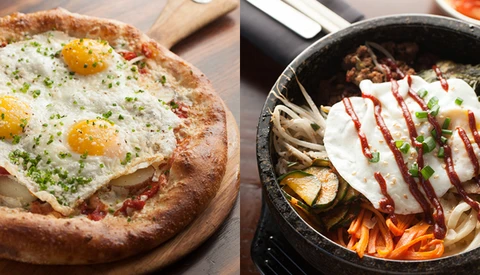
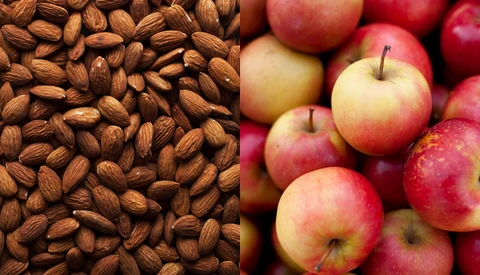
Every finished dish in a restaurant or final recipe shot is made up of different ingredients. These ingredients can be a wide range of things. Some ingredients, like fruits and vegetables, are equally delicious as a component in a dish or as a meal on their own. Other ingredients like flour, salt, and sugar, are best used as the building blocks for that final meal. When your are assigned to shoot a series of recipes or plated dishes at a restaurant, it is very common that your Art Director or client will want to include an overhead shot of just the common ingredient. Here are a few examples of when this shot is useful.
What is "perfect lighting?" It will differ for every style of photography and every photographer's style. For my food photography, I think the perfect lighting is the soft, beautiful, natural light found from a large window with indirect sun coming through. Unfortunately, most of the locations where I have to go and shoot food don't have this light that I am looking for. In order to get the shoot done, I have to to create the light. What if I could create this "perfect light" and have it for every assignment?
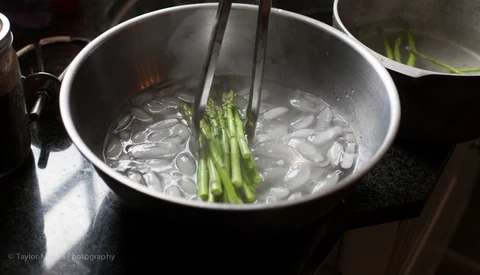
Broiling, braising, blanching, roasting, smoking, sautéing, and frying are just a few of the cooking methods that can be done to food. Do you know how they will visually change the appearance of your food? Did you know that some parsley has curly leaves, while other varieties have flat leaves? Would you be able to tell the difference between a julienne, brunoise, or a dice? The culinary world has a vocabulary all its own. Knowing these terms and how they effect the look of food is a necessary skill for every food photographer.