Back in September I spent a few days in New River Gorge, West Virginia, rock climbing with a group of friends. For this trip I developed a plan to put together a short documentary that would involve shooting an interview in the climbing area and doing a multicamera shoot of a climber. Watch the final video, and then read on for a breakdown of how it was all done.
The primary issue was the location. I knew we would be hiking in several miles, and I could only take what gear I could fit into my pack and carry in. No power, no crew (but some of the climbers were gracious enough to bring in some things, like extra tripods and safety gear). My pack was the LowePro 35L, so I was able to take quite a bit of gear in addition to rock climbing gear, food, first aid supplies, and water. (You may recall that I ran that pack through its paces while I was on this trip, and made a short video about it.) I wasn't going to try and bring any battery powered lights, since the space and weight needed would have been too much, not to mention I would have needed a light stand or something to mount it to.

Gear List
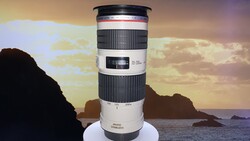
The image above is an example of most of the gear I packed. For reference, my essentials for this 2-camera interview shoot were 2 camera bodies, an H4n, wireless lav kit, tripods, and a large reflector. Here is the full list, with links to each item:
2x Canon 7D DSLR
Canon 70-200mm L f2.8 IS
Sigma 17-50mm f2.8 IS
Canon 35mm f2
Canon 18-200mm
GoPro + accessories
Rode VideoMicPro
Polarizers
Vari-N-Duo
Lens cleaners
LCDVF (magnetic viewfinder)
Headlamp
Leatherman
Induro tripod
Manfrotto tripod
Westcott 40" reflector
H4n Audio Recorder
Wireless Lav kit
Apple earbuds
Spike tape
REI Hiking Pole with camera mount
Shooting the Interview
The cabin we stayed at would have provided me with power for lights, but the setting just didn't go well with the story I felt. So, I rolled the dice with the interview and planned to shoot it outside, hoping that the shadow of the trees would break up the sun enough to smooth out the shadows a bit. My plan was to position a reflector in a good spot to get decent fill on my subject with a catch light in the eye. If you look closely, you can see the lighting change from one interview shot to the next, but the edits are broken up by B-roll enough that most don't notice. For having only a reflector, I was pleased with the results.


Using the 17-50 Sigma up close for a med-wide shot, and the 70-200 from further away for a close up shot, I knew it would allow me to cut back and forth to add some variety to the interview footage in the edit. I really enjoy the look of the 70-200 for close-up interview shots. The depth of field is really nice when you close it down to about f/4.
For audio I was running an H4n recording the signal from a wireless lavalier mic with an on-camera mic for sync sound. A lesson learned: the batteries died very quickly on the H4n, and I lost 15 minutes of quality interview audio!! This was a huge blow to the project, as I hadn’t realized I’d lost the audio clip until that evening. Next time I’ll be watching it like a hawk, but sadly when it’s a one-man show, issues like these are much more capable of happening. Honestly, I'd prefer to have an Zoom H1 since it's smaller, cheaper, and can serve as an on-camera mic too. Fortunately for me, the Rode VideoMicPro I had on the near camera caught mostly usable audio, so after I cleaned it up a bit in Adobe Audition I felt that I could complete the project with having to do ADR. Syncing was easy enough with PluralEyes.

Now for shooting the rock climbing portion of the video. I'll start off by saying that most professional rock climbing photographers I've come across were climbers/adventurers first, then they learned how to shoot. So they understand what they are doing with ropes and safety systems, as much as (if not more than) they understand their cameras. I wanted to share my techniques and approach with the community here, but didn't exactly want to encourage people to put themselves into a dangerous position. Therefore, see the obnoxious yet needed disclaimer for CYA purposes below:
I AM NOT A PROFESSIONAL ROCK CLIMBING GUIDE NOR DO I POSSESS ANY CERTIFICATIONS THAT ALLOW ME TO TEACH OTHERS ABOUT HOW TO SAFELY ROCK CLIMB. ROCK CLIMBING IS A DANGEROUS ACTIVITY AND IT CAN RESULT IN DEATH BY LARGE ROCKS TO THE FACE IF YOU'RE NOT TRAINED AND CAREFUL. IF YOU DON’T KNOW HOW TO BUILD A PROPER SYSTEM FOR SAFE ASCENSION AND RAPPELLING, YOU SHOULD NOT TRY ANY OF THIS. ROCK CLIMB AND TAKE PHOTOS OR VIDEO WHILE DANGLING FROM A SINGLE ROPE 100 FEET OFF OF THE GROUND, AT YOUR OWN RISK.
To capture video of climbing, I knew I wanted a multi-camera perspective without having to ask the athlete to climb it over and over again and make everyone wait longer than they would already have to. I had help from Seth McCubbin, who worked as a second camera operator, and we also left a stationary camera on the ground too for a backup angle.

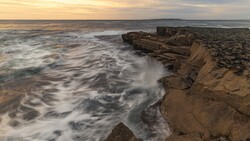
There are several ways you can shoot rock climbing from the air, and your equipment, objective and of course the rock face can all play a factor in what will work best. I climbed up the adjacent route and found decent vantage points to shoot from that revealed the lake in the background. My system for hanging was this: [warning: climbing jargon ahead] I lead climbed the route and then set the rope as a top rope system to rappel down from. Once back on land, I tied a figure-eight on a bight on one end of the rope, added a safety knot, and passed the other rope end through the loop. Once this was pulled though, I was left with a single, fixed line. I then used a Petzl ascender with a foot loop to ascend the rope, while attaching my belay loop on my harness to a grigri. I set safety knots in the line once I got up to certain heights, and clipped into bolts when in a position I was going to stay for a few minutes. I had some other gear on hand, but this was my essential setup. I also leashed my camera to my harness. Coming up with this took some time and trialing while on the ground, as safety was obviously a major concern.
Steady As She Goes
The hardest part about shooting is keeping steady and balanced while trying to capture your shot. Contorting your body while hanging from a rope and maintaining a steady shot is extremely difficult. There are some accessories that can make this a bit easier, which I’ll be investing in for my next project, like a seat to sit on while you shoot. Another thought was to use a monopod to contact the rock wall for added stability and to get up close shots when you need them. (Remember this post about Corey Rich using a ladder? Totally legit for stabilization, the rock face allowed him to get the to top easy enough and lower it down, and it's a great idea.) There were a few times where placing fixed gear into cracks, or clipping into nearby bolts would have given me a second point of anchor, so I became much more stable when shooting when I used those.

The second camera op climbed the route first and shot the athlete from above, near where the route finishes. The top-down angle is a good one, and I felt added great variety to edit. Being able to see the climbers face when they are struggling, and their hands when they are looking for holds adds a lot. On the operation side of things, exposure and focus are brutally difficult to control when using DSLRs for this kind of work. The sun is constantly changing, shadows are moving, and with Canon DSLRs a change in the exposure isn't smooth, so it's not very desirable during the recording. As for focus, most of you know how tough it can be to focus by eye while video is recording on DSLRs without a preview monitor. Even with an eyepiece it's still a challenge to nail perfect focus.
The easiest angle to shoot from is the ground, but when you don’t see much of the climber’s face and you get the infamous butt-shot, it just isn’t very interesting. (unless you are this guy) We left a stationary camera just behind the belay area to use as an extra shot to cut to if we needed it. Talking about angles, something I kept in mind was the 180-degree rule. I wanted to keep my all of the footage of my climber on the same side of the 180 degree axis so as to not cause disorientation to the viewer when cutting or showing closeups.

The other shot I had, which was one of my favorites, involved placing a GoPro inside a crack of rock along the route, right where the climber would be going. When we set it, the light was great, but since it took a bit to get everyone in to place the sun had moved by the time our climber reached it. The GoPro had to be set to record before the climb, since the iPhone app to remotely control it hadn’t been released at that point. This would be much easier now to compose and operate.
I knew that I would be the one editing it, so keeping things simple was important to me. Unfortunately, we would be shooting on DSLRs that don’t have much to offer when it comes to doing multi-camera shoots (no free run timecode without magic lantern), so I cautioned Seth to not pause the camera so that there would be fewer clips to sync. Thankfully, PluralEyes is pretty much the most amazing software ever and syncing wasn’t much of a problem.
A few tips if you might go shoot some climbers in the future:
• Use lenses with IS! Or, if you’re not on a DSLR, most video cameras these days have some kind of stabilization option on them. Use it.
• If you can, use a system that will allow you to adjust your exposure while recording (without clicking or hard shifts) and let you do a focus check while recording, as well.
• Consider asking the climber to repeat the climb so you can get multiple angles, or have them repeat hard sections so that you can get detail shots of there hands, face, and footwork.
• Personally, I’m a fan of high-shutter speed and increased detail when shooting an action sport, so I shot at something like 1/200 for the video. In the edit I used Magic Bullet and processed the footage to have a high-pass look to sharpen it up a bit.
Here are some resources that I found helpful when planning the rock climbing portion of this shoot.
Rock Climbing Photography Tips With Kamil Bialous by Peter West Carey.
How to Photograph Rock Climbing By Michael Clark.
Intro To Climbing Video by Jon Glassberg
How To Big Wall Climb - Basic Ascender Set Up by Chris McNamara
If you've shot stills or video while dangling from the side of a rock face, please leave a comment to discuss your techniques or set up to get the shots you were after.

Join the Fstoppers community for free
-
Post comments and join in the discussions
-
Browse the site ad-free
-
Share your work and get featured in the community
-
Compete in the photo contests for fun and prizes
8 Comments
This may be one of my favorite posts on fstoppers. Mainly because I love both rock climbing and photography) I love the information and you were very thorough. Also enjoyed the resourcefulness in your tools to get the job done right, as well as your post-production effort to minimize errors (such as b-roll to separate interview scenes of different lighting). I think you did an excellent job telling the story as well! Will definitely be referring back to this post from time to time! Thanks a ton!
Love that shot of Seth pointing at the camera! Great write up Mike.
Awesome write up Mike.
Thanks for the comments you guys. Seriously, in my head it sounds good, but I never do know. Hearing people readers pipe up about what I'm writing is the only way I can gauge whether or not it's worthwhile.
Really enjoyed this
Great post. That looked like a really fun shoot. Excellent details Mike, beyond thorough!
I really enjoyed this. Nice Work!
I really enjoyed this. Nice Work!