

The used camera market is a fantastic place to find value, but it's also a minefield of hidden problems that can turn a bargain into an expensive paperweight. While normal wear and tear is expected and often acceptable, certain issues cross the line from cosmetic imperfections into functional catastrophes. These are the red flags that should make you walk away immediately, no matter how good the price looks.
1. Scratches on the Sensor Stack
Every used camera will have some dust on the sensor, and that's usually manageable with proper cleaning techniques, though stubborn or oily deposits can require more than a quick pass with a rocket blower. What cannot be cleaned, however, is a physical scratch on the sensor's cover glass or filter stack. To check for this, remove the lens. On a DSLR, use manual sensor-cleaning mode so the shutter opens. On a mirrorless body, power the camera on. Then shine a bright flashlight directly onto the sensor surface at various angles. You're looking for hairline scratches that catch the light differently than dust particles. For a more reliable functional test, shoot a plain wall or clear sky at f/16 or f/22 with the lens slightly defocused, then inspect the resulting image for lines or artifacts. Be aware that flashlight inspection can make harmless dust look alarming, so the test shot is your definitive check. A scratched filter stack will often produce visible artifacts at stopped-down apertures, though severity depends on the scratch location, the lens you're using, and the scene you're shooting. Sensor stack replacement typically costs several hundred dollars at minimum and often exceeds the value of older camera bodies entirely, making this damage economically irreparable for most purchases.
2. Damaged Card Slots
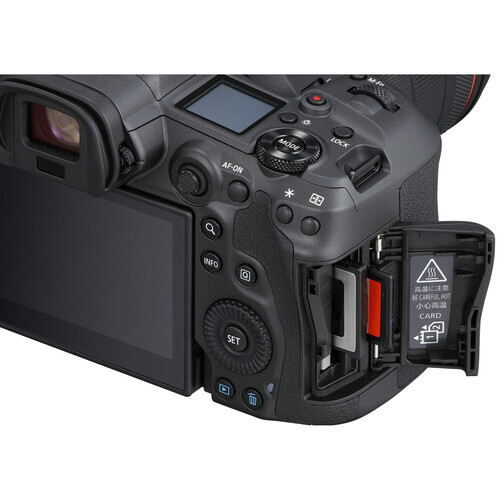
Memory card slots endure thousands of insertion cycles over a camera's lifetime, and careless users can damage the delicate internals. The inspection method depends on what type of slot you're dealing with. Compact Flash, XQD, and CFexpress Type B slots use rows of tiny exposed pins that can be bent, mashed down, or arranged in a chaotic zigzag pattern by rough card insertion. Shine a flashlight into these slots and look for pins that aren't perfectly straight and evenly spaced. SD card slots, which are far more common in consumer and enthusiast cameras, use a different design with flat sprung contact leaves recessed inside the slot.
3. Corrosion Beyond Surface Contact Oxidation
Saltwater and electronics have a relationship that can only be described as mutually destructive, and cameras used extensively near oceans often carry damage that will manifest months after purchase. Pop open the battery door and examine the metal contacts carefully, looking for any white, green, or bluish powdery residue. While you're at it, check the screws on the bottom plate, the tripod socket area, the port covers, and the strap lugs for similar discoloration. Minor surface oxidation on battery contacts can sometimes be cleaned and may remain stable. However, when you see corrosion in multiple locations, residue inside ports, fogging under the LCD or EVF, or sticky deposits alongside the oxidation, you're looking at evidence of broader liquid intrusion. Salt corrosion travels through internal wiring and circuit boards progressively, and a camera showing widespread external signs may have internal damage you can't see. Light contact corrosion is a negotiating point; evidence of saltwater throughout the body is a walk-away.
4. Impact Damage Near Seams and Joints
Cameras get dropped, bumped, and knocked around, and some cosmetic wear is completely normal and acceptable. Paint rubbing off high points, minor scuffs on corners, and light scratches on the LCD cover are all part of a camera's working life and don't affect functionality. What should concern you are dents, cracks, or deformation near structural seams, particularly around the viewfinder housing, the bottom plate, and where the body panels meet. These areas indicate a serious impact that transmitted force through the camera's chassis. A hard enough drop can damage internal image stabilization mechanisms, warp the magnesium alloy frame, or shift the lens mount out of alignment. A note on IBIS-equipped cameras: many modern mirrorless bodies will rattle slightly when powered off because the sensor floats on magnetic actuators and only locks into position when the camera is on. This is normal. What isn't normal is a loud clunking sound, a rattle that persists when powered on, or stabilization that visibly jumps or stutters during use. A misaligned mount might show up as soft corners or inconsistent autofocus behavior, though these symptoms can have other causes too. The real problem with impact damage is the uncertainty: you don't know what broke inside, and diagnosing internal alignment issues or IBIS faults gets expensive quickly.
5. Gritty Dials and Sticky Buttons
Pick up the camera and start manipulating every control surface you can find. Spin the front and rear command dials, rotate the mode dial, twist the exposure compensation wheel, and press every button from the shutter release to the smallest function button on the back. What you're feeling for are two distinct sensations that both spell trouble. The first is a grinding or crunchy texture when rotating dials, which indicates sand or fine grit has worked its way into the mechanism. The second is buttons that feel tacky or require extra force to actuate, suggesting dried liquid has contaminated the contacts. Some buttons sit on separate membrane assemblies that can be serviced without a complete teardown, and some dial mechanisms can be flushed by a skilled technician, but for a used purchase you're taking on risk and repair costs either way. Sand in particular is insidious because it acts as an abrasive, wearing down plastic and metal components with every dial rotation. A camera with contaminated controls might work today but will likely get worse with continued use, and the repair cost often approaches or exceeds the value of older bodies.
6. Dead Pixels, Hot Pixels, and Laser Burns
Modern cameras have millions of pixels in both their imaging sensors and their electronic viewfinders, and statistical reality means some will eventually fail. The question is whether the failure is within acceptable limits or indicates deeper problems. To check the EVF, put a body cap on the camera and look through the electronic viewfinder in a dark room, making sure the EVF is forced on via the menu or that the eye sensor is triggered so you're not looking at a powered-down display. Be aware that many EVFs show some noise, glow, or faint sparkle depending on the gain settings, so a few specks don't automatically mean the panel is dying. What you're looking for are bright, persistent, colored dots (often stuck pixels; dead pixels can show as dark points on bright scenes) that stay fixed in place regardless of what the camera is pointed at.
For the sensor, take a photo with the lens cap on at ISO 1600 or higher with a shutter speed of about one second, then examine the resulting image at 100% magnification. Disable long-exposure noise reduction if you can, and repeat once after the camera has been on for a few minutes. A few hot pixels scattered around are normal on most sensors and can often be addressed using the camera's built-in pixel mapping function, sometimes available in the menu (brand and model dependent) or run automatically via a maintenance routine. Run the pixel mapping during your inspection if possible. If hot pixels remain after mapping, or if you see lines, bands, large clusters, or persistent patterns at normal ISOs and shutter speeds, that indicates more serious damage. One increasingly common issue worth checking for specifically is laser damage, particularly on cameras that have been used for concert or club video work. Laser burns often show up as magenta or purple lines or clusters, but can also present as small dead spots or localized pixel failures, distinct from the single-pixel defects caused by age or heat. Shoot a plain wall at a moderate aperture and inspect for these patterns. A sensor with laser damage is effectively destroyed.
7. Loose or Broken Ports
The USB, HDMI, microphone, and headphone ports on a camera body are mounted to internal circuit boards, and they can be damaged by rough handling or by tripping over cables. Bring a USB cable and an HDMI cable with you when inspecting a used camera, plug each one into its respective port, and then gently wiggle the cable while watching the screen or checking for a connection indicator. Emphasis on gently here; you're testing, not stress-testing, and you don't want to create damage during inspection. A healthy port should maintain a solid connection throughout this test with no flickering, disconnection, or error messages. If the connection drops or becomes intermittent with light movement, the port has likely broken free from its solder points or the connector housing has cracked. Some cameras mount ports on small separate I/O boards that can be replaced without touching the main PCB, while others integrate everything onto one board where repairs become much more involved. Either way, a camera with unreliable ports loses critical functionality for tethering, video output, and external audio recording.
8. Smoke or Mold Smell
This test requires nothing more than your nose, but it can save you from an unpleasant ownership experience. Pick up the camera and sniff the rubber grip areas, then open the card slot door and take a whiff of the interior. What you're trying to detect are two particular odors that indicate problematic history. Cigarette smoke embeds itself into rubber and plastic components and is difficult to fully eliminate, though professional cleaning or ozone treatment can reduce it. The smell can transfer to your hands during use and bothers many photographers enough to affect their shooting experience. A musty or mildew smell indicates the camera was stored in humid conditions, which raises concerns about the storage history and potential fungal issues, particularly if lenses are included in the sale. Fungus in lenses is the bigger concern here, as the same humid storage conditions that caused fungus in one item often affect other gear stored with it, especially lenses. Beyond the comfort factor, both conditions significantly hurt resale value, meaning you'll have difficulty moving the camera along when you're ready to upgrade. Treat these smells as red flags about how the gear was cared for.
9. Bent Hot Shoe Rails
If you use flash or triggers, bent hot shoe rails are a dealbreaker. The hot shoe on top of a camera seems sturdy but is actually made from relatively thin metal rails that can be bent or crushed by impacts or by forcing accessories in at an angle or overtightening locking mechanisms. If you have a speedlight or wireless trigger with you, try sliding it into the hot shoe and see if it locks securely into place. Even without accessories, you can visually inspect the rails for deformation by looking down the length of the shoe from front to back, checking that the rails are parallel and straight.

10. Play in the Lens Mount
The lens mount is arguably the most critical mechanical interface on any camera, and it must maintain precise alignment to ensure sharp images across the entire frame. Mount a lens to the camera you're inspecting, preferably a lens you know is in good condition, then gently try to rock the lens up and down and side to side while watching where exactly the movement is occurring. A tiny amount of rotational play before the lens locks is normal on most systems, and some lens and body combinations exhibit slight play that doesn't affect image quality at all. What you're specifically looking for is movement in the mount ring itself relative to the camera body, which indicates the mount has been damaged or the mounting screws have loosened or gone missing. Check that all the mount screws are present and haven't been stripped or replaced with mismatched hardware, as this often correlates with prior impact or amateur repair attempts. If possible, test with two different lenses to confirm the play is in the body rather than a worn lens barrel. In more severe cases, a compromised mount can throw off alignment (field tilt or uneven sharpness), especially if the mount ring moves relative to the body or screws are missing or stripped. Mount replacement is possible but adds cost and uncertainty to a used purchase, and if you're seeing real image quality issues during your test shots, that's your signal to walk away.
The Bottom Line
Buying used camera gear is one of the smartest ways to stretch your photography budget, but only if you know what problems to look for and which ones to walk away from. Cosmetic wear, reasonable shutter counts, and minor quirks are all part of the used market and can represent genuine value. The ten issues outlined above are different. They represent functional problems that will either compromise your shooting experience or result in expensive repairs down the road. Take your time with these checks, bring the right tools for testing (memory cards, cables, a flash if you have one, and a known-good lens), and don't let a good price cloud your judgment. The right used camera is out there, and it's worth waiting for one that passes every test.


Join the Fstoppers community for free
-
Post comments and join in the discussions
-
Browse the site ad-free
-
Share your work and get featured in the community
-
Compete in the photo contests for fun and prizes
3 Comments
Good article, I've had great experiences buying clean used gear, it's important to know what you're buying with condition being paramount. I purchased two new 5DIV's in '17 but every other digital body was used ranging from the original 1D up through a 1Dx, six total used bodies with zero issues.
Good reminders, Alex!
One of the things mentioned - play in the lens mount - is really easy and cheap to fix yourself. Just buy another lens mount, unscrew the old one, and replace it with the new one. Done it several times and it doesn't require any special knowledge. And the tool needed is something most people have lying around anyway and if not, you can get it at almost any Dollar Tree for $1.25
High shutter counts, over 200,000 or over ~50,000 for "mint". Similar to miles on a car....
Internal battery that stores settings. Change some settings. Remove main battery. Were the settings remembered? It can be expensive to replace, and annoying to have a camera with Alzheimer's.