
There are three things in life that photographers will clear their schedules for: Apple announcements, Nikon/Canon late-night pre-orders for new flagship bodies, and Adobe product releases. So clear your schedules, guys and gals; because Adobe’s Lightroom 6 is here with more speed (FINALLY!), more features, and rich mobile integration.
For those more interested in in-app features or mobile integration than performance, feel free to skip to the conveniently labeled section that most interests you. Performance increases were the most important to me for this release, so that’s where I’ll start…and there’s quite a bit to discuss.
But first, let's discuss one more thing everyone wants to know very clearly: Lightroom 6 will be available as a standalone, old-fashioned application for $149 alongside Lightroom CC. Both will feature the same program while the CC version will be bundled for photographers with Photoshop CC in the Creative Cloud Photography plan for $9.99/mo and will include access to Adobe's mobile applications including Lightroom Mobile and Photoshop Mix. For the purposes of this review, "Lightroom 6" is used to refer to the update the Lightroom 5, simple as that. But fear not: "6" and "CC" are effectively the same thing in terms of the desktop experience.

PERFORMANCE
Yesterday, Lightroom was a brilliant all-in-one library catalog manager and color/tone editor that I didn’t want to live without, but that I was still considering leaving for something else. Today, with the introduction of Lightroom 6 come speed enhancements that will keep me around at least until Lightroom 7.
What greener pastures existed for me beyond Lightroom are quite unclear. It likely would have been an equally dark and murky experience in the depressingly small world of slow-performing photo editors that also help catalog, tag, and share your work in every way imaginable. But that’s all a moot point, now – and thank God (I mean…thank some engineers at Adobe, I guess).
For those interested, all of these times are based on a very real-world environment on my 15” i7 fully-loaded Retina MacBook Pro (pre-Thunderbolt 2). I had Safari and Chrome open with over 30 tabs, Mail was open with several in-progress emails minimized, iTunes was playing music, CrashPlan was backing up in the background, etc., etc. Dropbox, Box, Google Drive, Evernote, Creative Cloud – nothing was turned off.
Lightroom 5 was just always slow for me. Despite my fairly speedy SSD, dedicated video card, and 16GB of RAM, waiting for an image to finish “Loading,” as Lightroom likes to call it, took about 5 seconds in the Library module (after running for a few minutes, that is…since it was always fairly fast for a minute or two right after starting up). Switching to the develop module always took several seconds as well. And then waiting for a photo to be ready to edit took another three seconds, minimum, after selecting it.
Naturally, this made culling extremely difficult in either module. Enter Lightroom 6.
These times are quite general and change from time to time, but the feeling and time savings is very real, much in part to Adobe as it finally began tapping into that video card to help processing. Each of those times easily went down by two thirds. Changing from one file to another in the Library module takes about two seconds until the newly selected image is loaded. In the Develop module, very seldom did it take even close to a full second to be ready to edit the image.
Surprisingly, editing was fast. Like…really fast. I have this lovely memory of the original Lightroom being instant with every edit. This memory could be somewhat inaccurate and simply relative to what was available back then (the same way that I once remembered Nintendo 64’s Super Smash Bros. delivering graphics in full 1080p high-definition glory…until an old friend pulled it out one time to prove me oh so wrong). But the memory is there nonetheless.
In any case, Lightroom 5 was getting excessively slow and choppy with its sliders (several support tickets that I started on the matter each eventually went unanswered back in the last year or so). But Lightroom 6 certainly is that instant editor that makes editing so smooth and instant that it’s as fun as I remember the program being in its prime. Until that feeling wears out, I’ll likely be wasting some time sliding back and forth on every adjustment just to watch the colors change.
These new speed enhancements helped me rediscover sharpening within Lightroom, which is perfectly suitable for most uses. The same goes for noise reduction and just about every other section of adjustments that I would skip when I didn’t feel like waiting an extra couple seconds. I can’t say those features are more powerful or give more while taking less from the quality of the image because of improved algorithms. But they sure are faster to implement (Adobe confirmed to me that the algorithms should do the same job as they did in Lightroom 5, but that they were tweaked slightly on occasion for performance gains).
In the end, all of these improvements save time. Culling times, for one, are so much better. Waiting for 1000 images to load for three seconds each adds up to 50 minutes of waiting in Lightroom 5. Lightroom 6 cuts that time to a much more manageable less-than-17 minutes. Add in all the other improvements for every small adjustment (cropping doesn’t get choppy at all, now – it’s just as smooth and instant as any other adjustment), and you’ve probably saved yourself well over an hour in waiting for every 1000 images.
I do have to warn readers not to mistake my enthusiasm for performance improvements in Lightroom 6 for “fanboyism,” as this release doesn’t come without further wanting. There’s certainly more room for improvement in the sense that I’m still not sure why images can’t load (at least to the point where they seem sharp) relatively instantly as they do in the often-compared Photo Mechanic, the application that hundreds of news agencies use for culling, adding EXIF data, and uploading images to FTP servers. I will always wonder, “If they can do it, why can’t Adobe?”
Zooming in to 100% still takes some time, even if it is “faster.” And that’s the experience overall: Yes, it’s faster…no, it doesn’t solve the speed issues entirely, as adding multiple spot removals or switching between filters/tools is all a bit snappier, but not nearly instant in every case.
We live in a world of milliseconds – literally. While some choose to see this side of the world as a dystopian one filled with the Great Ungrateful Youth population only interested in instant gratification, this speed has some very real needs and applications. Some animations like minimizing a window have to be slowed down to a few hundred milliseconds, or it would seem like the window was closed instead. Similarly, a button has to turn to a darker shade and immediately lighten again when clicked on in a matter of milliseconds or it feels like your computer is lagging. To have an image take multiple seconds to load simply makes everything feel dated – not to mention it still slows us down, adding hours to every week. But I definitely welcome the performance improvements made in this round, even if there’s something to be desired.
NEW FEATURES
Thankfully, Lightroom 6 also brings a number of highly requested features to the platform.
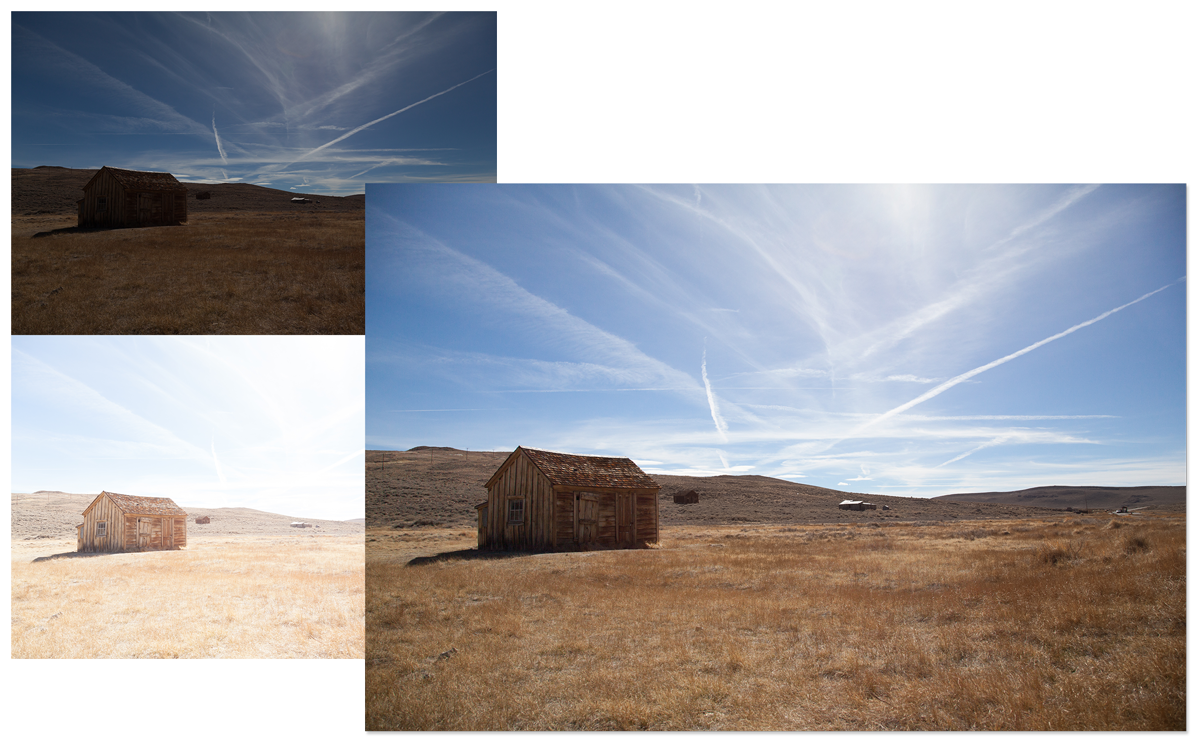
HDR Merge
High dynamic range (HDR) photography has gotten a bad rap. Some people over-lighten shadows and over-recover highlights to such an unrealistic point that the resulting HDR image becomes a metallic mess that eclipses the cheesiness of shoving Clarity up to 100.
There are, however, much more realistic implementations of HDR methods stemming from perfectly reasonable attempts to bring highlight and shadow detail to a level more commensurate with the abilities of the human eye. And now, Adobe is bringing us an incredibly easy way to implement HDR imagery within Lightroom 6. And yes, that’s about all there is to it.
Select a few images to merge, play around with anti-ghosting settings in case objects (like walking people or swaying trees) moved throughout the images, and merge the images to create a perfect HDR merge. The only thing to note is that Adobe recommends to not necessarily use twelve images if two or three will do, as the quality will likely decrease due to the increased likelihood of ghosting, etc. They have a good point, too, since you’ll want to avoid that hyper-real look that you loved back in high school.
Perhaps the best part about this is that HDR Merge images are saved as full, 16-bit raw DNG files. That's huge if you think about it.
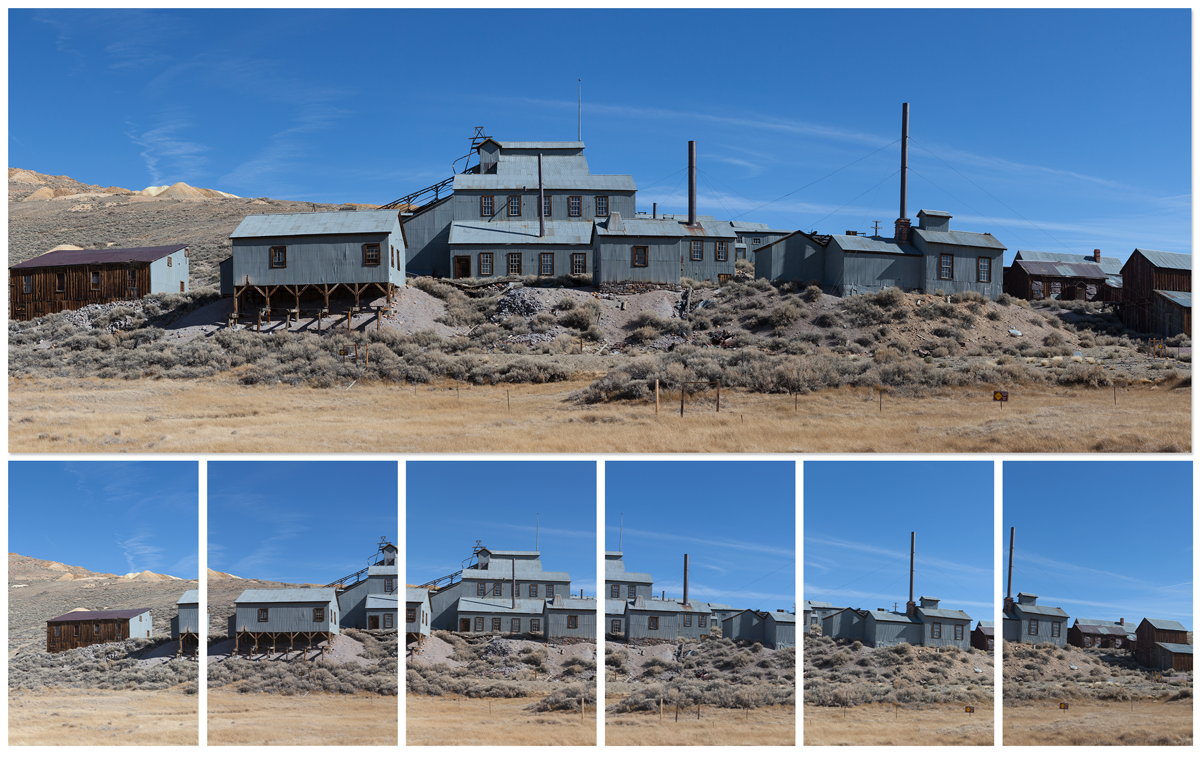
Panorama Merge
Panorama Merge is extremely simple as well and finally brings panorama creation to Lightroom without the need for Photoshop. This saves time not only in application switching, but also in removing the need to create another copy of the file(s) from which to actually create the panorama. There’s also no need to have perfectly edited images before the photomerge since Lightroom 6 will automatically exposure match for you in this case. Three different panoramic merging treatments, including spherical, cylindrical, and perspective, are offered to help create a great-looking panorama for any scenario from landscape images to architectural stitches that require maintaining straight lines. And an auto-crop feature rounds out a great way to create new Panoramas. All of these features worked quite well in my experiences throughout the week. And just as with the HDR Merge feature, panoramas are also saved as raw DNG files -- pretty sweet.
Facial Recognition
The only reason I still use Apple’s Photos (formerly iPhoto) is for facial recognition for my personal photos that come off of my phone. Facial recognition is something that really should be everywhere now. It’s also incredibly underrated as a search/filter tool – more so than GPS-tagging, which I think has much more of a cool factor than an actual use for most people (action/adventure photographers likely excluded).
Facial recognition in Lightroom 6 works almost identically to the way it does in Photos, but unfortunately not without a few extra…should we call them, “special personality traits?”
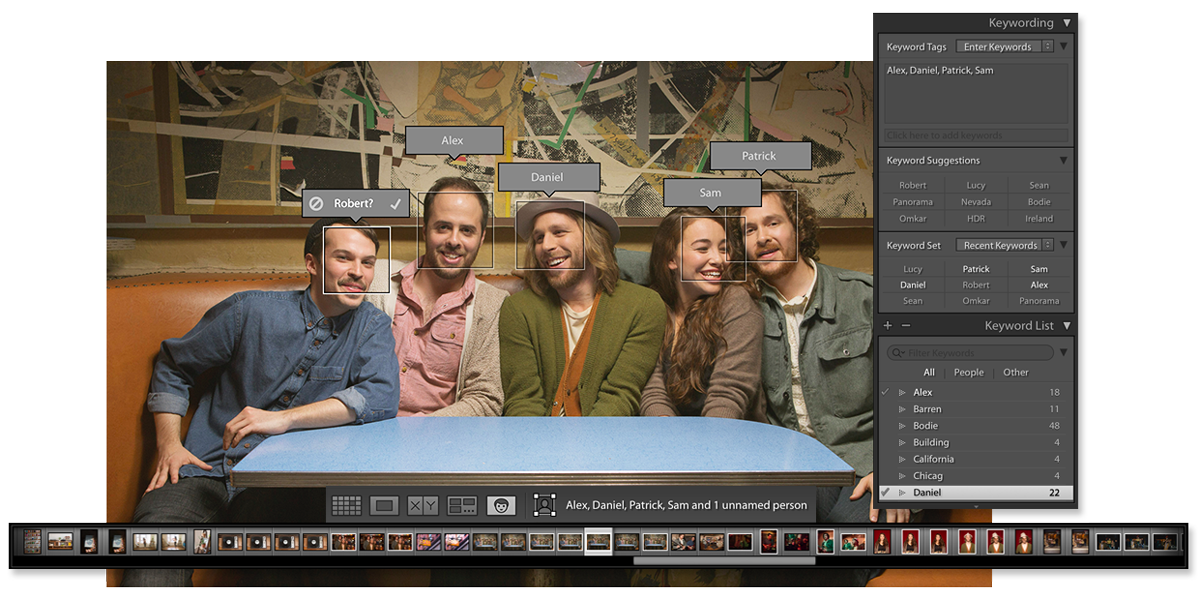
In general, finding faces works incredibly well. Lightroom even found rather dark reflections of faces in windows that a model was standing next to. However, while the preview of the “face” was indeed often an actual face, it was also occasionally a preview of another part of the image. The person that it “guessed” was in that image was guessed accurately, but I didn’t want to confirm it was correct out of fear that I was confirming this random part of a wall behind that person was really that person’s face. This was quite frustrating and just confusing since the person was actually in that photo. But it’s also something that will hopefully be fixed in the near future.
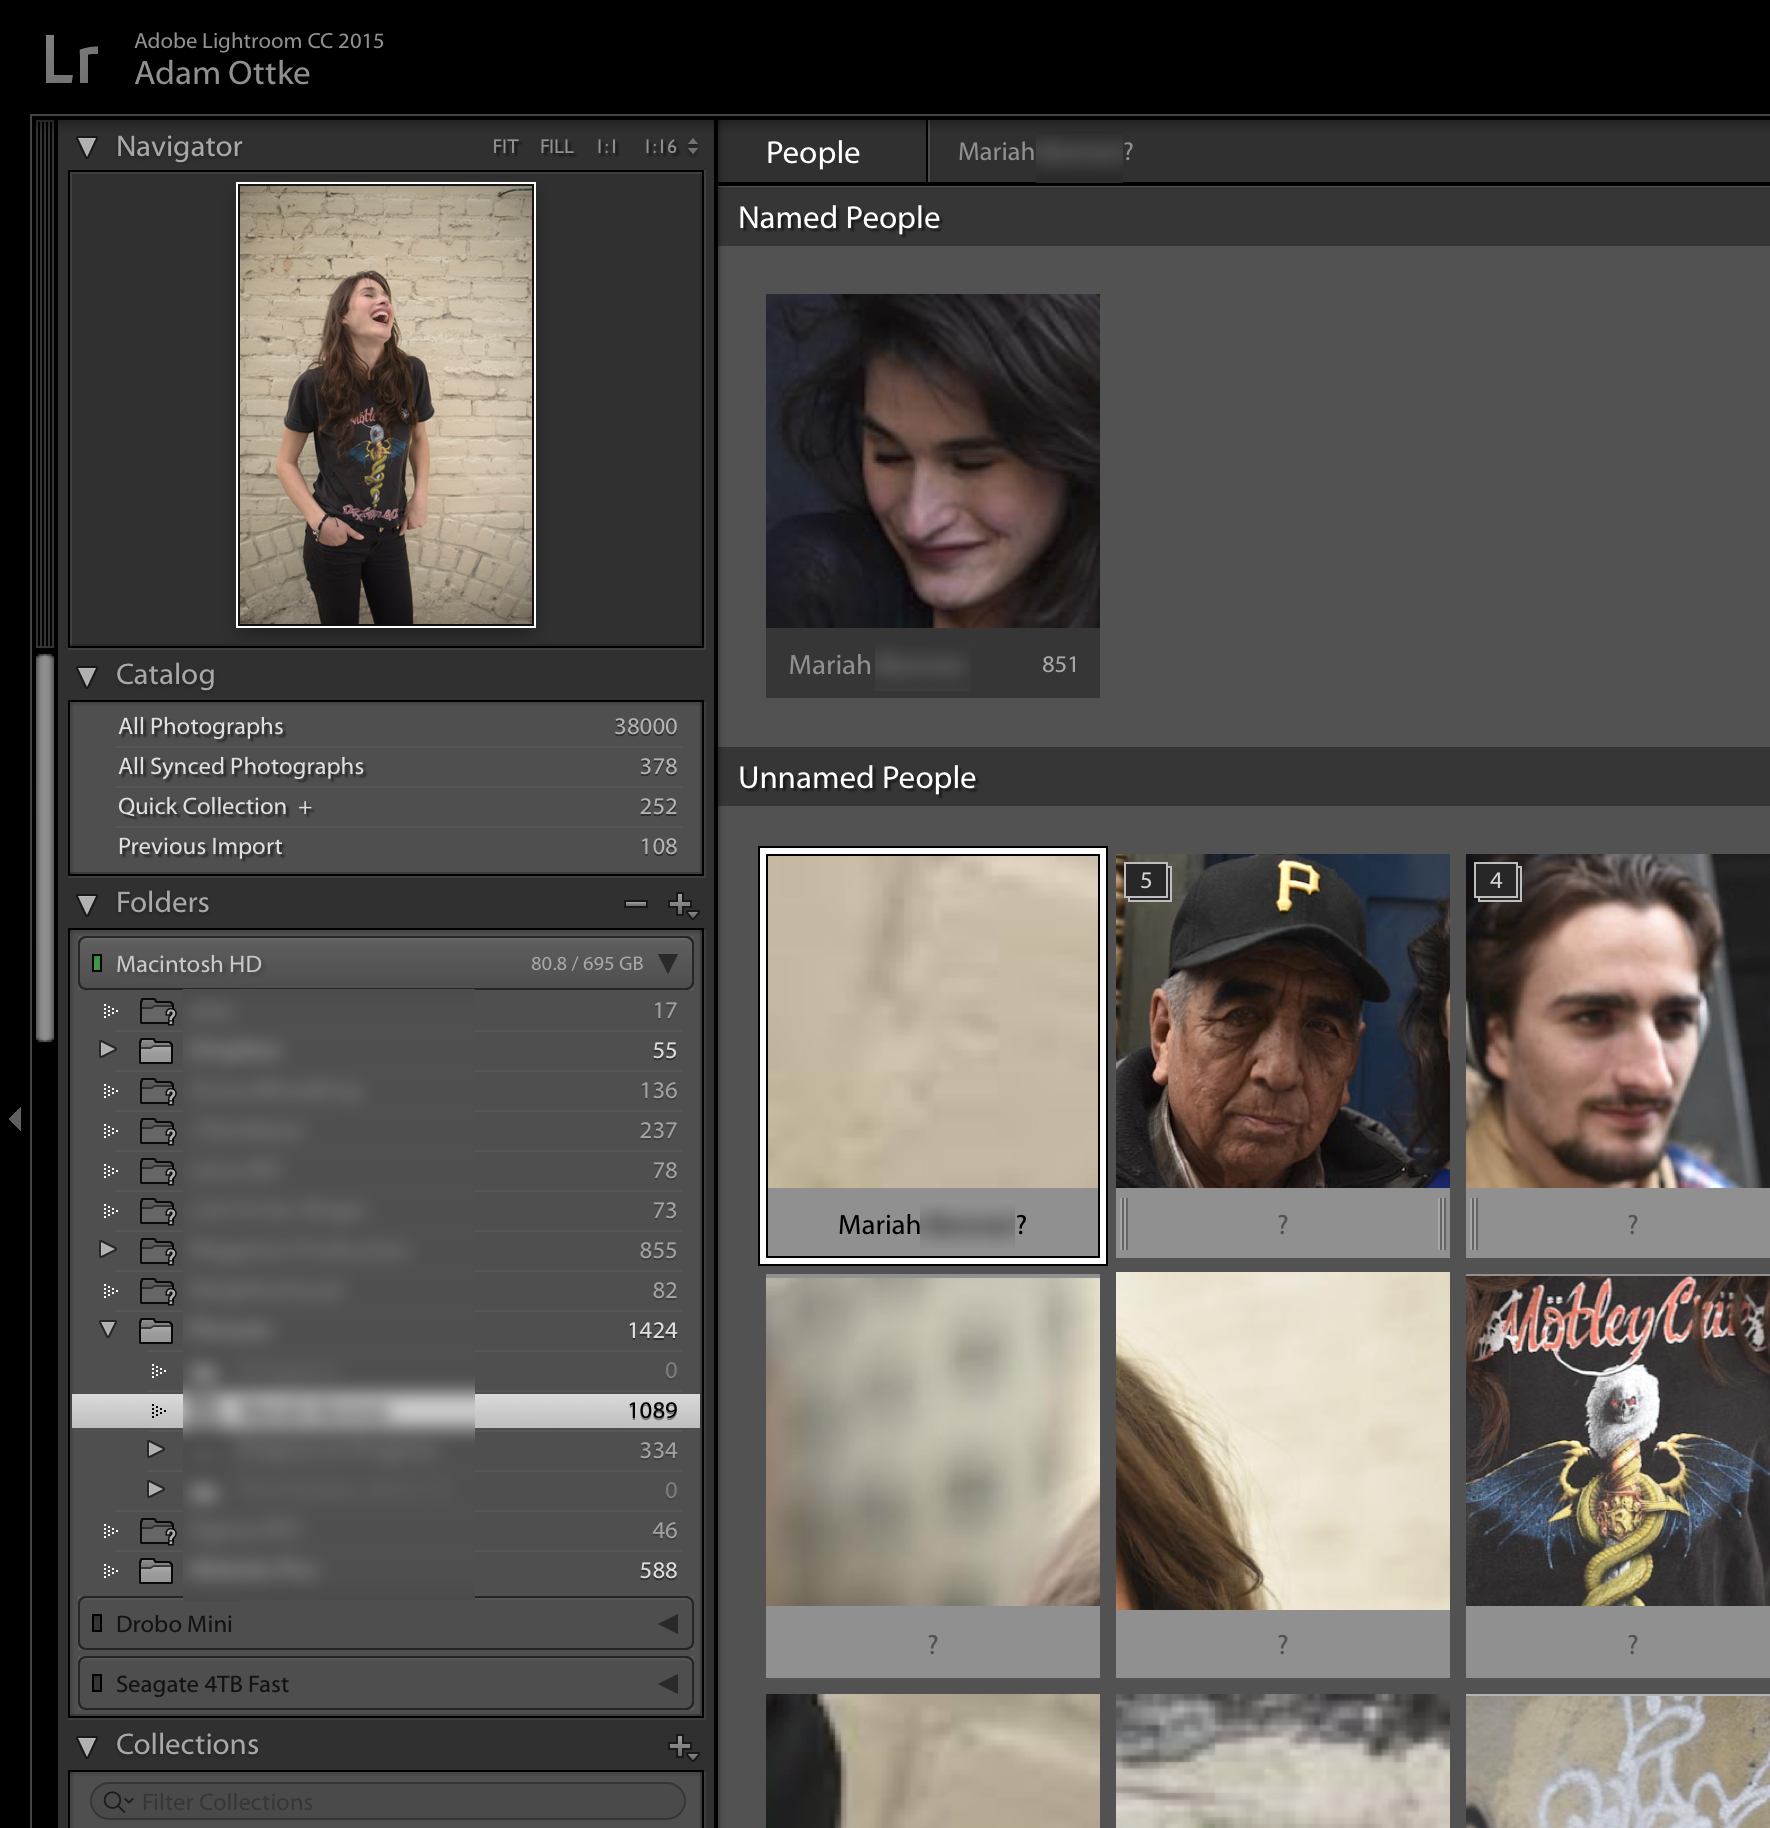
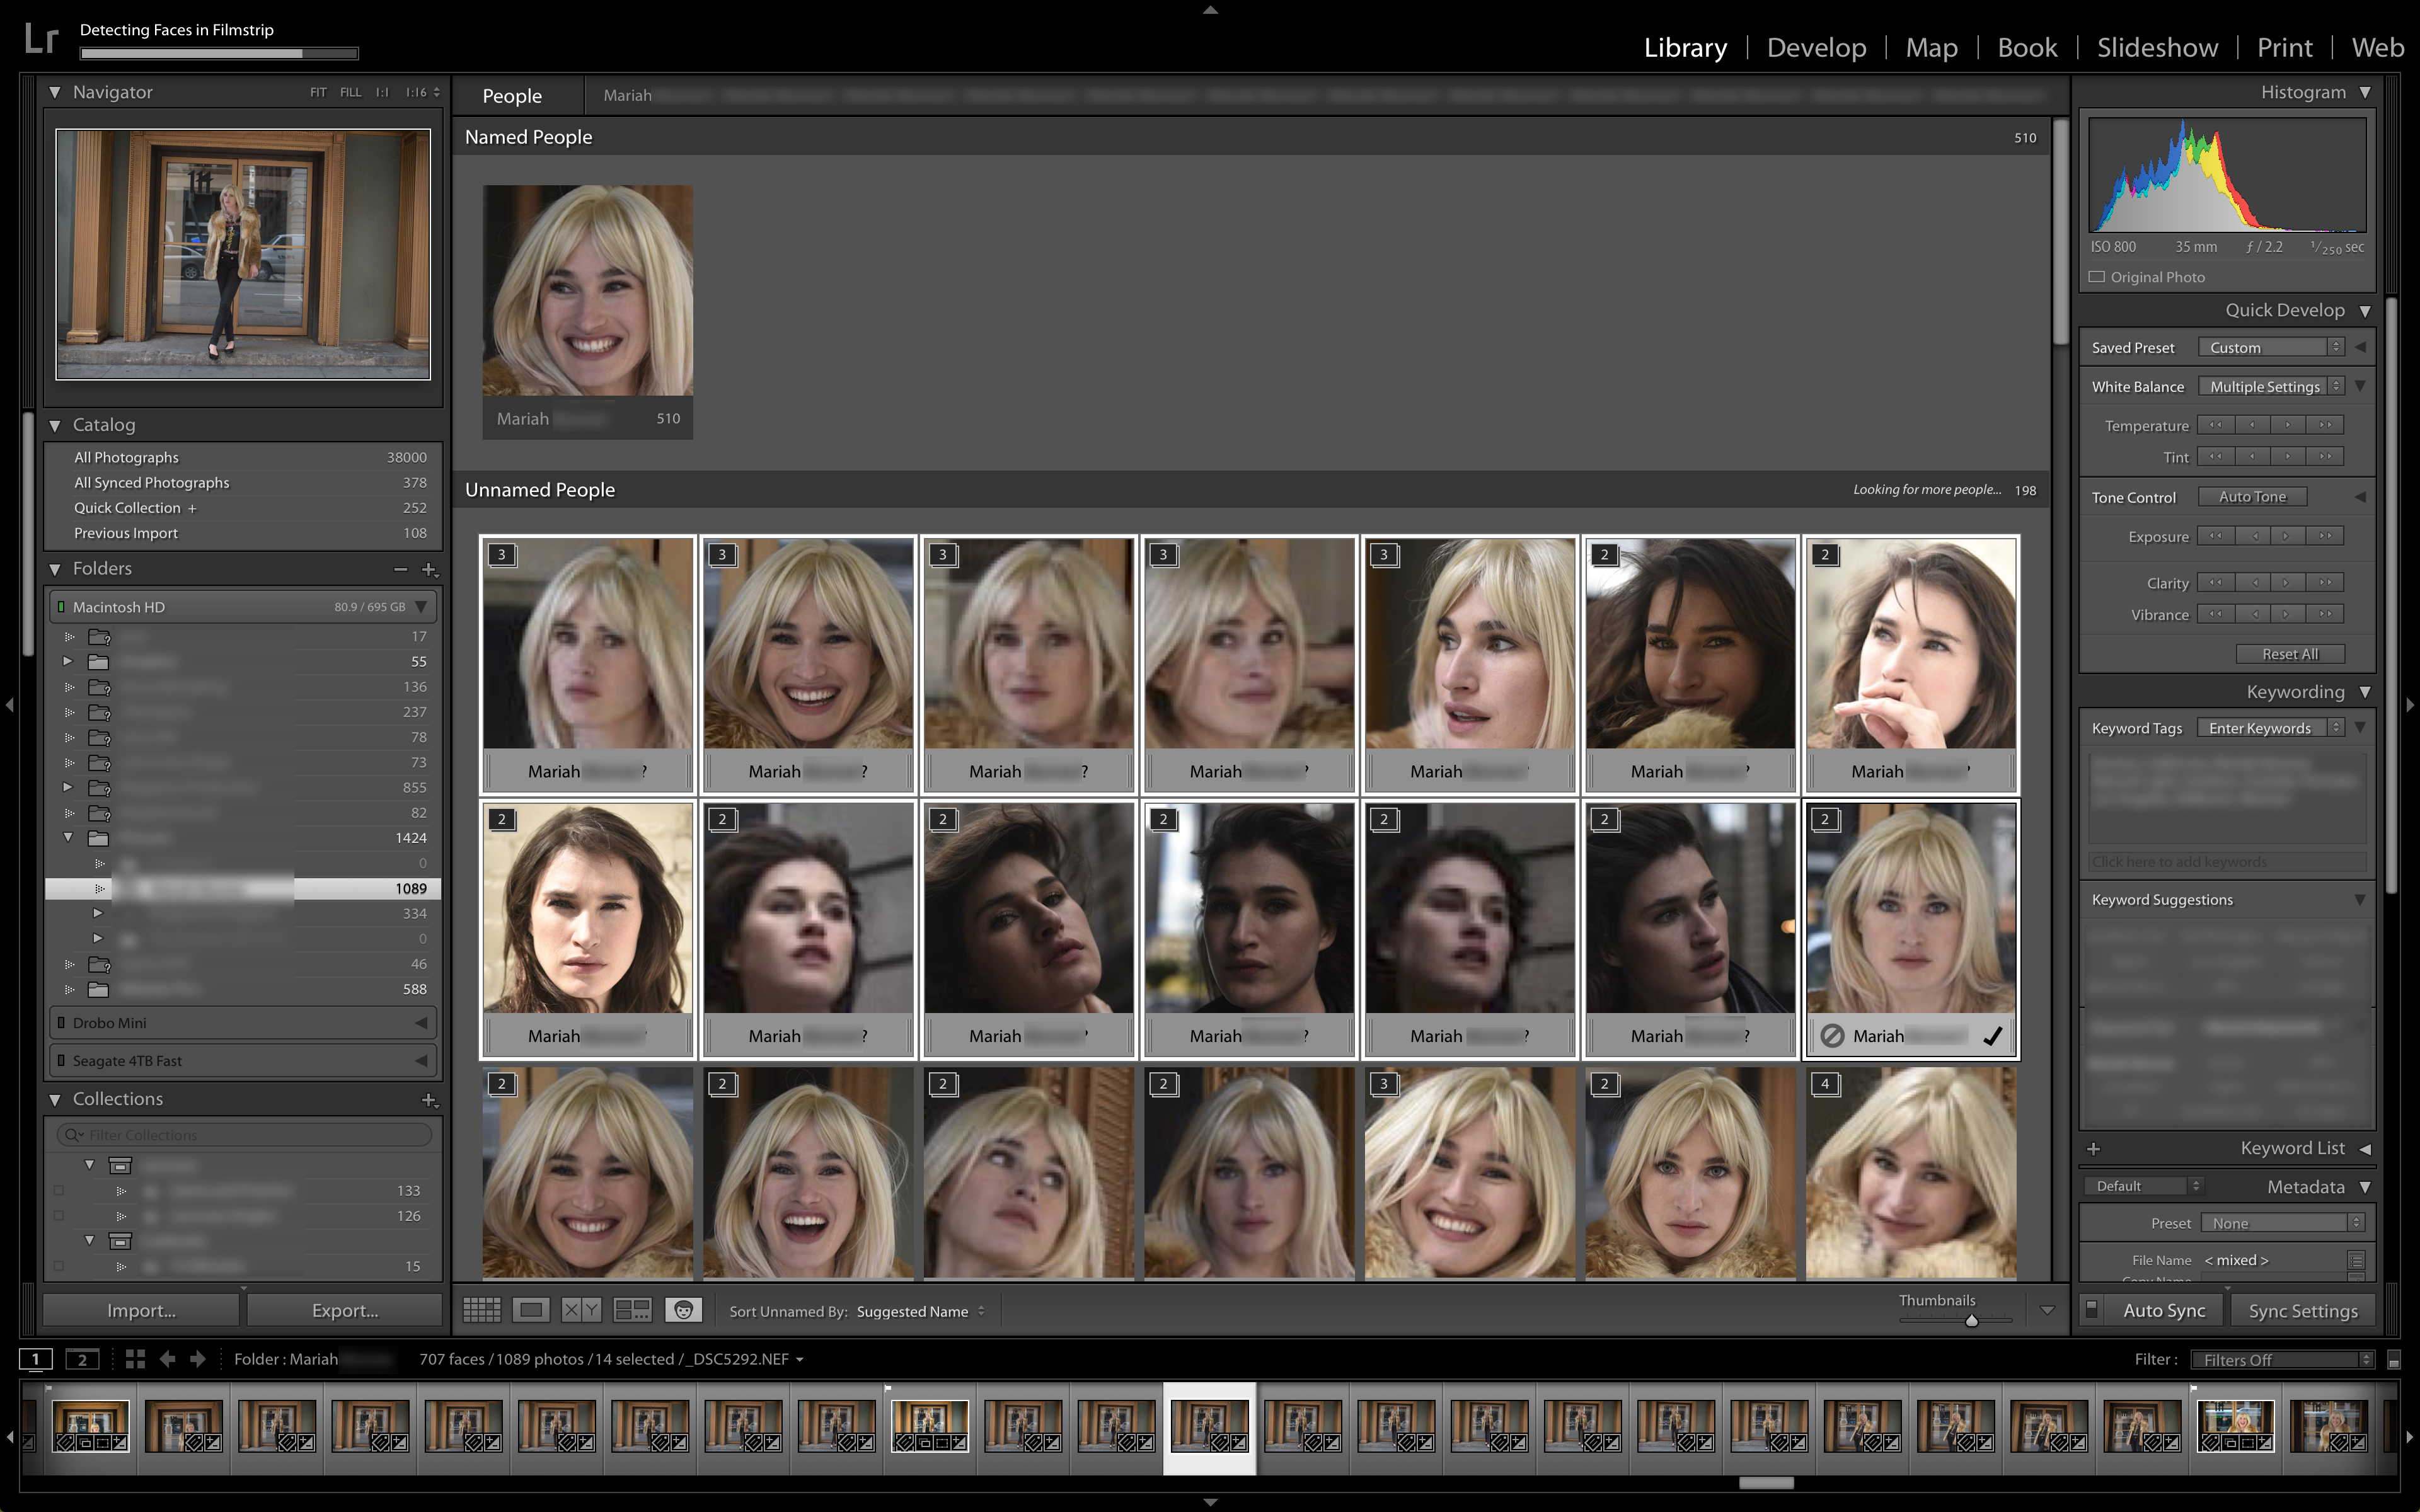
I guessed that the algorithm was finding and marking the correct face after all, but that there was just a minor bug that displayed a preview of the wrong area of some images. When I asked Adobe about this, I was told that the application is simply misreading some areas (as any facial recognition inevitably would, in their defense). But I’m honestly still not convinced what I was actually experiencing was not a bug. I mean, just look at some of these things that it thought was a face in the image below (and keep in mind that the person it’s suggesting – Mariah – is actually clearly visible in those images…just in another part).
On another note, that image up above is quite the cherry-pick of a screenshot to make my point. Notice that I had already ‘Okayed’ over 800 correct identifications of a face (though it only sometimes knew it was Mariah, specifically, and not just some random face). And for those times that Lightroom doesn't see a face (as with profile shots, for instance), there's a handy icon in the bottom of the toolbar when in the Library module that lets users draw a box around a face and subsequently name that person. If you can tag people in Facebook, you've already got this covered.
When all is said and done, Facial Recognition should be great to have for future (and past) shoots. The fact that it will not export Facial Recognition naming metadata unless specifically requested when exporting an image is another nice feature that doesn’t interest me in particular, but that will certainly alleviate those with concerns over security, celebrity discretion, etc.
Filter Brush
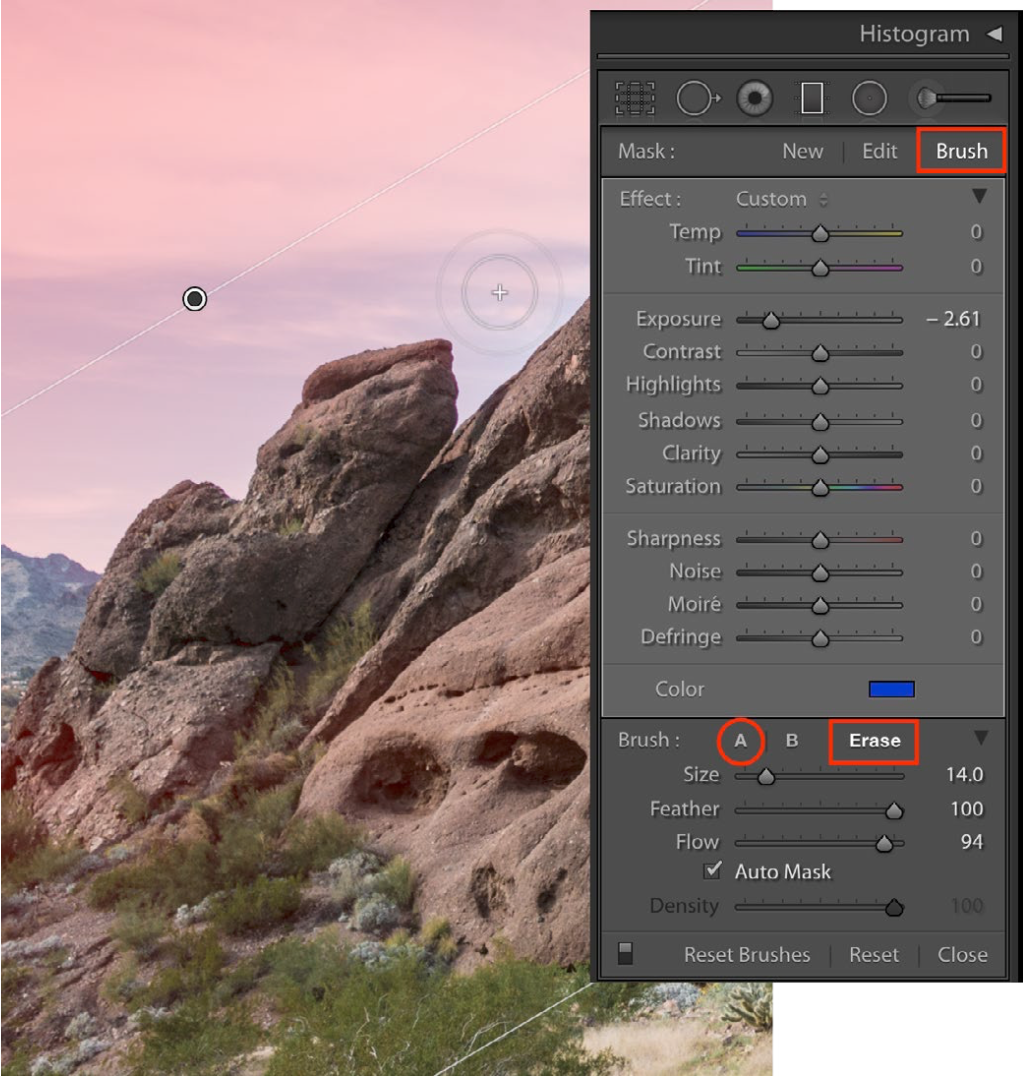
Ever want to use a graduated filter on a sky in an image where the horizon is broken by an object in the foreground (like a rock or a person standing, smiling in the middle of the desert)? Previously, the graduated filter would also affect that object in the foreground if any part of it were to have poked above that horizon line. And it still does, of course. But now there’s a fix for these scenarios that doesn’t involve trying to brush your way into a graduated filter with the brush tool to avoid that spot.
The Filter Brush is as simple as it is necessary. Working as more of an eraser (though you can add a filter back into an area that was erased with it or brush that same filter into entirely separate areas of the photo, too), the Filter Brush lets you brush away the effect of a graduating or radial filter from a specific part of the image. There’s nothing more to say about that feature other than to reiterate how nice – if simple – it is to have this feature. Adobe was quite vocal about the fact that this, along with a number of other features in the Lightroom 6 release, was created directly in response to multiple customer feature requests.
Advanced Slideshows
This is something that’s nice, but perhaps not so useful or applicable to everyone. Personally, I use other programs (read: video editing applications) to create slideshows more than I use Lightroom. Even though I did create a quick, silly slideshow for a friend within Lightroom back in the day (and it was fairly easy), these programs simply give me a bit more control.
For those that like to keep everything simple, however, Adobe has now included several new features that make the slideshow functionality much more useful.
“Sync Slides to Music” automatically syncs slide changes to beats in the music that are analyzed in every song. A Pan and Zoom slider adds motion to slideshows. An Audio Balance setting lets you choose how loud the music volume is compared to the volume in the video (essentially diegetic vs. non-diegetic sound for you movie buffs). And finally, users can now add up to ten songs per slideshow.
MOBILE AND ONLINE
Lightroom Mobile is still an imperfect experience, but its concept and usefulness has increased over time, and it certainly has its place.
Naturally, Lightroom 6 works in concert with the Lightroom Mobile app, allowing multiple collections to be synced from, to, and between both applications at your choosing, as a new collection can be created, copied, or deleted from either end. Any changes or edits made on any device to a photo within a synced collection will be carried over to the other device(s) upon syncing with a proper Internet connection.
Because Lightroom’s syncing works by syncing Smart Previews across devices, edits and downloads of those edits should be fairly quick and take up little space in the real world. Furthermore, for those planning on getting Lightroom CC through the Creative Cloud Photography plan, these files don’t impact your Creative Cloud storage capacity, so you can theoretically sync as many images as you like.
The same goes for Adobe’s web service, whereby collections can be synced, shared, and viewed in an online, in-browser platform from any computer. While a set limit wasn’t specified, Adobe said it has tested these services with over 200,000 photos.
While the web portal likely won’t be used too often, I won’t complain about another way to upload, share, and view photos. In my view, a slight inconvenience is that I can't seem to create a new album on Facebook for the images I want to upload from Lightroom Mobile. I can, however, post images individually or as a group either on their own or in an already existing album. Alternatively, photos can be shared to a web gallery that's essentailly an Adobe-run viewing area from which people can view, comment, favorite, etc., although those that want Facebook or Twitter sharing that will actually help sustain a social media presence and fan support, users may want to shy away from this method of sharing.
Of course, for those that want direct control through their social media app of choice, users can always export/save images onto their device’s Camera Roll (iOS) or Gallery (Android) and upload from there. Not being an expert in social media APIs and mobile application restrictions, I can’t be sure that this inability to create new Facebook albums is entirely Adobe’s doing (or lack thereof) and not simply a casualty of overly cautious security requirements and settings for mobile application developers by Facebook.
The app currently has a mediocre three-star rating on the App Store, but I would be surprised if that number doesn't go up in the future as more people discover it (and learn to use it how it's intended to be used). I've enjoyed the app myself for basic things as it stands, especially with the new Presentation mode in mind, which lets users put the app into a presentation mode that hides editing tools so you can share a collection with someone next to you.
Personally, there are two big draws to mobile integration. The first is that one can get a lot of the basic culling done on mobile in the form of up- and down-swipes to flag or rate images that are actually extremely pleasant to use. I can’t say it’s faster than using keyboard shortcuts on a desktop system, but it’s still a nice way to go if you’re returning from a long shoot in the car or on the plane and want to get some work done (provided you've already had to time to import your shoot, create a collection from it, and then sync that collection to your Lightroom Mobile application over the cloud).
You won’t find your more advanced brushes or color options for editing on mobile, but what amounts to the Develop module’s entire Basic dialog (and cropping) is available for adjustment to lay down a decent foundational tweak to each image. For quick edits to a file with the intent of saving and uploading to social media for a fan update, a few added color filters can give your images the right feel you might be looking for without having to touch your computer.
The second draw is a feature that allows for automatic imports of your mobile photos into a catalog. This is great for a number of reasons, but mostly because, combined with Facial Recognition, it solves my problem of needing to use Photos (for facial recognition for my family/friends photos from my iPhone) and Lightroom (for my work photos) separately while it also makes it even easier to get my mobile photos into Lightroom to begin with.
Of particular note and much to Adobe's credit (I didn't at all expect this), although adjustments like Split Toning, Lens Corrections, Graduated Filters, etc., cannot be edited within Lightroom Mobile, these settings and visual changes are synced through the system so you can still view, copy, and paste all of those changes within the Lightroom Mobile app if they were already there to begin with. Similarly to copying settings in the desktop application, you can even select which types of adjustments are copied (more advanced adjustments included). This took my by very pleasant surprise.
Adobe also is using the release of Lightroom 6 to push its Slate and Voice apps that help create interactive and professional-looking visual or narrated slideshow presentations with ease. These apps are perhaps Adobe’s most successful or most-loved (assumed so because of their high ratings on the App Store), but some photographers will still prefer to simply put together a post through their own blogging platform or to create slideshows through other applications. Even so, it may be getting harder to give up cloud integration with Lightroom.
FINAL CONCLUSION
Everyone’s been waiting for Lightroom 6 for quite some time. For those coming from a standalone application version of Lightroom 5 or earlier, is it necessary to update?
Is it everything we hoped?
It’s not like you have a choice – Lightroom 6 still is the best all-in-one image catalog and editor – but even if it does provide enough reason to upgrade, it also leaves plenty of room for improvement.
I thought about what’s reasonable to expect and what’s not for quite some time. I don’t want to rain on the entire Lightroom parade (and I hardly think my complaints could be characterized as "rain," let alone even as a light sprinkle), but I do think we can expect just a little more from Adobe with respect to everything from performance improvements to improved editing ability within the mobile applications. As I said, it’s great to have an update to some already great software; and the improvements that I personally would like to see are relatively minor.
The increased performance that is included certainly makes it a necessary upgrade for anyone. The HDR and Panorama Merge features don’t hurt either alongside Facial Recognition and the new Filter Brush tool. But I’ll be not-so-patiently waiting (while using Lightroom 6) for some further performance updates come Lightroom 7 (and hopefully earlier) in addition to my very own, special, personal wish to merge images into multiple exposures and add text without having to leave for Photoshop.
Lightroom 6 (the standalone application) can be downloaded from the Adobe website or from B&H Photo for $149. Alternatively, those interested in subscribing to Lightroom CC and Adobe Photoshop CC can do so through Adobe’s Creative Cloud Photography package offered at $9.99/mo. That subscription fee includes free access to Lightroom Mobile, Photoshop Mix, and integration with Slate and Voice for iPhone/iPad. Of course, Lightroom Mobile is available for Android as well.
Are you in love with the new Lightroom 6? Disappointed? Let us know what you think? Have more questions of features you’d like me to test out? Go for it down below in the comments section.
UPDATE: For those who already have the Creative Cloud Photography plan and are in the same boat as me with a slightly glitchy Creative Cloud application on the desktop, you may have an issue where CC shows no updates. For me, a simple quitting and reopening of Creative Cloud got the update(s) going just fine this time.
UPDATE 2: For those that had more issues with finding a way to install Lightroom CC or have it show up in the CC app, go to Preferences in the CC app, sign out, and then sign back in. You should be able to see what you need from there.
Also, those looking for upgrade pricing need to go to the Lightroom CC page, find the Lightroom 6 Buy Now button on the bottom right, select "edit" in the upper right once it's added to the cart, change the version from Full to Upgrade, select the current version of Lightroom that they own, and finally Save Changes and check out. Good luck.
UPDATE 3: Adobe also released DNG Converter 9.0 for Mac and Windows today.
Additionally, B&H Photo Video has a deal through April 23rd (that's only two days, people) on one year of the Creative Cloud Photography plan that includes Lightroom CC and Photoshop CC while saving you $20 on your year-long subscription. Adobe also offers a one-year, prepaid option, but at the exact same cost as a month-to-month plan.
Check out these "Hidden Gems" that weren't so advertised during the release today. While some of these aren't too special, others are REALLY fantastic (like being able to finally move an adjustment made with an adjustment brush!). Now there's not even an ounce of me left that cannot recommend updating. This is just the cherry on top.
https://www.youtube.com/watch?t=32&v=1GZErV1m1uQ


Join the Fstoppers community for free
-
Post comments and join in the discussions
-
Browse the site ad-free
-
Share your work and get featured in the community
-
Compete in the photo contests for fun and prizes
67 Comments
Completely agree (although I just have to take your word for the first part..but I trust you :-)). But they absolutely should do that and let people choose. There's no reason that things can't be 98% the same for the culling and basic edits portion of editing. THEN at the end if you NEED to, there's no problem with switching back to the full-res DNGs/RAW files that you had. I don't get why that's so hard....but I can't do much about it (except to try and convince people to write in to Adobe telling them to do it).
Can anyone help me? I have started using LR 6 with two screens in Windows 7. In the develop module, instead of getting the picture I am working on, I get a blue rectanglewith a cross in white diagonally in it. It seems to be the crop box because I can rotate the picture (or where the picture would be). Likewise with respotting - I can't lose this blue box!
Uh oh. That doesn't sound good. I would contact Adobe's support team about this. You may have found some kind of bug, and it could be caused by ANYTHING. You never know what part of your particular setup is causing it with these things...that's the tough part. Hopefully there is or will be a quick fix for you other than just restarting, reinstalling, etc. (I'm sure that was already tried and not the issue).
Thanlks - I'll get on to them
So.... I signed up for CC and installed LR cc.... But I'm hugely disappointed by the speed... And, yes, I ticked the performance to share the load through the graphics card box.... It now takes much longer to load 1:1 previews, although the initial thumbnails load quite quickly.... Disappointed, as the speed was the only thing i was after :(..... Would I recommend it ?.... so far No !!
I can confirm based on your comment. I disable the GPU acceleration and my Development "Loading..." time was cut in half. 1 second without, 3 seconds with GPU. What's going on here, Adobe? I have a R9 280X OpenGL-supported card. Prefs say
Graphics Processor Info:
AMD Radeon HD Tahiti XT Prototype OpenGL Engine
Check OpenGL support: Passed
Vendor: ATI Technologies Inc.
Version: 4.1 ATI-1.30.5
I'm sorry your speed isn't increasing. I'm still disappointed as well, but it's MUCH better for me, personally (and I've had even more time to test that all by now), than it was with LR 5 in the recent past. That said, there are strange glitches that I've also noticed....like using the backslash - \ - symbol to show the before/after views cause the image to flicker until you go back and forth a few times, copying from previous using command+option+V in the Develop module takes a few tries/needs a minute to load the image to be ready to accept that command...stuff like that. Hopefully that and you're speed issues will all be fixed soon. But I have no idea why it'd be SLOWER than LR 5.... Sorry about that...
Dude! Build your 1:1 previews before culling. Then, you aren't building previews on the fly and consuming even 17 minutes of waiting. As far as GPU, I'm using a modern R9 280X and I can confirm that the core temps don't rise a bit which leads me to believe that it's different code involved with slider responsiveness and general speedups. For example, the Development stack applies all of the sliders as you render. The GPU is only taking sharpening, rotation and a few other floating point calculations off the CPU's back. I suspect CPU parallelization... core 1 do this, core 2 do that. DNG was tiled this way.
Another speedup that's non-GPU is that LR is now stacking exports: no more 1->2->3. It's doing 1/2/3 then 4/5/6 so it can use multiple cores... super great unless you wanted a responsive LR UI. My CPU now hits 95-100% (4790k) for most of the export except for the end when there's an odd number of images left and LR can't parallelize them.
Thank you for the information, I'll try uncoupling the graphic card tick bow, to see if there is any improvement.... Thanks again Sean :)
I am posting this so maybe it will fall into the right hands- Adobe??? Three things I would like to see in LR. I tethered capture with LIVE VIEW. That way the photog working on his own can get the setup right a bit quicker. Floating pallets - I use two monitors and would love to breakl out my pallets. Double watermarks- I post a lot of galleries for my clients. I like to have my own logo/watermark on the images- but also would like to have the file number on the images. This cannot be done to date. Please!
These are VERY specific but also fantastic (and relatively easy, for the most part) suggestions for Adobe to implement. I imagine there are quite a few people that don't care about ANY of what you're suggesting (which is why you haven't seen that change); but I'm sure that there are PLENTY of people just like you who'd like that same flexibility. Adobe? Are you reading? Help our readers (your customers) out! :-)
Great Article! I wish it boosted the performance for the 27" iMac w/ 5k display. Its certainly an improvement but I am sure it will get better with updates.
Exactly how I feel (and what I hope). :-)
Adobe put HDR up on a pedestal with this release and made it sound like it was the greatest feature as part of the upgrade. Got to say the results are lackluster and have even pissed off some HDR enthusiasts (See Trey Ratcliff's hashtag: #WTFAdobeHDR)
I think what has to be kept in mind is that it's still fairly basic. You don't have a ton of features with Adobe's HDR in Lightroom 6... HDR enthusiasts, I'm sure, will still prefer to use Photoshop and/or 3rd-party solutions as they have been (it's hard to beat something BUILT for HDR)... But for those who are beginners or want a bit more here and there, it's a nice feature to have in LR6, I suppose....
True. But there are really no features within the HDR dialog box beyond align and deghost. It does give you range in your exposure and obviously you can make any adjustments you could before in the Develop module, but those true HDR adjustments in software like Photomatrix are still missing. It is a step in the right direction though for LR.
I'm in the process of installing LR6 right now and am hoping for some performance gains that you mention in the article.
That said, there is a trick in LR5 that I found online that can really improve older versions and perhaps further speed up LR6 since I see the option is still there.
Simply build 1:1 previews on import or let the machine process them while you do something else. In Library mode, Library > Previews > Build 1:1 Previews
I use a seriously sucky old HP i5 laptop that is more than 4 years old now with 8gig of ram. This process made LR5 more or less usable for selecting / culling even on this machine. It spends quite some time building the previews. But at least once that is done it makes culling much, much faster. While it's building the previews I can do something else which speeds up the overall workflow from my time perspective.