
Every photographer has been there. You're at a dimly lit wedding reception, a moody concert venue, or walking the streets at night, and your camera is begging for a tripod. But tripods aren't always practical, welcome, or even permitted in these environments. The good news is that you don't need one. With the right combination of technique, body mechanics, and smart camera settings, you can consistently capture sharp, usable images in challenging low-light situations without any support gear.
This isn't about luck or hoping for the best. It's about understanding the mechanics of camera shake, knowing how to work with your equipment's limitations, and building a systematic approach that turns difficult lighting into an opportunity rather than an obstacle. Here are ten essential techniques that will transform your handheld low-light photography.
1. Adopt the "Tuck and Brace" Stance
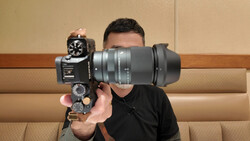
Your body is your tripod, and like any tripod, stability comes from proper form. The tuck and brace stance is the foundation of sharp handheld photography, and it's surprising how many photographers overlook this basic principle. Start by tucking both elbows firmly against your ribcage, creating a solid connection between your arms and your body's core. Your dominant hand grips the camera body while your non-dominant hand supports the lens from underneath, cradling it with an open palm rather than gripping it from the side. This support-from-below approach is critical because it creates a stable platform while allowing you to make smooth adjustments to focus and zoom. The next part is equally important: use the viewfinder, not the back screen. When you press the camera against your face, you create a triangular support system with three points of contact (two hands plus your head), which is inherently more stable than holding the camera away from your body. This simple shift in posture can easily gain you one or two extra stops of stability, which is the difference between shooting at 1/60 s versus 1/15 s.
2. Master Your Breathing Technique
3. Know the New Reciprocal Rule
The traditional reciprocal rule (shoot at 1/focal length or faster, so 1/50 s for a 50mm lens) was created when sensors had far lower resolution. Modern high-megapixel cameras magnify every tiny bit of camera shake, making that old guideline dangerously optimistic. The new reciprocal rule is simple: double it. For a 50mm lens, start at 1/100 s. For a 200mm lens, think 1/400 s. This updated baseline accounts for the increased resolution of modern sensors and gives you a much more reliable starting point. Of course, this is still just a guideline, and many factors can push you faster or allow you to go slower. Image stabilization, your personal steadiness, the weight of your lens, and whether you're using proper bracing technique all play a role. But as a baseline for when you're unsure, doubling the traditional rule will save you far more shots than it costs you.
4. Set a Minimum Shutter Speed (The Pro's Secret)
5. Use Burst Mode to Stack the Odds
6. Activate and Understand Your Stabilization
In-body image stabilization (IBIS), lens-based stabilization (IS, VR, VC), or a combination of both can be worth three to five stops of stability, which is absolutely transformative in low light. Modern cameras like the Nikon Z8 and Sony a7R V offer exceptional IBIS that genuinely delivers on those stability claims. But here's the critical thing many photographers misunderstand: image stabilization only corrects for camera shake, not subject motion. This means that IBIS will allow you to photograph a still subject at 1/15 s with a 50mm lens and get a tack-sharp result, but if your subject is walking, gesturing, or moving in any way, they will still be blurred at that shutter speed. The practical application of this knowledge is important. Use your stabilization to lower your ISO for static or mostly static subjects (portraits where people are standing still, architecture, product shots in dim lighting), but don't rely on it to freeze motion. You still need fast shutter speeds for that. Understanding this distinction prevents the common mistake of shooting too slow for the situation just because your camera has stabilization. Also worth noting: some older stabilization systems can actually introduce blur at very fast shutter speeds (1/500 s and above), so check your lens or camera manual to see if you should disable stabilization when shooting action in good light.
7. Use the Viewfinder, Not the LCD
8. Use Your Environment as a Brace
You don't need a tripod if the architecture around you becomes your support system. Anytime you can press your body or elbows against a solid, immovable object, you dramatically reduce shake. Lean your shoulder into a wall or doorframe. Press your elbow against a pillar. Rest your camera hand against a railing. Even sitting down and bracing your elbows on your knees provides significantly more stability than standing unsupported. The key is to make contact with something that's firmly anchored and won't move. A wobbly table won't help you, but a concrete column will. Get creative with this. Street photographers often lean into buildings. Wedding photographers brace against walls during receptions. Concert shooters press into barriers. This is free stability that requires no gear and no setup time, just awareness of your surroundings and a willingness to use them.
9. Enable Electronic First-Curtain Shutter
10. Don't Be Afraid to Raise the ISO
Here's the truth that every professional low-light photographer knows: a sharp, noisy photo is infinitely more valuable than a clean, blurry one. Noise can be reduced in post-processing. Artificial intelligence-powered denoisers are astonishingly good at cleaning up high-ISO files. But blur cannot be fixed. There is no "unblur" slider that magically recovers a soft image. Modern sensors, even in crop sensor and micro four thirds cameras, produce usable images at ISO 6,400, 12,800, and often 25,600 or higher. Of course, fast glass helps immensely. Lenses like the Sony FE 50mm f/1.2 GM or even more affordable options like the Canon RF 50mm f/1.8 STM give you extra light-gathering ability that can keep your ISO lower. But even without ultra-fast lenses, modern sensors are remarkably capable. Yes, there will be noise, but the image will be sharp, the moment will be captured, and you'll have a usable file. Too many photographers sabotage themselves by being precious about ISO, dropping their shutter speed too low in an attempt to keep the ISO under some arbitrary number like 3,200 or 6,400. This is backwards thinking. Your first priority is sharpness. Always. If that requires ISO 12,800, then shoot at ISO 12,800. You can always add grain for aesthetic reasons, but you cannot add sharpness that was never there. Make peace with high ISO, and your low-light photography will immediately improve.
Conclusion
Mastering handheld low-light photography isn't about owning the most expensive camera or the fastest lens, though those things certainly help. It's about understanding that sharpness comes from a system of interconnected techniques, each one building on the others to create consistently reliable results in challenging conditions. The photographer who combines proper stance, controlled breathing, smart camera settings, and a willingness to embrace high ISO will outshoot the photographer with better gear but poor technique every single time. These ten tips aren't theoretical concepts or nice-to-have extras. They're the practical, field-tested methods that working professionals rely on when failure isn't an option, when the moment happens once and won't repeat, when the light is terrible but the shot is essential. Start by implementing just two or three of these techniques in your next low-light shooting situation. Pay attention to which ones make the biggest difference for your particular style and equipment. Then gradually incorporate the others until they become second nature, automatic responses rather than conscious decisions. With practice, you'll find yourself confidently shooting in situations that once seemed impossible, capturing sharp images in darkness that would have previously sent you reaching for a tripod or heading home empty-handed. The ability to work handheld in low light is a superpower worth developing.


3 Comments
A must read for knowing before you try. If there is light you can capture with out a flash.
I've found the breathing approach Alex describes here to be a great help, and I learned it from an unexpected place: My father, in his younger days, was a competitive marksman at a pretty elite level. What he taught adolescent me at the rifle range translated directly into the way young reporter me handled my first long lens.
He said the squeeze on the trigger should be so gradual, so much the opposite of a "jerk," that it should even surprise you a little. That works with a shutter release too. Of course, in either kind of shooting, there are "shots" where you can take your time and ones where you can't.
The direct bone support ("tuck and brace") part applies, with small variation, across the two disciplines as well. And before anyone gets qualms at the parallel, we're talking here about punching holes in paper. :)
To test my handholding skill, or lack thereof, I put the camera in Spot AF, with 400-500mm lens, AF on a small distant subject, and see how steady I can hold that AF point in place without movement.
While it may differ for others, I discovered that holding the camera / VF slightly forward, rather than flat against my face resulted in far less movement.