
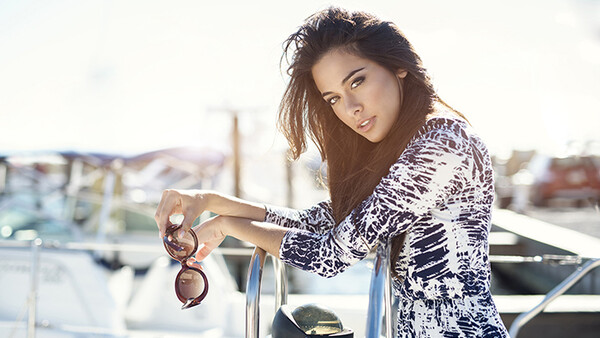
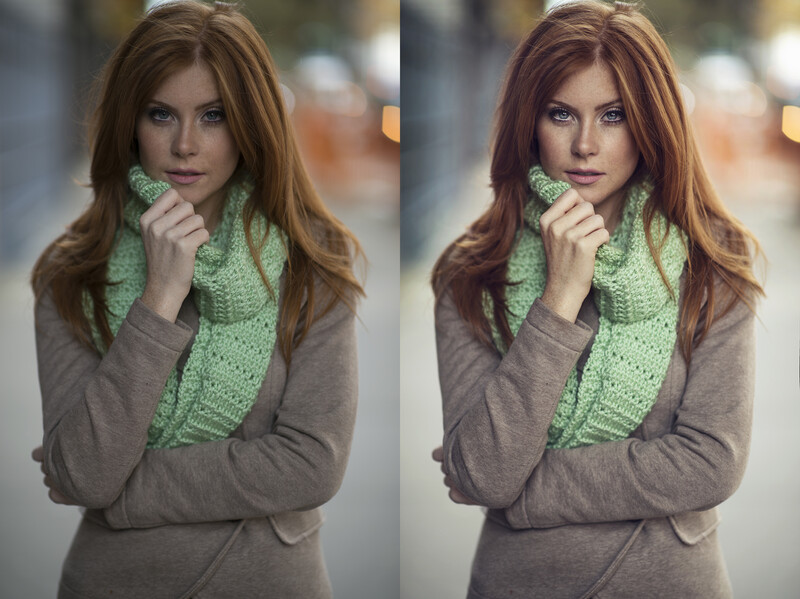
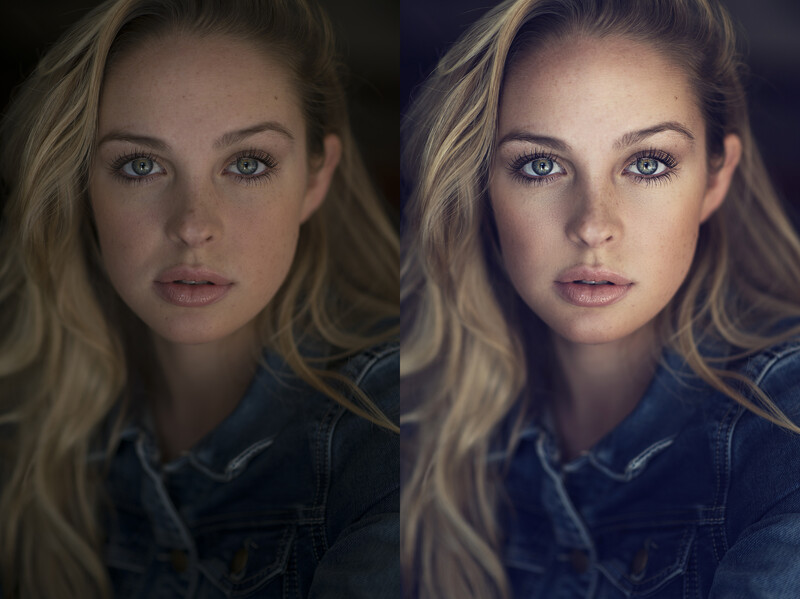
One of the most noticeable differences between portraits taken outside using natural light as opposed to artificial light is the background. Images using artificial light tend to have darker backgrounds. This is crucial in catching the eye of the viewer and allows him or her to focus on the subject. This article is a guide in achieving this look using natural light only.
In most cases when shooting portraits with natural light only, the background comes out very bright. Technically speaking, when taking a photograph using natural light, the exposure is generally set for the subject’s skin tone, which is typically darker than the background. If achieving that dark background and having perfect lighting on the skin is important, the key is to underexpose the image. This will not only result in perfectly lit skin but it will also help retain the most detail. It is a lot easier to recover shadows than highlights. Contrary to popular belief, bringing out details from an underexposed RAW file does not mean creating noise when it’s done properly. In this day and age, any DSLR on the market can handle bringing out details from the shadows without creating noise. Using the following steps, it is guaranteed to walk away with phenomenal results.
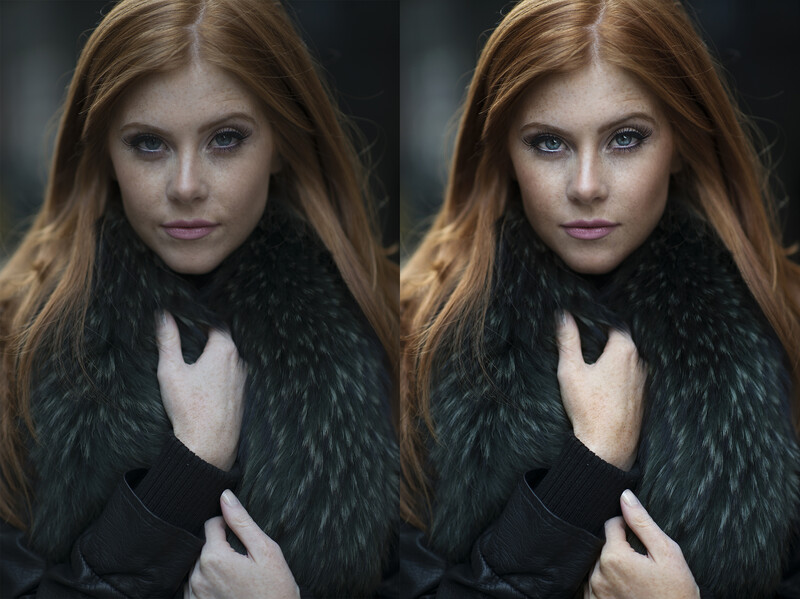
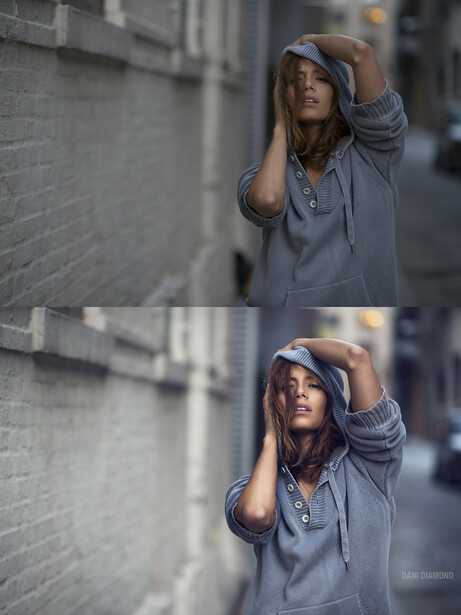
Before I get to the steps, it is important to address a popular concern. Have in mind when looking closely at the final results; the subject continues to look underexposed. Parts of the skin were lightened to make it appear properly expose. This draws the viewer straight to the subject’s face, as it is the brightest part of the portrait.
Why Not Just Get the Exposure Right in Camera?
Technically, underexposing IS getting it right in camera. If the goal is to achieve that dark background that generally only comes with artificial lighting, it is less work in post-production to lighten the subject. There is no argument here; the skin makes up 10% of the image and the background is 90%. Lightening the skin is undoubtedly easier than darkening the background in post. Read on to learn why.
When shooting, it is important to shoot RAW. This file type contains all the extra information in the shadows. It’s possible to using Adobe Camera Raw or Lightroom, to brighten the shadows and make light pop. Personally, the main slider I use is the Shadows, Whites, Clarity and Luminosity ones under the HSL tab. Remember that underexposing the image and not properly lighting the subject are two completely different things. In order for this process to work, it is essential that the subject is properly lit. If the light hitting the skin is soft and evenly, brightening in post will be absolutely no trouble at all. When capturing the image, stay conscious of the light and the direction it is coming from. Once the subject is properly lit, underexpose the image SLIGHTLY.
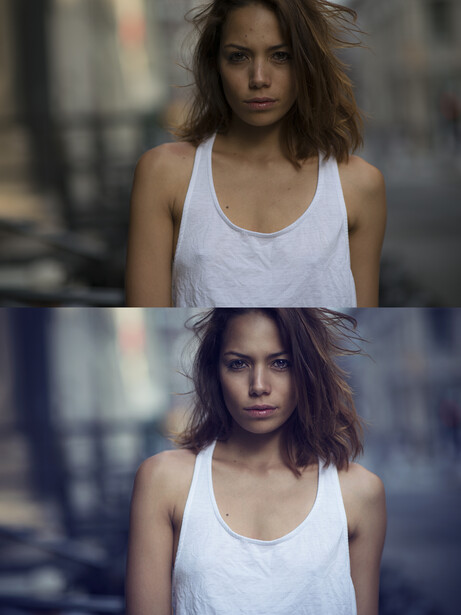
Underexposing an image is no specific science. It varies from image to image, subject to subject and background to background. The best suggestion is to look at the images as they are taken and concentrate on the highlights. The goal is to avoid any blown highlights. If the highlights are blown, you can kiss the skin detail goodbye. Unless having overexposed Barbie skin is the objective, blown highlights should be avoided at all cost. In some cases, the background might have blown highlights like a sun flare or the sky. In instances such as those, overexposed pixels are fine.
An underexposed image makes dodging and burning three times easier. It’s a lot simpler to lighten the highlights on the skin than to darken the entire skin. When working with a darker complexion, shaping the skin and structure of the face is so much simpler too. Dodging and burning is vital if you want to have the perfect light in the final results.

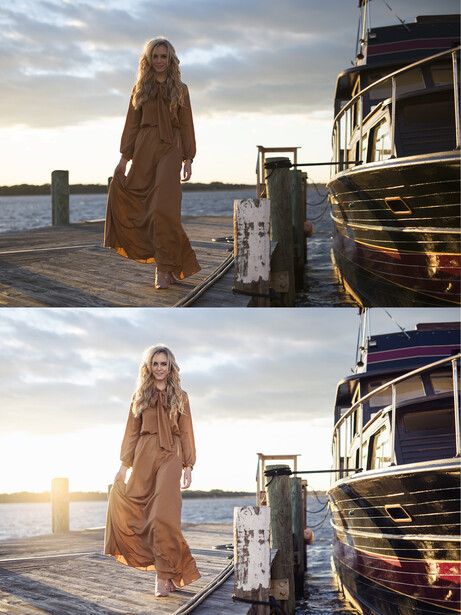
I find the best setting for this method is to use Aperture Priority. I then override the camera’s auto settings by using the exposure compensation and underexposing with a few clicks. Every DSLR has this setting. I prefer to concentrate on the composition, light, pose and expression instead of wasting time and effort shooting in manual.
Using strobes is a fantastic method for lighting. I applaud all those who do it and do it well. However, I believe that when using strobes there are extra complications that can override a lot of the creative process. There is always a time and place for strobes. But when using natural light there is no need for an assistant, time is spent on composition, expression and communicating with the subject. As always, the methods used depend on a variety of factors. With this method of underexposing, using lights, reflectors and assistants is unnecessary to achieve amazing results. Natural light is quite powerful, one must take their time to master it and apply the correct methods for mind-blowing results.
Other before/after combos can be found on Dani Diamond Photography

Join the Fstoppers community for free
-
Post comments and join in the discussions
-
Browse the site ad-free
-
Share your work and get featured in the community
-
Compete in the photo contests for fun and prizes
186 Comments
Because it's being presented as 'advice' Daniel, rather than merely as something that works for him. It is demonstrably BAD ADVICE to encourage people - especially those without a D800 - to deliberately underexpose their images.
No, it's not bad advice. You simply don't agree with it. There is no reason for an accomplished photographer to not share his technique that works well for him. You're doing the same thing. How about you go write up an article rather than taking such an aggressive stance against this? This whole "there is only one right way to do things and anyone else who does it differently is wrong and has no place giving advice" spiel that you've been on is extremely arrogant.
Do you understand the benefits of ETTR Daniel? If you do, then how can you say that encouraging people to deliberately underexpose a digital file is *not* bad advice? It's a bit like encouraging people to chop their foot off to 'cure' an ingrown toenail...
Once you underexpose then that shadow data which wasn't recorded in the RAW file is gone. Forever. Not recoverable. Ever.
if there was *no other way* of achieving the effect seen in the OP's examples, then of course he could argue that underexposing was simply a means to an end; but that's not the case here. Exactly the same effect could be achieved by exposing optimally, globally pulling the exposure down in LR/ACR and then pulling back the exposure on the subject selectively.
I get that there is a technically correct way to do it. There is a technically correct way to do any craft like this. That being said, artistic license also needs to be considered. If Dani's results weren't good, only then would I question his methods. Everyone does things differently, and you can't ever change that. Just accept it.
Have you seen his work? Seriously..Stop hating on his technique..How is he flat lighting with natural light? It depends on the direction the light is coming in..Natural light is not always flat..Move on already Stefano
Nobody's 'hating on' the technique Chris; but the so-called 'advice' is very bad for the vast majority of DSLR owners, and I certainly have a problem with that.
For any technique if you are not doing correctly it will look like a patch up job. 90% of my work is done with natural light and I have been using this technique to achieve the results. Like Dani has shown his results, (which is proof in itself) you will see I am able to retain all the details necessary using this method www.armantphotography.net.
I don't think there is any use in trying to argue. Stefano see's only his way and anything else is "wrong" to him.
There's one reason he was against with that technique... He is probably a Canon shooter. Most Canon DSLRs have those kind noise problem in shadow area. After I made a switched to Fujifilm System from Canon, Underexposed technique was the best way to do it cause highlights get clipped where it not easy to recover and it doesn't get noisy at low iso like the Canon type. So, if shooting on Canon, they do it by overexposed the image while with other brand, we do it by underexposed the image. so there's no right or wrong about Dani's technique, it really depends on camera model and technology. There's another guy who highly recommended underexposed image for general type of photography:
check it out, highly recommended for Fuji shooters, it should work for Sony, Nikon shooters and maybe others...
http://www.fujirumors.com/exposing-right/
Rico Pfirstinger stated:
ETTR is often misunderstood as “overexposing” an image, then correcting the exposure by “pulling the brightness back down” in an external RAW converter like Adobe Lightroom.
there's another guy who underexposed an image and then add some exposure back up, he said he did this to not lose cloud details (preventing it from clipping) and he is a Canon shooter. https://iso.500px.com/aging-storm-outdoor-portrait-tutorial/
Wow, that photographer has some really beautiful work.
The article says, "In most cases when shooting portraits with natural light only, the background comes out very bright. Technically speaking, when taking a photograph using natural light, the exposure is generally set for the subject’s skin tone, which is typically darker than the background."
That's NOT the case in this image -- or in "most cases" for that matter -- so my question to you is, why wouldn't you just do like any professional portrait photographer and shoot in open shade, using a reflector to pop light into the subject's face?!
I feel like you're probably spending more time at your computer in post if you'd just friggin' light and expose your subject correctly in the first place.
Literally, the same end result would be achieved in less time.
Sometimes exposing to right means blown highlights in the background which you can't recover nearly as easily as shadows. That's the point he's trying to make in the article. Clearly you didn't read the article thoroughly.
Where did I suggest blowing highlights Albert? I specifically said that in *some* cases underexposure is unavoidable to ensure that highlights aren't clipped. However, the OP is trying to tell us that we should *always* underexpose simply to start out with a darker background! This is palpable nonsense as anybody who understands how data is stored in a RAW file will immediately tell you.
I was going to type up almost exactly what you did. Well said. Shoot to the right and lower the exposure if using lights is really not possible.
My thoughts actually. Even though i love Dany's work, and the images are great, i bet my 6D would not get that shadow detail. I would get muddy details and noise all over the place.
I've been using ETTR for a while now, and it works fine on Canon sensors. For Nikon ones, this technique is awesome, and works like a charm.
I used this technique for a while, and get good results from it, but have found that for me personally I get better results by exposing it "properly" (I say proper exposure in a subjective way, because I understand that my idea of a proper exposure isn't ideal to everyone), and then pull the exposure down in ACR, then apply my dodge and burn technique in PS.
That being said, I don't think anyone can argue with your results and say it's not the right way to take world class portraits, it's just one of a handful of ways to. Clearly what you are doing is the right technique for you, and your results are just impeccable. I have to ask because you don't mention it in the article, but do you also use a curves and selective color adjustment layer to get contrast and color adjustments for your final results?
I really admire your work. I've always shot in M mode, and found that it can be a bit distracting, so I am definitely going to try and give AV mode a chance and see if it helps me focus on other aspects of my photos. This is a great article! Thank you for writing it.
Usually I apply more contrast with curves and then do subtle dodging and burning. I'm going to try giving your method a try a few times and see if I like it better. Again, great article. I'm glad to see an article that touches on the subject of natural light in a positive way, and you certainly have the skill to prove a great point.
I've got some in my portfolio. I wouldn't feel comfortable posting my images in the comments of your article.
If it wasn't for all these examples I probably would have disagreed with Dani's method but clearly I would have been wrong. This guys work is off the hook.
Have you seen his RAW files Albert, or are you just looking at the final cleaned-up images posted here? Don't get me wrong - the final results look very nice, but the method suggested for achieving them is most certainly NOT optimal in terms of capturing and preserving the greatest possible amount of data in the RAW file. What happens, for instance, when the subject is dark skinned and wearing all black? If you underexpose that then you will lose a heck of a lot of data (ie. detail) in the darkest shadow areas. And when I say "lose" I mean LOSE - that's not something you can "pull back" because it was never there in the RAW file in the first place. Whereas, by contrast, if you ETTR the same scene you could potentially get another stop (or even two, depending on the scene) of usable shadow detail on the subject, and that's going to be a big help when you come to retouch those super-dark areas where you still want plenty of detail.
I've never understood the reasoning behind looking at the RAW files. The final product is all that should matter. I think everyone would be greatly unimpressed with say Ansel Adams or Annie Leibovitz if they saw their RAW files. IMO the final image is all that matters.
What the OP wants to do is his own business and yes, as far as he (and apparently his supporters) are concerned, of course the final result is all that matters. He could shoot all his stuff at -6EV with a 1mp P&S for all I care as long as it makes him happy!
What concerns me though is that his *preference* for underexposing his files is being presented here as *advice* for people who might not know any better. I hate to think how many people will end up with noisy, blocked up files as a result of this so-called 'advice', If it were presented as "this is what I do but I wouldn't recommend it for everybody as it's not technically the best way to expose your files" then I would have no problem with it; but it's not, and that I do have a problem with.
Maybe I just don't think it is that bad. I'm sure doing it Danni's way still leaves much cleaner shadows than what we were doing with D200s 8 years ago (or D700s even sooner). 99% of the images taken these days are for web where no one will even be able to tell. For those 1% who are actually printing and printing large, I'm pretty sure they have a system all their own that produces good results too. I guess my point is no one will every really even tell in the end. The prints we have of Ansel are probably grainy and copies of copies but the general public doesn't even notice it and just enjoys the art for what it is.
Funny that you mentioned Ansel Adams because he was the one who created zoning system. He would expose for shadows (deliberately overexposing the frame) to place the shadows in desired zone. Then he would measure highlights area so he could "recover" the highlights during development by shortening the process by calculated time.
All that matters is final result but if Ansel didn't expose and develop the way he did, no one would be impressed with his final image.
Wow great stuff here, Fstoppers needs more writers like this guy.
Nailed this one Dani
I suggest please, change the title, strobe lighting is totally different technic and photograph style that people are using. The title that now is kind of exaggerate...
Yeah, read the article...still not selling any strobes.
Clearly there is no one ultimate way to expose a photo. The tip stresses the ease of the process at the time of shooting while taking into account the post processing that is intended. This method needs to be tested before being judged as bad advice.
On that note, anyone can say that the results posted above are just "wow".
<-- Now waiting for the next tip that will come from Dani
Sorry Ryan, but the *optimum* exposure for a digital image is always obtained via ETTR - that's just a technical fact. While you may *choose* to needlessly underexpose if you wish (although I still don't understand why anybody would wish to), this will always result in less data (and hence less shadow detail) in the RAW file. There's no getting away from that. Underexposing only makes sense in a few very limited scenarios where you absolutely have no other way of holding data in the highlights without clipping. See this excellent article for a full explanation of why ETTR is the best option 99% of the time. http://www.luminous-landscape.com/tutorials/optimizing_exposure.shtml
I read this article and scratch my head... I mean it does work for you, at least for the web-sized pictures but why do it this way? By underexposing you are loosing lots of data and you have lower SNR to work with.
Instead you can take the picture for the highest amount of data and reduce exposure in ACR and continue from there like you normally would. The concept is as old as photography - expose for shadows in film and "expose to the right" in digital world...). Of course if you have bright bg you need to make some sacrifices preserving as much data as possible(and perhaps use reflector or flash for fill).
Regarding camera settings... Again use what you feel comfortable with but...
If you set camera to "manual" you can concentrate on the composition, light, pose and expression and not worry that white or dark piece of clothing or background color will throw off your in-cam light meter and you will end up with even darker underexposed picture.
"Easier to brighten a shadow than darken a highlight"? I haven't read so much nonsense in a long while. Have you not discovered the "highlights" slider in ACR yet Dani? I suggest you give it a try.... ;)
Thanks Dani. If you haven't read it yet, check out this excellent article for a full explanation of why ETTR is the best option 99% of the time. http://www.luminous-landscape.com/tutorials/optimizing_exposure.shtml
In the article you write, "It is a lot easier to recover shadows than highlights."
Not true. More on that in a bit.
"Contrary to popular belief, bringing out details from an underexposed RAW file does not mean creating noise when it’s done properly. In this day and age, any DSLR on the market can handle bringing out details from the shadows without creating noise."
While somewhat true, that's just testament to how far sensors have come over the years in their dynamic range capabilities. However, it still doesn't reflect how sensors process images by design.
That link Stefano provided is a *perfect* read on the subject, even for today's DSLRs. If you're having trouble recovering the highlights, then you're exposing TOO FAR to the right. Try turning on your blinking highlight warning on your camera.
Dear Dani, happy holiday!
First off, let me tell you that im a big fan of your work which inspires me. Your photo & post production skills are phenomenal and one day i hope to reach that level.
That being said, and i hope this wont be taken badly, I do tend to agree with people mentioning that exposing to the right is more technically correct. By laws of physics and electronics, digital sensors are made to retain much more detail in the highlights than in shadows, hence if you open up the shadows, even slightly, you do in fact loose some of the details vs bringing the highlights down. The "Practical Zone System for film and digital photography" book, has a whole chapter explaining this with examples and an appendix section that goes into the technical aspect. The first image shown is from a screenshot of the book. (a) shows the image when corrected after being underexposed and (b) shows the image corrected after being overexposed. The second screenshot is a representation of the density of information in highlights vs the shadows. Observe how much more detail there exists in highlights.
One way to test this is to adjust levels in order to correct an underexposed image and do the same with the overexposed version of the same image. You will notice many more pixel gaps in the histogram vs adjusting an overexposed image. These gaps are simply absence of information which are shown as banding or posterization. This is greatly affected by the bit depth of the RAW file. Higher bit depth = more condensed histogram offering much more room to stretch without breaking its continuity (inducing banding).
This may not be so obvious when retouching an image but having side by side the same image having the histogram corrected with the 2 different methods, you will notice a clearer, less mushy image for the overexposed one vs the underexposed, especially in the mid tones and shadows.
Lastly, as technology advances this is less evident in modern bodies but i think its always a good practise to retain as much detail as possible even this is just a fraction more by making these small changes.
Merry Xmas to everyone!!!
Agreed. Underexposing always results in less data (and particularly less shadow detail) in the RAW file, even if it's not immediately obvious.
Different style and different lighting scenario but an example of recovering from +1EV overexposure.
In studio I always overexpose 1EV because there is no risk of burning highlights and pushing data to the right gives me smoother gradients.
Very different light scenarios... Its a very widespread to slightly overexpose images in studio. There are no doubts on this.
But dont you think that there are some differences with shooting outdoor with natural light and shooting in studio?
I dont really see any problems with slight underexposing on modern Nikon and Sony cameras.
And talking about less data. Can anybody tell me what should be the size of prints that you can notice a loss of data?
I wasn't proving the point here. Dani asked for example of "darkening a highlights" so all it is here.
When we do talk about data it is like arguing between jpgs and RAW.
There was a time that everyone kept saying how one does everything right in camera... You can do everything "right" in camera and still have 12 or 14bit RAW file for unforeseen situations etc.
Dani's technique works for him and he shoots amazing stuff. Undeniably.
I think only the part of underexposing is unnecessary and it is actually a waste of camera's capability.
What, I think, Dani is concerned about is the "specular" highlights that are easily overexposed and when he tries to darken the image those highlights are troublesome. I think it is better to treat it on case-by-case basis and still try to keep the histogram as much to the right as possible without blowing out those highlights.
and regarding the print size. It can be 4x6 if you have a blue sky in the background or other type of gradient, you may see bad posterization (banding). I assume you know basics about digital photography and I will skip explanation what causes the banding.
Excellent article! Such a simple tip, yet so practical and powerful when utilized correctly.
Great write up. most article on natural light portrait include the use of a reflector, which then required an assistant
I'm very dissapointed with all those bad reactions to this article...
There were very good point about Nikon and Canon capabilities in terms of DR to do this flawlessly. That was a very good point. While I dont know much about Canon coz I'm Nikon shooter. I have to say, even with my cropped (not FF) Nikon D7000 I'm capable to use this technique without loosing in quality. For that I just need to do all right.
I'm sure all you readers need to get this info in a right way. It is not a mathematical formula to be applied always and in all circumstances. Its just a very good technique for those moments when you need it because of some conditions or circumstances.
Thanks, Dani, for posting this! Its good to know that there are more people who do it this way.
Andrew, underexposing only makes sense in a few very limited scenarios where you absolutely have no other way of holding data in the highlights without clipping. See this excellent article for a full explanation of why ETTR is the best option 99% of the time. http://www.luminous-landscape.com/tutorials/optimizing_exposure.shtml
Stefano, you're trying to convince me know and your argument is an article in which the author takes photos of cats and corn fields with his Fuji X100...
Sorry, but we're talking here about shooting portraits...
I know about ETTR, but I'm sure you need to think wider. As I mentioned, there are maybe some differences with Canon/Nikon/etc... I dont know for sure, so maybe.
But overall, this is a really good tip with all its obvious pros.
Just try it.