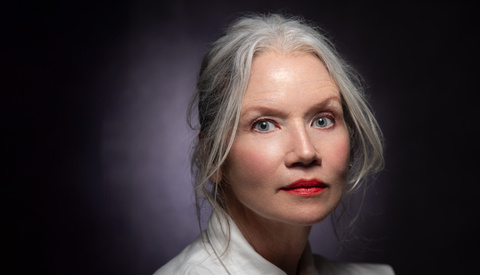
How to Edit Portraits Using Lightroom, Photoshop, and Nik Collection
Knowing how to quickly achieve professional results without sacrificing quality is crucial when editing portraits, especially when you have limited time. Here's how to do it.
Street photography has grown hugely in popularity over the past couple of years. For me, it’s become one of my favorite photography genres because it’s easy to do, a lot of fun, and so accessible. Most of us live in or near a large town or city, so a spontaneous outing is feasible without planning. I like that. And you don’t need a lot of fancy, expensive gear.
So, paying attention to light direction is vital. And by the way, I have used studio photographs in several instances here because they more adequately illustrate the concept I am discussing. The point of that, of course, is that concepts and principles cross genres of photographic work. They are basic principles.
You're set to capture something amazing with your camera, but where should you begin? Without a clear process, it's easy to rush, overlook details, or end up with photos that miss the mark. Let’s outline a simple, repeatable approach to help you slow down, capture more, and make each shot count.
Telephoto lenses aren't always the first thing you think of when photographing landscapes, but they're crucial if you want to simplify scenes and highlight what's truly compelling. Landscapes aren’t just wide, sweeping vistas—they’re also about selecting elements that tell a clearer story.
Learning how to use masking in Lightroom Classic unlocks precise editing possibilities, allowing you to enhance specific parts of your images independently. It’s a practical skill that transforms your workflow and improves photo quality.
Composition is more than following rigid rules or ticking boxes on a checklist. Understanding composition means expanding your toolkit, so you can intuitively capture striking images in any scenario.
Seascape photography isn’t just about showing up at the right location with good light—it’s about knowing exactly when to press the shutter. Capturing the ocean in a way that feels dynamic and intentional isn’t just about where you stand—it’s about when you click the shutter and how long you leave it open.
Giving your photos a striking and moody style isn't complicated if you use Lightroom effectively. In this tutorial, Möhrle shows you exactly how to achieve a dark silver look—a cool, dramatic effect that emphasizes your subject while adding depth to the image.
Have you ever come back from a shoot using your 50mm lens, only to find the images feeling slightly off, but you can't pinpoint exactly why? Understanding how to use this popular lens correctly can drastically improve your photography results.
Knowing how to quickly and effectively adjust your photos in Lightroom can significantly improve your final results. Getting the basic sliders right means your images look natural, realistic, and closer to what you saw when taking the shot.
Lately, I’ve been reflecting on my own journey in photography, questioning why progress sometimes feels stagnant. After speaking to a few industry experts, I have come to realize that there’s an awkward stage every creative reaches. A plateau where inspiration seems to dry up, and even slight growth feels like an impossible uphill battle. The more I think about it, the more I realize that this plateau isn’t just about skill or talent but about two fundamental limitations involving effort and money. Both demand deeper commitment, and without that, breaking through the stagnation feels impossible.
People may be scrambling to find the automated AI holy grail of one-touch, realistic, high-end skin retouching, but you can have my dodge and burn technique when you pry it from my cold, dead Wacom tablet.
Photo editing can seem complicated, with endless techniques and software tools competing for your attention. Yet, at its core, successful editing comes down to mastering foundational skills that simplify your process and elevate your results.
Photography can be simplified down to the art of capturing light, and we all learn to capture that light correctly for perfect exposure. But what if that is actually hurting our creativity and work? This advice changed how I take photos.
Adding atmospheric elements like fog can transform a flat image into something more dramatic and immersive. Lightroom Classic now offers better tools to create and control fog, allowing you to shape the mood of an image without needing perfect weather conditions.
Macro photography opens up a world of detail that often goes unnoticed. Small subjects like fungi, moss, and intricate textures can turn into striking images when framed properly. But working at this level presents its own set of challenges, from finding the right focal length to dealing with distortion in certain lenses.
If you want to learn how to get better colors in your photos, then this video by Todd Dominey is for you.
Finding the right conditions for photographing forests can make or break an image. Fog, light, and composition all play a role in transforming a chaotic scene into something visually compelling. If you’ve ever struggled to create strong forest images, focusing on these elements can help.
Giving away a book for free might seem like a strange decision. After all, writing a book takes months of work—planning, researching, writing, editing, and refining. Then there’s the effort that goes into designing the layout, selecting images, and making sure the final product is something worth reading. So why give it away when I could sell it?
Places of emptiness and desolation might not immediately demand the attention of the photographer, but they have a haunting beauty that is all too easy to overlook. For one landscape photographer, the quiet magic of these neglected spaces has often been the source of his inspiration.
If you’re only making quick adjustments with auto settings or exposure sliders, you’re missing out on Lightroom’s most powerful tools. Understanding how to work with tone curves, masks, and color adjustments will push your images to the next level.
Lightroom and Adobe Camera Raw give you plenty of powerful tools to enhance your images, but some adjustments can do more harm than good if used incorrectly. Over-processing is easy to spot—crushed shadows, unnatural contrast, and an artificial look that takes away from the image instead of improving it. Three sliders in particular tend to cause the most damage when misused.
The tone curve in Lightroom is a powerful tool for adjusting the exposure and tonal balance of your photos. Mastering this feature can help you achieve more refined edits, creating a polished, professional look.
Editing a sunset photo involves more than just increasing the brightness or contrast. It's about enhancing the mood and bringing out the rich, vibrant tones that make sunsets magical. Using Lightroom, you can transform a good photo into something extraordinary with a few precise adjustments.
Adding contrast can transform an image, but it often changes more than just light and shadow. It also affects color saturation, sometimes in ways that don’t look natural. Understanding how to manage this is key to creating polished images without overdoing it.
High-key photography is a powerful way to create bright, dreamy landscape images with minimal shadows and a soft, low-contrast feel. Winter is the perfect season to experiment with this style, as snowy scenes and overcast skies provide a natural foundation for high-key aesthetics.
Lighting can make or break your photos. It’s one of the most important elements to get right, yet it’s also one of the most common areas where mistakes happen. By understanding a few key missteps, you can improve your results quickly and avoid some of the pitfalls that hold many people back.
Reflecting on your work and setting intentions for the future can transform the way you approach photography. With a new year comes an opportunity to refine habits, focus your energy, and work toward meaningful progress in your craft.
Creating depth in your images can transform a flat photograph into something visually compelling. Here's how a good Lightroom edit can do that.
The end of a year and the beginning of a new one is the perfect time to reflect on your photography progression and think about the year ahead. What will you work on improving? How will your approach change? The five tips offered in this video will help you have a strong start.
As the holiday season approaches, the towns and neighborhoods in my neck of rural Utah light up with the magical glow of Christmas lights, presenting a wonderful opportunity to capture dynamic scenes that are heavy on holiday vibes.
Prime lenses are known for their stunning image quality and shallow depth of field, but they can be prohibitively expensive. If you're using a zoom lens, you might wonder if it’s possible to achieve similar results without the hefty price tag. This video explores how to create prime-lens-like subject separation by mastering four key concepts.
Photographing the landscape can be hard work, at times very hard work. It entails rising well before daylight in most cases and working in sometimes very harsh conditions. Most of the time, you will be out in the woods until well past dark, waiting for just the right moment, which may not come—even after your most valiant efforts. It makes sense, then, to do everything you can to stack the odds in your favor. Here are some thoughts on that.
Holiday lights and festive displays offer a unique opportunity for creative image-making. Capturing them in busy public spaces, though, can present challenges with crowds and distracting elements. By using advanced techniques like stacking multiple exposures and editing in Photoshop, you can achieve clean, polished results while preserving the vibrancy of the scene.
When Adobe updated Lightroom Classic, they introduced a feature called Content Credentials. This tool provides a way to establish ownership of your images and track how edits, including AI tools, were applied. Whether for contests, client work, or personal projects, Content Credentials offer additional transparency and security for your photos.
Masks in Lightroom have become much more powerful, offering a way to fine-tune your edits with precision and creativity. Here's how to get the most out of them.
I’ve noticed that dramatic photos, full of bright colors from a sunset or a scenic view, get the most likes on social media. People aren’t liking the photographer’s skillful technique; they’re liking what they’re seeing—the colors, the location, etc. Of course, many of these photos are taken by photographers solely because of the colors or the view, with no other reason.
Landscape and street photography, in particular, saturate social media feeds, and most of the photos are simply nice views, vibrant colors, or dramatic, high-contrast lighting. Then there are those who...
You’ve probably heard the advice to always shoot at the lowest ISO possible. While this might seem like solid advice, sticking to it rigidly can be one of the biggest reasons your photos don’t turn out as expected.
Editing skies in landscape photos can be challenging, especially when you want to create a vibrant, natural look. Using Lightroom’s tone curve is an effective way to add depth and color without overcomplicating your workflow.
Photo editing doesn’t have to be complicated, even with a program as powerful as Lightroom. With the right techniques, you can make significant improvements to your images while streamlining your workflow.
Contre-jour photography offers a dramatic and challenging way to add depth and impact to your images. This style, which involves backlighting your subject, demands an understanding of lighting, exposure, and post-processing. It’s a versatile technique that works across subjects like landscapes, portraits, and nature.
As landscape photographers, we know exposure bracketing is our friend when we face a high-dynamic-range scene with bright highlights and dark shadows. But are you making this mistake when you set your camera up for bracketing?
Photography can be tricky, especially when your images don't turn out as expected. Common problems like poor exposure, blurry details, or excessive noise can be frustrating. The good news is that many of these issues can be fixed with a straightforward approach.
Landscape photography, often romanticized as a calm pursuit, is, in reality, a demanding test of patience. Unlike studio photography, where they control the lighting, backdrop, and subject, we landscape photographers must yield to nature’s rhythm. Whether it’s the color at golden hour, a dramatic storm, or a perfectly composed scene, capturing the ideal moment requires unwavering patience.
Adjusting brightness, contrast, and color in an image can change everything about a photo’s mood and focus. Two key tools in Photoshop that allow you to manipulate these aspects precisely are the Levels and Curves adjustments. Each tool has its strengths and hidden features that provide control over light and color in ways that are unique to each method.
Focus stacking can take your macro photography to a new level by allowing you to capture every detail of a subject in perfect clarity, even when that subject has considerable depth. It’s especially helpful for macro shots, where your focus plane is often razor-thin. But capturing a sharp, focus-stacked image doesn’t end with taking hundreds of shots in the field; processing them correctly is equally crucial.
Choosing a laptop that strikes a balance between performance, portability, and screen quality can make or break your workflow. This video offers a clear breakdown of what you need to know about laptops specifically for creators, touching on practical details about performance and specific configurations that work best for different creative tasks.
A well-placed light effect can turn an ordinary landscape photo into something vibrant and dynamic. By controlling light and shadows in Lightroom, you’ll achieve a realistic glow that brings out key elements, creating a sense of atmosphere that feels as true to life as being there.
It seems hardly any time has passed since I reviewed the Spyder X2 Ultra. The SpyderPro has now superseded that, an update extending its predecessor's functionality and ease of use.