Recent Photoshop Articles

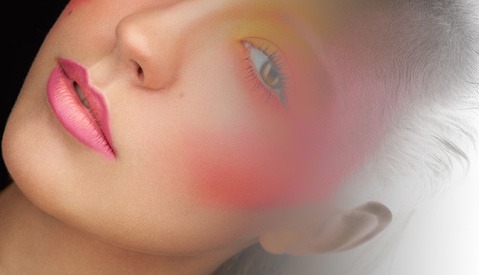
3 Ways of Changing Makeup Color in Photoshop

Changing makeup color or the color of anything in Photoshop for the matter doesn't have to be a challenging task, although it can be very easy to mess up. In this tutorial I will show you three different ways of changing makeup color in Photoshop.

However, these techniques can be used to change the color of any portion of your image portrait or otherwise. The techniques in the video will range from quick methods that beginner Photoshopers users can use to the more advanced techniques retouchers can make use of.

Adobe's New Dehaze Tool Can Recover Incredible Detail

In case you haven't had a chance to play with Adobe's new Dehaze tool, Photographer Bimal Ramdoyal, a redditor with the handle "manual_mode", shared this before and after image he shot during a blizzard that he then processed through the new tool in Photoshop (also available in Lightroom). The results, needless to say, are pretty impressive.

Creating Colorful Portrait Effects In Camera and In Photoshop

So a few weeks ago I found sometime to shoot a personal project, a summer inspired beauty shoot. The idea behind the shoot was to focus on summer and to play with bright and vibrant colors. Prior to the shoot a spent days experimenting with new techniques and different ways of introducing color into my shoot. In this article I want to share a couple of techniques I used to create colorful effects in camera and also how I recreated one of those effects in Photoshop.

How to Use a Negative of an Image to Improve Your Retouching

Great retouching is all about small details. They often make the difference between a well-retouched image and a world-class retouched image. However, seeing some of the details can be tricky. Especially when you are on the go and retouching on a laptop screen that doesn't offer the precision of a well-calibrated screen with a large color gamut. A couple of months ago I showed you a trick to see more details than what your eyes might see on an image by using a solar curve. In today's article, I am going to show you another technique that I often use to clean up small details. It is so easy you might end up wondering why you did not think of it before.

Dramatic Beauty Tutorial Part 5: High Contrast Black & White Conversion

In the final part of the Dramatic Beauty Portrait Tutorial, we will look at how I do my Black and White conversion. This image is a dramatic image so it calls for a punchy and high-contrast black and white conversion. In this tutorial, I will show you how I stack blending modes and adjustment layers to get my image exactly where I want it. You can follow these steps in your own images or use the techniques and customize them for your own use. In the video you will also see how to use layer masks to create targeted adjustments for your high-contrast black and white portraits.

Adobe Announces New Stock Image Service

Yesterday, along with many other updates across its creative suite, Adobe announced new its stock image licensing program. The libraries are integrated directly into Adobe’s various creative software, making it incredibly easy for users to browse, test, and integrate stock images or graphics directly into their projects. Adobe acquired stock photo provider Fotolia earlier this year, and has used its image and graphic assets to launch this new service. According to Adobe, there are over 40 million different image and graphics available, with contributors adding new content daily....

8 Common Client Objections and How to Overcome Them

As you build up your clientele, you will undoubtedly encounter a host of requests that can blindside you. Many photographers will learn quickly how being a good salesmen is just as vital to their business as the quality of their photographs. Below I have compiled a list of the most common customer concerns, and how to best overcome them while building value in yourself and in your brand.

Dramatic Beauty Tutorial Part 4: What Is Negative Dodge and Burn

In my opinion, mastering negative dodge and burn is the key to any beauty retouch. There are many steps and many hours that go into a great retouch, but negative dodge and burn is as essential, if not more so, than any of them. The term "negative dodge and burn" is one that I first heard from fellow retoucher Pratik Naik. It was the concept of having a specific process of removing distractions and smoothing tonal transitions through dodge and burn that was responsible for one of the biggest jumps in my own personal retouching game.

Dramatic Beauty Portrait Tutorial Part 3: Basic Skin Retouching

In Part 3 of the Dramatic Beauty Portrait Tutorial, we will finally get into the first main step of the skin retouching process. Basic skin retouching involves addressing subtle skin and texture issues on our portrait images. We will not only look at techniques for skin retouching in Photoshop, but also discuss the theory behind our decision process during the retouching process. I will also show optional techniques for those looking for quicker or alternative options during their portrait or beauty retouching. In case you missed it, during Part 1 of the tutorial we went over the lighting and shooting of our image and in Part 2 we looked at the "pre-editing" process.

How to Easily Create a Tasteful HDR Image Using Photoshop

A lot of people associated HDR with over-processed, surreal images. This is not always the case. Shooting HDR can be very useful in different circumstances. It is often seen in real estate and landscape photography and can be very useful to balance a wide range of light levels. There are many programs out there for merging images together to create an HDR photo, but one of the simplest ways to create these dramatic photographs is using Photoshop's built-in HDR Pro.

Three Methods to Match Skin Tones in Photoshop

A question asked very often by photographers is "How do I fix red or mismatched skin tones in Photoshop?" As with everything in retouching there's hundreds of ways to achieve the same thing. So the question you're left with is, which is the most efficient method that has the best results. Here's the top three methods known to mankind, pick the one right for you!

5 Ways to Improve Your Engagement Photography

If you're a wedding photographer, chances are couples are also asking if you do engagement photos. The answer to this should be “absolutely!” So you’d better get good at them quick, because well-executed engagement sessions will lead to more work. But before you think about weddings, spend some time and find your style shooting couples. Here are five simple ways to improve your engagement photography.

Use Luminosity Masks to Enhance Your Landscape Photography

Our cameras today are extremely powerful with settings and features that help us archive stellar image quality. But sometimes the images we come home with just don't capture the true essence of what was photographed and what our eyes saw. The photo is just a bit overexposed or underexposed and doesn't capture what we felt in that moment we pressed down on the shutter button. We fiddle and tweak in Photoshop with sliders and brushes, but there is another tool to add to the arsenal: masks. Specifically, luminosity masks.

Dramatic Beauty Tutorial Part 2: Preparing Your Image for Retouching Using Lightroom and Camera Raw

In Part 1 of our Dramatic Beauty Portrait Tutorial, we looked at the lighting setup, gear breakdown, and shooting of our dramatic beauty shoot. In Part 2 of the tutorial we will now look at two different ways of exporting and preparing your image for retouching. The first method involves creating versions in Lightroom and exporting directly to Photoshop. The other method utilizes Adobe Camera Raw and the ability to make variations within Photoshop. I will also discuss the overall goal of our pre-edit stage.

Coolors Is A New App That Quickly And Easily Generates Beautiful Color Palettes

Coolors is a fantastic new app that I stumbled across the other day. It is an incredibly easy and intuitive way to generate a beautiful 5 color palette for any situation. Primarily developed for designers it has instant appeal to us photographers. We deal with colors in most of our work and knowing how to match and complement effectively can make or break the images we create.

How the Retouching Academy Beauty Retouch Panel Improved My Workflow

Since its first version, Photoshop has changed quite a lot. The functionalities it offers are greater now than ever before. But plugins are legion and for beginners it is hard to differentiate the ones that are truly useful and those that are just a waste of money. The Retouching Academy Beauty Panel has been around for a little while and was revamped very recently. I use it all the time when retouching but I get many questions about it. I am frequently asked if it is worth its price and if it makes my retouching any better. Here is my take on the panel, why I bought it, and above all, why I keep using it everyday.

Sneak Peek of Adobe Mobile Retouching Capabilities

Adobe has released a YouTube video highlighting some of the retouching features that may be available in upcoming Adobe mobile apps. While no release date is given yet, the video shows off some pretty impressive abilities that accentuate the mobile device's touchscreen and makes the application more user friendly for quick changes or creative endeavors. This video has us excited for what retouching abilities are being brought to our mobile devices. Watch the video and have a look for yourself.

Dramatic Beauty Portrait Tutorial Part 1: Complete Lighting Setup and Gear List

This is Part 1 in what will be an 8 part series for a dramatic beauty portrait. In the series of tutorials, we will go through everything from the gear used, to the lighting setups, and all the way through the complete retouching process. In Part 1, I will breakdown my gear list used for the shoot and I will thoroughly go through my lighting setup. In this video tutorial not only will you see the gear and setup, but also a behind the scenes look as me and my team go through hair, makeup, and shooting. The complete series of videos will be available here on Fstoppers and on my YouTube Channel.

Five Common Mistakes That Make Retouched Skin Look Unnatural

Retouching skin is about detail and patience. It can be a real time consuming and can require a high level of precision to keep the natural aspect of an image. Each of us has a different style of editing and our tastes differ. However when giving retouching lessons many photographers ask me about skin texture and how to keep it looking as natural as possible.

This is not a simple answer as it is mostly a combination of elements. In this article I have combined the five things I see most photographers do wrong or too much when looking for a believable skin texture and look.

Start to Finish Fashion Editorial Retouching: Part 2

In Part 1 of the "Start to Finish Fashion Editorial Retouching" tutorial, we looked at how to clean up a white background, how to liquefy clothing to achieve a better fit, and how to clone and heal out distracting elements in our editorial image. In Part 2 we will look at how to go about the more common and essential retouching steps including: skin retouching using dodge and burn, color toning, sharpening, and value adjustments. In this video, I take you through each step and give you insight into the "why" as well as the "how" of editorial retouching.

creative-wedding-shoot

When I saw this wedding shoot I was stunned into silence for a few moments. I really didn't know what to think of it! In my mind, when I think of wedding photography, I think of a world of immaculate white dresses, expensive shoes, thoughtful furnishings and of course, smiling wedding couples and their guests.

Healing and Fill Content-Aware Tools on Steroids Using Affinity Photo

Photoshop has been around for quite some time now. It works great and every photographer has gotten used to it. It is a staple in my workflow alongside Capture One and Photo Mechanic. Until a few days ago, I did not think I would hesitate changing my retouching routine. After a few years of trials and errors I am finally somewhere I feel comfortable with my post-production. However, after having installed Affinity I must admit that I might "cheat" on Adobe Photoshop.

Watch How Photoshop Manufactures Beauty in 90 Seconds

This ingenious video has gone viral as the true level of photoshopping to manufactures 'beauty' is exposed. In this clip, we see 6 hours of photoshopping sped up to fit into a 90 second clip. All of these hours of work has gone into creating just one perfected image of a model.

guide to contour faces like a makeup artist

Before I learned about makeup I used to strengthen or create contouring in post the same way on every single picture. However, because everyone’s face is different, contouring should differ from person to person. Contouring not only can help create dimension it can also help alter shapes. Let see how we can make our model’s and client’s face look their best without going crazy with the liquify tool. Shadows and highlights are photographers and makeup artists best friends!

Accelerate Your Photo Editing Workflow with Color Lookup Tables

Color lookup tables (also known as LUTs or 3DLUTs) have been a popular tool used by colorists in the video industry for a while and are just starting to find their way into photography. LUTs are a great alternative to actions or expensive plugins that can help speed up your editing workflow.

Beating the Crop Factor

When you are shooting for magazine publication (outside of the medium format realm), one thing you always have to consider is the aspect ratio of your images. Paper sizes, in most cases, do not match up to image size, so there are crop variables you have to constantly keep in mind -- especially for editorials where there will be titles, typography or article copy on the page as well.

A Fast and Easy Way to Remove Annoying Dust Spots

Dust spots are inevitable, and removing them can sometimes be a burden. While there are many ways to go about removing dust spots, retoucher Chris Lambeth shows us a really quick and easy way to get rid of them. This method for removing them is completely new to me, but I'll be sure to incorporate it into my workflow.

Surprisingly Realistic Tilt-Shift Images of Van Gogh's Most Famous Works

For those who are only familiar with "tilt-shift" as a filter setting on Instagram, tilt-shift refers to the physical tilt and/or shift of the lens plane that can create some dramatic selective focusing. Taking into account the Scheimpflug principle, tilting and shifting the lens plane can dramatically change the depth of field forcing a change of size and perspective in an image. Serena Malyon, a third-year art student applied a Photoshop replication of this technique to some of Vincent Van Gogh's most famous works.

Phlearn Photoshop Tutorial: How to Create and Place a Logo in Perspective

In this tutorial, Photoshop guru Aaron Nace of Phlearn.com shows you an easy yet effective way to take branding your images to another level. By placing logos or other branding elements into a scene's already existing spaces (such as billboards, truck trailers, or even clothing) you can really drive home the message you are trying to deliver. Follow Nace's simple step-by-step instructions to recreate this effect in your images.

How Retouching Made Me A Better Photographer

I rarely write in first person but because this is a topic I feel very strongly about, I want to tell you about my personal experience. When I was reminiscing with my wife about the one thing that changed my photography, it was the day I saw the light. Literally. The only way I was able to conceptually grasp light and the way it works was because I started retouching. There is no way to deny it, as I mastered retouching my photography was taken to the next level.