Recent Lightroom Articles

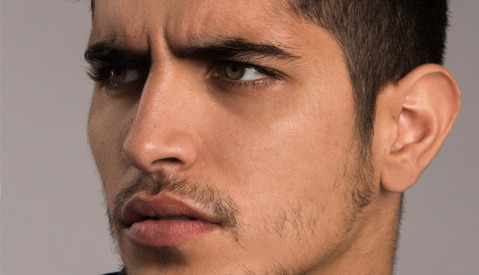
Simple Men's Portrait Retouching Workflow

As I spend more and more time around other photographers, I’ve had the opportunity to sit back and listen to everyone’s take on what makes a retouched image successful. Some photographers spend minutes retouching, while others spend literally hours on an individual image. Regardless if you spend 15 minutes or 3 hours retouching in image, it’s important to have a strong workflow so that you maintain your sanity.

Lightroom Black and White Conversions for Dummies

Black and White conversions programs are a dime a dozen. You have the ability to do black and white conversions in Adobe Lightroom and Photoshop and also in third party software like Silver Efex Pro and Perfect B&W, but if you're just learning how to edit, I always recommend sticking with Adobe Lightroom because of the easy user interface.

Lightroom Color Grading for Dummies

How do you move beyond using someone else's actions and presets to tone your images? It’s a lot simpler than you’d think. There are so many different ways to achieve similar results in post-production, and having so many options can be extremely intimidating when you’re just learning how to edit. This is the reason that many photographers will rely on actions and presets to “color grade” and tone their images when they are first starting off.

Recover More From Your Image's Shadows in Lightroom

Matt Kloskowski from onOne has released another great Lightroom tip video that can help with recovering shadows from your images. In some situations, you might need to recover more out of the shadows than you originally intended when taking the photo. Basically, by reverting the Lightroom Process Version to 2010 or earlier you can tap into some recovery options that could make all the difference to your image.

How to Use Lightroom Brushes to Contour Faces

It's amazing how adding just a little bit of shadows can drastically improve the depth of your photographs. Contouring faces is a little trick that can take a few minutes to do, but ultimately increases the overall image quality. I'm going to show you how to use the adjustment brush tool in Lightroom to act similar to the dodging tool in Photoshop, and then the key areas to brush for properly contouring a face.

How to Create a Digital Suntan in Lightroom

It’s the middle of winter; everyone is looking a little pasty and pale, and you wish the subjects you are photographing had that healthy summer glow. So what do you do? Should you send them to a solarium or get a chemical spray? If you are a fan of black and white photography, this is a fantastic Lightroom technique that will give your subject a natural looking suntan.

A Natural Light Tip That Will Have Strobists Selling Their Lights

One of the most noticeable differences between portraits taken outside using natural light as opposed to artificial light is the background. Images using artificial light tend to have darker backgrounds. This is crucial in catching the eye of the viewer and allows him or her to focus on the subject. This article is a guide in achieving this look using natural light only.

Can't Take a Holiday this Holiday Season?

Photographers around this time of the year, portrait and wedding photographers especially, tend to have clients banging down their doors for holiday photos and other must have product deliveries in time for Christmas. While the rest of the world is gearing up for a relaxing holiday, we often experience anything but. From Christmas cards to wedding albums — regardless of the client's procrastination all year — we're expected to produce our work in record time.

Another Useful Lightroom Feature You Probably Did Not Know Existed

I feel like I'm constantly hearing about new shortcuts in Lightroom that make my workflow increasingly painless. This is one that's been around for a while, but you have probably never used it. This short video is an easy to follow tutorial from photographer Matt Kosklowski about an exposure feature that will surely speed up your editing process.

How To Enhance Eyes Using Lightroom

Everyone has heard the saying, "The eyes are the window to the soul." There is a lot of truth to this when it comes to photographs. The first thing many of us look at when we see an image are the eyes of the subject. In this article I'm going to teach you how to enhance eyes using the brush tool in Lightroom.

The #Phlearnmethod Is Here To Make Photoshop Simple

The guys at Phlearn have done it again. This time they present us with a set of actions that will speed up your workflow and show you that Photoshop is nothing to be afraid of. The #phlearnmethod will allow you to transform your images in a few clicks, adding unique, themed-styles.

Just Do It - How and Why I Shot the Best Photo of My Career

For years I found myself making excuses as to why I wasn't creating the type of images that I so desperately wanted to make. I didn't have the gear, I didn't have a model, I didn't have access to a studio. At the end of the day, it came down to one simple thing, I never tried.

How To Achieve the Film Look Using Lightroom

It seems as if the film edit is getting more popular every day. A lot of beginner photographers out there will do anything to achieve this look. The easiest way to do that is to buy presets but I want to show you how to create the look yourself. I believe once you understand how to create the look yourself you can begin to find your own style. I know too many photographers that take an image, slap a preset on it, and call it good. All the editing on these images was done in Lightroom 5.

Enhance Muscle Definition via Burning Directly from Lightroom

What's up everyone! My name is Pye and I am one of the educators for FStoppers Bahamas! This is my first article here on FStoppers, and I am really proud to be a part of such a great community of photographers. We all know dodging/burning is a fantastic tool when it comes to retouching. But maybe a less common usage, it is also a fantastic tool to enhance muscle definition. Since most of the time we think of Photoshop when we think of dodging/burning and retouch, we are going to stick within Lightroom just to illustrate how powerful and efficient the Adjustment Brush tool can really be.

Is Photoshop Dead? An Interview with Dave Doeppel

I’m a big proponent of outsourcing editing in my wedding photography business. There’s probably nothing more painful to me than the thought of trudging through 800-1000 images from each wedding I photograph. However, when it comes to my favorite few images from each job, the ones that I’ll share on social media or use to update my website, I take a dive into Lightroom and Photoshop and enjoy every second of it.

Rethinking the JPEG

At the most basic level, photographers seem to be in two camps when it comes to image file types. There are those who care about the look of their images and shoot with big RAW files and those who don’t and use the smaller JPEG files.

RAW files offer a tremendous level of control over noise, tonality and color; a hearty file that can cope with the demands of our creativity.

VSCO Pack 6 Announced, Now Available

The guys at VSCO - Visual Supply Company - are at it again. Today they released Pack 6 of their wildly succesful Lightroom/ACR/Photoshop-based film emulation presets. They've dubed the set the alternative process collection, which includes films that have been pushed, pulled, and cross-processed stocks.

Having Trouble? Adobe Provides Detailed Instructions for Migrating from Aperture to Lightroom

Earlier today, Fstoppers writer Adam Ottke published an article introducing Adobe's latest plugin to help Apple iPhoto and Aperture users mirgrate to Adobe Lightroom. Unfortunately, many of the folks who've tried to use it have run into complications. Adobe seems to be watching closely, as they quickly updated the plugin page with detailed instructions guiding users through the migration process. For the full scoop, you can check out Adam's earlier article here, and see Adobe's full blog post here.

Adobe Releases Plugin to Help Migrate from Aperture and iPhoto to Lightroom

Adobe has released a plugin it promised a while ago to migrate photo libraries from Apple's soon-to-be-forgotten Aperture and iPhoto apps into its own Lightroom. If you're worried about Apple's switch to its own all-in-one photo app, "Photos," or simply want to ensure similar functionality to that found in Aperture, Lightroom has long been an industry-standard alternative. There are, however, a few notes to keep in mind with regard to migrating from these apps to Lightroom.

Restore that "Back of the Camera" Look in Adobe Lightroom 5

Have you ever been shooting away with your camera, and you absolutely love the colors and saturation you see on the back of the screen...only to get your images home and have them look ENTIRELY different once you've loaded them into Lightroom?

Well for those of you who want your images to look like they did on your camera, i'm going to show you how to get that starting point back!

Top Lightroom Tip That Your Clients Will Thank You For Learning

If you are photographing people than you understand the importance of sharpening areas of your images while masking out other parts and keeping them soft. For example, I love to sharpen the eyes, the lips, the hair, but don't want to bring out any unnecessary detail on the cheeks. Fortunately in Lightroom there is way to apply sharpening to your image while masking out areas where you would otherwise not want to apply the effect.

Give Your Colors a Nice Kick With This Lightroom Trick

The great thing about the program Lightroom is that there are usually a number of different ways to accomplish a task. In this video I show you one fantastic way to create some nice colors in your photo by using a slider tool that you might not have even touched before. As I usually do the video is short - about 2 minutes - and I've provided some samples below to see a before and after as well as steps for those that prefer to read it versus watch a video.

Little Known Way to Manipulate Colors in Lightroom

For the last month I have shared a useful tip in Lightroom each week and I look forward to continuing the series. For this week I show you how to use the often overlooked color sliders to control the hue, saturation and luminance of each color in your photo. In the short video I also show how to get those mint saturated greens that are currently very popular.

Are You Taking Advantage Of The Survey View in Lightroom?

Like Photoshop, Lightroom is a powerful piece of software. Sadly most of us learn the basics and don't take advantage of all that is has to offer. One powerful feature is called the "Survey View." Are you taking advantage of it? If not, take a couple minutes to watch this two minute video where I go over how to use the tool and the shortcut to get there.

Another Useful Lightroom Tip Your Mom Never Taught You

Adobe Lightroom is a program full of many different little tips and tricks just waiting to be discovered. In this short video I show you one of my favorites which allows you to apply a selective focus technique to your photo without having to open it in Photoshop. This technique is especially useful if you want to draw your viewers attention somewhere specific in the photo.

Quick Lightroom Tip - Import Multiple Cards at Same Time

As a wedding photographer I often fill up 3 or 4 memory cards at a wedding and it is important that I get those images downloaded and backed up as soon as possible. Rather than download one card at a time I like to do them all at the same time using multiple card readers. I usually use Photomechanic to do this but recently discovered that it is actually very simple to download multiple cards at the same time in Lightroom as well. I put together this quick video tip to show how.

The advantage to downloading multiple cards at the same time is so one doesn't get...

Easily Upload Your Images to 500px via this Lightroom Plugin

500px has taken the world by storm since their launch in 2009. In many ways it's become the new hub for sharing and expoloring work from some of the greatest photographers around. This nifty little pluggin from the developers at 500px (available here) will alow you add one quick step to your workflow to share your images on the site.

Optimizing Photos for Maximum Quality and Minimum Size

What's the best way to optimize photos so that I can deliver quality to my clients while reducing the file size for faster uploads into the cloud? This has been a question I’ve been thinking about for sometime. I have tinkered with settings in Lightroom to try and find the right export recipe but it wasn’t till another photographer told me about JpegMini that I finally felt I had the solution. Using image optimization technology they developed, JpegMini was able to deliver maximum quality at minimum file size. I ran it through some tests and here are my results.

Adobe Develops Guide To Move From Aperture To Lightroom

Last month, Apple announced that they were ceasing development of the beloved Apple Aperture. While the software is still usable and available for purchase and download, it has a timeline on how long it will work, as new camera profiles will no longer be supported. Fortunately, Adobe has made the transition a little easier, with a simple transition guide.